|
Carefully steam-press your fabric to remove any wrinkles or foldlines. If the fabric has been long in the store, this may reveal a soiled mark along the fold that must be washed out or dry cleaned before you proceed. In some fabrics, such as knits and permanent-finish fabrics, the crease may not always be removed by pressing. For these fabrics, avoid layouts where the pattern pieces are placed on the fold. You may need to figure a new layout that avoids the crease altogether or places the crease in an inconspicuous place. |
Straightening FabricWoven Fabrics -- Straighten ends to coincide with the crosswise threads by snipping close to the selvage and pulling a crosswise thread, this will cause the fabric to pucker... keep pulling the thread along the entire edge and then cut along the puckered line. This is the most time consuming method, but it is the most accurate. If the crosswise thread is readily visible, then just cut directly. Another method is to snip and then tear the fabric, use extreme caution with this method; the pulling action may throw the first several inches off grain at both fabric ends. Also, if not done swiftly and accurately, the cloth may suddenly split along the lengthwise grain. Knitted Fabrics -- straighten the fabric ends by cutting along a course or crosswise line of loops. If loops are not easily seen, it may be necessary to first mark the course with a marker or even thread tracing. These markings can be used for determining if the knit is on-grain or not. A tubular knit can then be cut open lengthwise following a rib or lengthwise row of loops.  Above: Woven fabric (left); Knitted fabric (right) |
Are you looking for sewing or crafts-related items such as sewing machines, sergers, yarn, and knitting supplies? Try our online catalog pages here.
Or see what products on our site the popular search engines have chosen to list...
- Google listing of all "Sewing" items on our site
- Yahoo! listing
of all "Sewing" items on our site
- Alta Vista listing of all "Sewing" items on our site
Recommended Reading
Recommended Products
5 Drawer Foldaway Desk: Perfect for your sewing machine or serger! Constructed from durable melamine laminated particle board the Mobile Desks will offer a life time of reliable service.
If you need specific sewing supplies, browse through the products on pages like these:
- Brands of Overlock Serger Sewing Machines: Brother Serger and Coverstitch Machines and related items
- Singer Needles for Home Sewing Machines
- Industrial Sewing Machine Accessories
Straightening Grain
We cannot emphasize strongly enough how vital the correct grain is to the final appearance of your garment. Your fabric is on grain when crosswise and lengthwise threads or loops are at perfect right angles to each other.
- Check the grain after ends of your fabric have been evened out.
- If the edges do not align along all three sides, then the fabric is off grain and must be straightened.
- If edges are even, check to see if the corners form a right angle by aligning a corner of your fabric with your cutting surface.
- For knitted fabrics, match only the ends; the lengthwise edges of a knit may not always be straight.
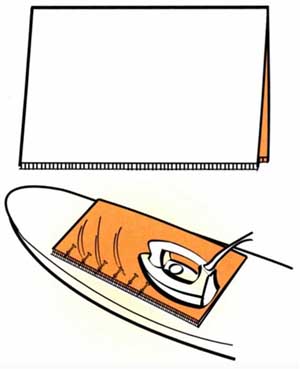
If the fabric is only slightly off grain, it can be straightened by steam-pressing the threads into proper alignment. To do this, fold the fabric right sides together, and then pin together every 5” (13 cm) along the selvages and ends. You may need to pin the fabric to the ironing board to keep it square. This is where an ironing board cover, printed with a grid, comes in handy. Press firmly, stroking from the selvages toward the fold.

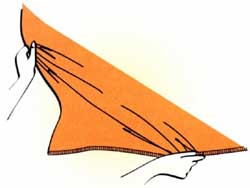
If your fabric is very off-grain, it can be straightened by pulling the fabric gently but firmly in the opposite direction from the way the ends slant until a perfect right angle corner is formed. If fabric is washable, place it in warm water for a few minutes to help relax the finish before pulling the fabric ends. Then pin a selvage to a taut clothesline every few inches or lay on a flat surface and allow to dry. Repeat if necessary.
In some instances, you may have to try a combination of these techniques for the best results.
Note that permanent finish fabrics cannot be straightened. It is perfectly all right to use them as they are, matching and pinning the selvage only, not the ends.
Some printed fabrics may not be off grain but the print design does not coincide with the grain-line. These fabrics should be avoided. If you must use them, you must allow the print design to dictate the layout, not the grain.

Pre-shrinking
Many fabrics on today’s market may not require preshrinking. Always read the label on the fabric bolt to determine the specifics on shrinkage and the suggested care for the fabric.
If the manufacturer has not shrunk the fabric, or if it will shrink more than one percent according to the label, you must shrink your fabric before you cut it.
If you are unsure, it is always safer to preshrink your fabric rather than discover a shrinkage problem after your garment is completed.
Washing or dry cleaning can also help to remove resins used for finishing some knitted or woven fabrics that could cause skipped stitches.
For washable fabrics, you can launder and dry the fabric following the same methods you will use on the finished garment.
Another method is to fold the fabric evenly and immerse in hot water for thirty minutes to one hour. Gently squeeze out the water and dry according to the fabric care instructions.
Dry cleanable fabrics should be shrunk by a professional dry cleaner, if possible.
- To do it yourself, first, straighten the ends of the fabric, snip selvages at intervals, and fold in half lengthwise. Baste across ends and along the selvages. Place a very damp sheet on a flat surface and lay the fabric on the sheet. Fold carefully, keeping the sheet on the outside.
- Leave the fabric folded in a tub or basin overnight.
- Unfold, smooth, and stretch the fabric into shape and on grain. Let the fabric dry and press lightly with a steam iron. Then test for grain perfection before cutting.

Identify the Right Side of the Fabric
Occasionally the right side of the fabric is not readily discernible from the wrong. The way the fabric is displayed on the bolt is an excellent clue in distinguishing the right and wrong sides.
You will find that certain fabrics are usually wound on the bolt in a consistent manner. For example, cottons and linens are almost always folded in half with their right sides out, and then placed on the bolt.
Delicate, easily marked fabrics are rolled or folded on the bolts with their right side on the inside as protection against damage.
If you have purchased a fabric as a remnant or have forgotten which side is which, try these procedures.
- Look at the center fold, which is parallel to the lengthwise grain and refer to standard packaging procedures for the type of fabric.
- Examine the selvages for slubs, nubs or other irregularities. Generally, the selvages look less finished on the wrong side.
- Examine the fabric surface to see if the finish used will indicate the right side. The finished side may be shinier, flatter, more brushed or even the weave more pronounced.
- For knitted fabrics, the cut edge usually rolls toward the right side when pulled in the direction of greatest stretch. The right side may be more decorative or textured.
If you still can’t figure out the right side, pick the one you like the best! There is no reason that you cannot use either side of many fabrics. Just be very certain to use the same side consistently when laying out your pattern. Before you remove the pattern from your fabric, you might want to mark your pieces so you know which is the right side. If you neglect to do so, the slightest variation in shading can destroy the good looks of your garment.
Organizing
For your next step, sort all your pattern pieces, selecting those for the view you have chosen.
- Press these pieces with a warm, dry iron.
- Prepare to alter your pattern.
- Get out your cutting guide and read through it.
- Take out your equipment for measuring, cutting and marking.
- Now that you’ve got your fabric, pattern, and equipment organized, your ready to begin!
