Machine embroidery is easy: give a beginner a clean, well-oiled machine; fine thread top and bobbin; a sturdy piece of cotton fabric in a hoop. Teach her one new technique and let her take off. Let her experience the joy of making, even if her product won’t win prizes at the state fair.
Later, much later, she will begin to notice the subtle differences between needles, threads, fabrics, brands of machines. She will want to upgrade her skills, to know more.
This section is all about those subtle ties. Some of them matter more for traditional garment sewing than for machine embroidery. Others we take for granted and shouldn’t. Let’s start with our basic tool, the sewing machine, and the basic lockstitch.
Stitch Quality
After many hours of stitching (and a quick review of Section 1), you under stand how a stitch is formed on the sewing machine. But the more experience you acquire with sewing, the more you realize the tiny ways you can help your machine best form that stitch. It involves the correct matching of needle, needle position, needle-plate opening, presser foot, feed dogs, thread, and fabric.
Your best straight stitch is formed by using an expensive European needle (I prefer Schmetz) in the correct size for your thread. Why expensive? Because the scarf is deep, allowing the bobbin hook to come close to the needle and grab the loop of top thread without ever missing the loop. This deep scarf requires precise machining, which isn't cheap. An expensive needle also has a highly polished eye. Since the thread saws through the eye several times for each stitch, a less polished eye might have burrs on it that would catch on the thread, causing it to fray and break. Too small an eye has the same effect: it cuts into the side of the thread, causing it to snap. That’s why we match the size of the needle to the thickness of the thread.
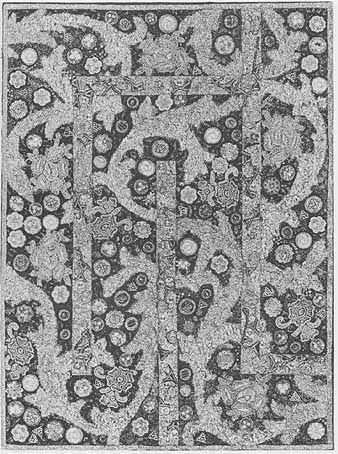
Fig. 13—1 Christine R’s “Flower Maze,” 46 x 61 cm.
You remember that if the fabric lifts as the needle leaves the material, the loop also lifts, perhaps causing the bob bin hook to miss it. How do we prevent the fabric from lifting? By pressing it tight against the needle plate and feed dogs. But if you have a zigzag machine and are using the zigzag needle plate, you can see that there is a hole under the fabric where the fabric isn't pressed tight against anything. It may look insignificant to you, but the hole is big enough for the fabric to be pulled down into the bobbin case, and it can lift slightly as the needle goes back up.
On medium-weight fabric, which resists pulling and lifting, this hardly matters. But on lightweight fabrics, like organza or tricot knit, it matters a lot. The fabric puckers along the seam line from being pulled into the bobbin case, and sometimes a stitch is skipped if the fabric lifts. How to remedy these problems?
If possible, use a single-hole needle plate and the straight-stitch presser foot, which surrounds the needle snugly and is flat on the bottom, holding the fabric securely against the feed dogs. Also use a ballpoint needle, which doesn't cut the fibers of the fabric but slips between them. (If the needle cuts the fiber, the fabric is skewered like a barbequed mushroom and tends to lift up when the needle rises out of the fabric.)
If you don’t have a single-hole needle plate but can change your needle position, de-center the needle to the left. This supports the fabric on three sides of the opening, as well as allowing the hook a fraction of a second more time to grab the loop. Also use a wider presser foot.
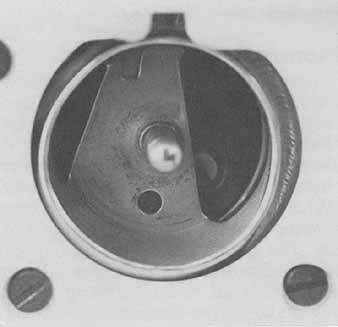
Fig. 13—2 Front-loading oscillator bobbin system.
Bobbin Systems
There are two bobbin systems most often used in today’s machines: the front-loading oscillator (Fig. 13-2) and the top-loading rotary (Fig. 13-3). The oscillating shuttle mechanism oscillates or see-saws back and forth to make a stitch. It never completes a full circle. The rotary, on the other hand, makes a full revolution to make a stitch.
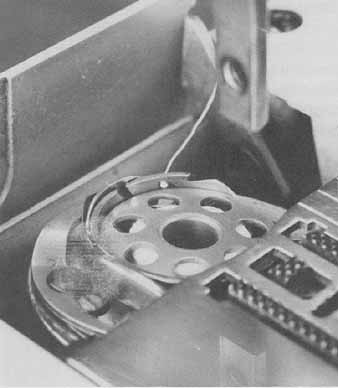
Fig. 13—3 Top-loading rotary bobbin system.
Does this matter? After talking to hundreds of consumers and sewing- machine dealers, as well as sewing on both kinds, the answer is “no,” not as far as the quality of the stitch is concerned. The only difference, and it only matters if you are lugging a machine around often (to classes, to seminars, to a distant studio, to friends’ places, on an airplane), is that the oscillating machines must be heavier to keep from bouncing around on your sewing table. If you still prefer an oscillating machine, the solution is simple: buy a suit case trolley and cart your machine around on that. (And learn how to lift heavy objects correctly, bending from the knees, so you don’t injure your back.)
Feed Dogs
When we only had straight-stitch machines, we needed merely to guide fabric forward under the presser foot. Therefore, the feed dogs were shaped in a saw-tooth pattern, like little slanted teeth. These gripped the fabric from underneath and moved it through smoothly.
But when zigzag machines were developed, especially those with a reverse cycle (which means they can stitch for ward a little, then backward or side- ward a little, then forward again, as with, for example, the stretch overlock stitch), we needed a different kind of feed dog, one that would hold the fabric securely as it moved it backward and forward under the needle and that would return it accurately to the same position, so that the needle would enter the same hole as before. Thus, the diamond-point feed dogs were developed. (Some machines have a third kind of feed dog, made of rubber.)
Motors
Within the last ten years, most sewing-machine manufacturers have converted their AC electric motors to DC electronic motors. This is a more efficient use of electricity, which gives an instant torque. “Torque?” you say. “Who cares?” It means that you have greater penetration power at the needle. The needle can pierce up to eight layers of denim at a slow speed. It can also pierce all those layers of thread you make in free-machine embroidery.
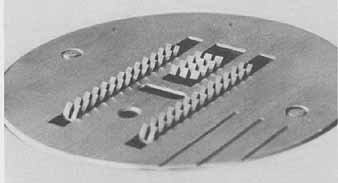
Fig. 13—4 Saw-tooth feed dog.
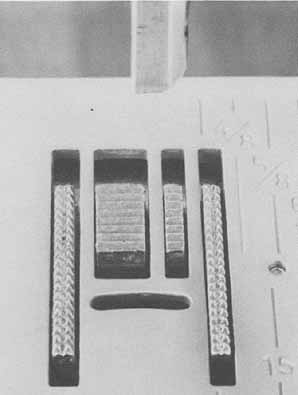 Fig. 13—5 Diamond-point feed dogs on the sides, with large saw-tooth
feed dog behind.
Will a dealer tell you whether or not a machine you’re considering buying has an AC or DC motor? No.
Presser Feet
In Section 8, we discussed the use of various presser feet and I won’t repeat that information here. I would only en courage you to measure your shank so that you can try feet from all the brands that fit your machine. Each company has something special. The Bernina embroidery foot, for example, is painted white along the shank, which makes seeing the needle hole for threading much easier. New Home has a craft foot with small red dots on it, so you can line up decorative stitches easier. Viking has snap- on feet, which is a convenience (you can buy an adapter kit for most machines that allows you to use snap-on feet).
When you become a connoisseur of presser feet, play a game with yourself. Dump all of yours upside-down and identify them, one by one, by the shape of the underside of the foot. When you understand why they are formed as they are, you will have mastered another subtlety of the machine. Also, watch the wear-and-tear on the underside of plastic feet. After years of heavy use, the foot becomes chewed up and may need replacing.
Needles
Needle sizes refer to the diameter of the needle blade (the European size is in tenths of a millimeter). As a needle increases in size, its eye becomes bigger. Equivalent sizes in these numbering systems are:
American
9 10 11 12 14 16 18 20
65 70 75 80 90 100 110 120
European
The most important quality-control tip I can offer is to use the needle recommended for your machine. It commonly occurs in machine-embroidery classes that someone needs help because her machine is skipping stitches. When I look closely, she’s using, say, an American needle in a European machine. Don’t be afraid to try an expensive European needle in your machine, no matter the make. Sometimes a cheap import machine loaded with an expensive European needle performs like the most expensive, best-made machines. People think it’s the machine and often it’s the needle.
I’ve already mentioned the importance of using a well-produced needle for sewing. For machine embroidery, you must become even pickier, depending on what technique and what fabric you’re using.
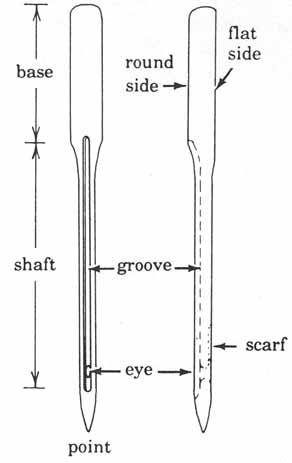
Fig. 13—6 The standard sewing-machine needle.
The needle most used in ordinary sewing is labeled 705 H (for “Hohlkehle,” the German word for “long scarf”). The 705 H comes in sizes from 10(70) to 18(110). When the 705 H appeared, it was considered a break through. It is engineered with a long scarf for zigzag, so that at no position during the formation of a stitch would the needle hit or deflect off the bobbin hook. It also has a modified ballpoint tip, called a universal point, which al lows you to sew on both woven and knit fabrics. This means that home sewers don't need to change needles, which most hate to do, when they change fabric.
But the 705 H was not satisfactory for extremely stretchy material like loose knits and rubberized material, so the 705 H-SUK (refers to “synthetic”) Stretch Needle was developed. It has a full ballpoint tip, which slips between the fibers instead of piercing them. 705 H-SUK Stretch Needles come in all standard sizes.
You can also buy a 705 H-S “Blue” Stretch Needle, but only in sizes 11(75) and 14(90). The blue has nothing to do with performance; it's merely a color coding. (One rumor is that it's a silicon treatment to reduce friction — not true.) The Blue Stretch Needle has the same full ballpoint tip as the 705 H-SUK, but it's a little flatter on the shank, to bring the needle closer to the hook. It was developed for flimsy knits, like Qiana, to prevent the fabric from being dragged into the bobbin case. Using a wide presser foot also helps prevent this.
The only sharp needles made today are for heavy wovens or leathers. If you were to use a ballpoint needle, you might get a slight wobble to a straight stitch, as the needle deflected off the threads instead of piercing them. Therefore, the 705 HJ (J for jeans) has an acute but round tip and is used on denim, canvas, or awning material. It comes in sizes 14(90), 16(100), and 18(110).

Fig. 13—7 Leather wedge needle (left) and slotted or handicap needle
(right).
The leather wedge needle has a sharp cutting point. It’s called 705 H-LL and comes in sizes 12(80), 14(90), 16(100), 18(110), and 20(120). Use it for non-woven fabrics such as vinyl, synthetic suede, and leather.
For most machine-embroidery techniques, depending on the thread selected, you will use a 705 H 12(80) or 14(90) needle, the latter especially for rayon thread. This pokes a big enough hole in the fabric to allow the thread to pass freely without fraying. Some people prefer to use a 705 H-SUK.
However, if you are filling in a shape with sideways zigzag on medium- to heavyweight woven fabric, I recommend trying a topstitching needle, the 130N, which comes in 10(70), 12(80), and 14(90). It has an elongated eye with a sharper tip than the stretch or universal needles. When filling in a shape with thread, we can't expect the tip of the needle to perform like a ballpoint tip and slip between the threads on its way through the fabric because there are too many overlap ping layers. We need a needle that will easily pierce the layers of thread on in its downward trip (as does a jeans needle—705 HJ).
This is merely an opinion, though, reached after experimenting with side ways zigzag on cotton, satin, organdy, organza, and voile. The closely woven delicate fabrics like satin and tricot hate a sharp point. They seem to demand a ballpoint tip. This leads to a finer distinction: choose your thread to match the fabric, the size of the needle to match the thread, and the tip of the needle to match the fabric. Incidentally, I experimented with rayon thread and was surprised to discover that each fabric demanded its own top tension setting. For example, with a tight tension nylon organdy looped on top, but it lay beautifully with a loose tension; on the other hand, cotton voile was happier with a tighter top tension. Please experiment for yourself.
Two other needles are useful to know about. One is the slotted or handicap needle which is open on one side of the eye for easy threading. This of course weakens the needle, so extra care must be taken when sewing: don’t pull the material and don’t sew fast. The basting needle, 130/705 RH, has two eyes, one above the other (it’s sometimes called the “magic needle”). Ordinarily, for basting, you thread only the upper eye and use the blindstitch. The stitch forms only on the jag of the blindstitch, skipping all the other stitches. This gives a long basting stitch. But you can thread the eyes with two different threads. If you have trouble catching both threads in the lockstitch, de-center the needle to the left and move the needle a hair lower. All of this is to help the bobbin hook catch the two top loops of thread.
The topstitching, handicap, and basting needles are not always displayed in stores. If you don’t see them in your favorite store, ask somebody—they may be in a drawer in the back. Otherwise, contact the mail-order sources listed at the end of the guide.
The finish used on many modern fabrics tends to dull the tip of the needle, which is why you are advised to change to a new needle for each major project. If you pre-shrink your fabric, it re moves some of this finish; however, for many machine-embroidery projects, we don't think to pre-shrink our fabric— nylon organdy, for example, or fabric we cut up to use for test cloths. Be aware that this finish may subtly affect tension settings.
One other tip about needles: I can never remember what size needle I left in the machine, especially now that I have four machines and my daughter also sews. I always have trouble reading the number printed on the needle, so I keep a linen tester by the machine, which magnifies the print. Hold the point of the needle, where the eye is, to the left to read the number, which is printed on the round part of the needle base. The lid of some needle cases has a built-in magnifier over the bases. Put your unidentified needle in a case to read the number. I also made myself sewing-machine covers for all my machines, with a dial pointing to the last needle size used (see Part Two).
Threads
If there is anything we machine-embroidery nuts take for granted, it’s threads. We know what we like, but we usually have no idea of the subtle differences between types of thread. How is the thread manufactured? What are its strengths and weaknesses? What do the numbers on the spool mean?
Two types of yarns are used to make thread: filament and staple. Filament yarns, which comes from silk and man made fibers like rayon and polyester, are extremely long, thin, smooth, and lustrous; staple yarns, like cotton and linen, are shorter, thicker, fibrous, and without luster.
To produce sewing thread, slivers of the yarns are fed into rollers and drawn out in strands. These strands are spun counter-clockwise as they emerge, to increase the strength of the yarn. This is called an S-twist. When two strands are then twisted together into a two-ply machine-embroidery thread, they are twisted in a clockwise direction so they won’t come untwisted. This is called a Z-twist. Sewing machines require Z twisted sewing threads. (Just for fun, run your fingernail along the end of any machine-embroidery thread. It will untwist and you can see both the two plies and the Z-twist.)
The reasons you choose a thread for constructing a garment are not the same as for machine-embroidery. For example, 100% cotton thread has a low stretch ability. If you were to sew a seam in a knit garment with cotton thread, the stitches might pop.
Machine embroiderers, on the other hand, tend to choose threads for their fineness and texture. Cotton threads have a matte finish; polyester is slightly shinier; and rayon and silk gleam. If you want to highlight something, stitch it in rayon or silk and contrast it with surrounding areas of polyester or cot ton.
We also care about how a thread behaves when it's stressed by repeated stitching. Extra-fine machine-embroidery cotton resists untwisting, so it's perfect for straight stitch, satin stitch, and reverse-cycle stitches. Polyester is strong, but it has a tendency to untwist (especially with cheaper brands). Ray on has a high sheen, but it isn’t strong and it has a high thread drag. There fore, reduce tensions and don’t sew fast. But let me immediately contradict my self. Not all rayons are twisted identically; some are looser than others and may require a tighter tension to keep them from rolling or untwisting. (Ray on thread produced in third-world countries may be spun on second-hand equipment originally intended for a different fiber, like cotton, which explains the difference in twist.)
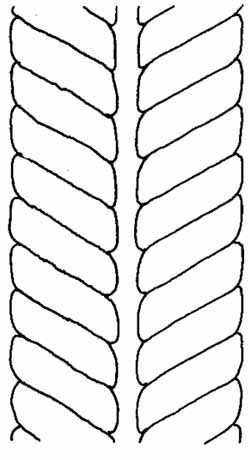
Fig. 13—8 Thread twists. (Left) S twist; (right) Z-twist.
More important to machine embroiderers is understanding the numbering system for threads. There is no uniformity to the systems used, but generally the number describes the relationship of the length and weight, the number of plies, or the diameter of the yarn.
In the indirect method of measurement, the higher the number, the finer the yarn. Thus size 50 machine-embroidery thread is finer than size 30. In this method, the number refers to the number of 840-yard hanks per pound. Size 50 is 50 hanks per pound; size 30 is 30. The indirect method is used for staple yarns like cotton.
To further complicate things, some companies use English numbering, designated Ne, for cotton sewing thread and metric numbering, designated Nm, for synthetic sewing thread (referring to the number of meters of thread which weigh one gram). For both systems, the higher the number, the finer the thread. Equivalent sizes for these two systems are:
Cotton
Ne 20/3 40/3 50/3 60/3 60/2
Nm 30/3 70/3 85/3 100/3 100/2
Synthetic
The denier (pronounced duh-neer) method of measurement is used for silk and man-made filament yarns. It gives the weight in grams of 9,000 meters of filament. In this case, the smaller the number, the finer the yarn. This method isn't used for staple yarns because their greater weight would require huge numbers on the spools.
The numbers on spools also show the number of plies: 60/2 means Size 60 with two plies.
Sometimes the number is followed by a phrase describing special processes applied to the thread, like “triple mercerized.” Mercerizing is applied to cot ton and cotton blends to increase their luster and to improve their strength. The threads are immersed under tension in a caustic soda solution, which causes permanent swelling of the fiber. Triple mercerized means the process has been repeated three times.
The new computer machines and the popularity of sergers, which sew faster than old machines, has put new demands on thread. The newest method of production is an air-texturing process that eliminates the old spinning techniques. This produces a strong, almost perfectly round thread with high tensile strength and hardly any defects or “nebs” (these get caught in your tension guides and needle eye and cause the thread to break). Because the thread is round, it reflects light like silk.
Thread is wound onto the spool in either vertical or cross-wound lines. A vertically wound spool empties from the top to the bottom. A cross-wound spool empties evenly until the last layer of thread, which crosses the entire spool like a giant Z-twist. The only difference between the two is that there is a slight color-cast change on vertically wound spools, making it slightly harder to match thread to fabric color. This is why you undo the thread on vertically wound spools and lay it across your fabric to match it. Merely holding the spool against the fabric isn't accurate enough.
The best way to learn about the threads in your possession is to make a sample chart (Fig. 13-9). Lay down a long line of satin stitch and label each line with brand, size, and color number (optional). As Jackie D. says, “It’s amazing to see the differences—from fuzzy to sleek, from variegated that blends beautifully to the ones that look like lengths of coral snakes, with no blending. Each rayon make is also different.”
Bobbins
Buy yourself extra bobbins and a bobbin-holder case. I can never remember exactly which weight thread or brand is on a bobbin, especially if I wound it five years ago. I keep small tags in my bobbin-holder case, identifying the brand and weight (e.g., Zwicky silk, Nm 40/3).
You can also buy plastic gadgets that attach a bobbin to a spool of thread (twisted pipe cleaners or plastic-bag ties work, too).
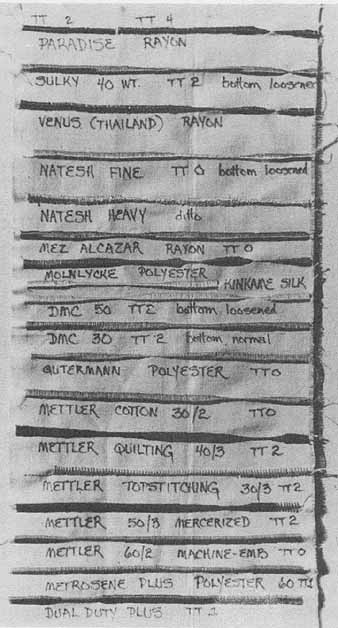
Fig. 13—9 Know your threads by making a sample chart.
Hoops
The purpose of the hoop is to hold the fabric taut. In the dark ages, we used hand-embroidery hoops for machine embroidery, struggling to find ways to make them ever tauter while tilting them clumsily to fit under our needle. I’ve had a favorite 6” wooden hoop for fifteen years, the inner ring wrapped in masking tape which has begun to deteriorate.
But, since then, hoops have been developed expressly for machine embroidery, with spring closures that make it easy to move the hoop while you’re working large areas. I prefer the smaller hoops, because they keep the fabric tauter, but when working large areas, I use larger hoops so I don’t have to move the hoop so often.
The problem with spring hoops is that they are not taut enough, and they tend to pop off thick fabrics. Mari O. solves that problem by wrap ping the inner ring with 2”-wide silk adhesive tape, available from surgical supply stores. She cuts the tape in thirds the long way and wraps it at an angle.
Juliie C. wraps an extra-large paper clip around the handles of her spring hoop, so the handles can't open all the way. This prevents them from popping off.
People who swear by screw-type wooden hoops tighten them with a screwdriver, for extra tautness. Others file a half-moon out of the inner and outer rings to aid putting the hoop under the needle.
Scissors/Shears
I have tons of both. What’s the difference? Scissors are less than 6” (15 cm) long and have equal-sized finger loops. Shears are 6” or longer and often have one finger loop shaped to accept the thumb only. Most of us use the word “scissors” as a generic term for all doo dads with two blades that cut. I will, too.
No scissors are eternally sharp. Everything you cut with them dulls them slightly. But synthetic fabrics are the worst, worse even than paper. If you were extremely organized, you would have one set of scissors for cutting natural fibers only, one set for synthetics, one set for paper, and one set for decoy (no matter what you tell your family, like “You die if you touch these,” they will still grab the nearest pair to open Grandma’s package wrapped in strap ping tape).
My favorite scissors/shears are Ginghers. I have the 4” craft scissors that cut to the very point, the 6” duck- billed appliqué scissors, and 8” knife- edged shears. But these are so expensive ($17 for the craft scissors) that I also have lots of others, all of which I love for different reasons. For example, I have a small pair that tip up at the end, which are perfect for cutting thread ends without cutting the needle thread while doing free-machine em broidery. These came with my New Home Memory 6000.
I encourage you to treat yourself to at least one good pair each of scissors and shears. Also visit a surgical-supply store for a variety of good scissors with strange shapes. Take care of your scissors. Wipe off the lint after each use. Oil the pivot area lightly from time to time. And if necessary, hide them.
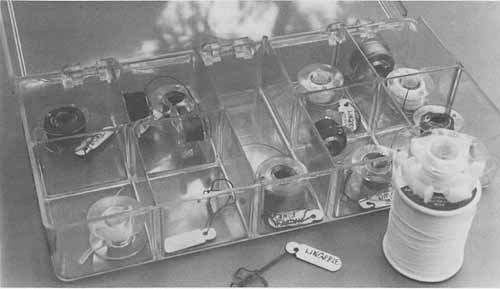
Fig. 13—10 Plastic gadgets clip onto spools of thread to match bobbins
wound of that thread. I keep my bobbins in a plastic screw box, with hang
tags labeling the type of thread.
Additional Idea
By now, you know enough to make “December” of your fabric calendar by yourself. When you finish, wrap it up and give it to someone you love.
