The best months to hatch in most climates are February and March. If you live in very cold climate, March and April are the best months. A breeding flock and its chicks are strongest and healthiest in spring.
Pullets hatched in spring will lay by fall and continue laying for 1 year. Pullets hatched in winter will lay by midsummer but may molt and stop laying in the fall. Chicks hatched in summer are not yet strong enough to ward off disease-causing organisms that flourish in warm weather. For best results, hatch in spring.
You can hatch eggs in two ways: Let a hen hatch them for you or hatch them in mechanical device.
Natural Incubation
Letting a hen handle the hatching is called natural incubation. The hen doing the hatching is called a setting hen or a broody hen. The eggs in the hen’s nest are called setting or a clutch. The chicks that hatch are also sometimes called a clutch, but more often are called the hen’s brood.
Since a hen stops laying when she starts setting, breeds developed primarily for their laying ability have been selectively bred against the instinct to brood. Luckily, the hens of some breeds are still good setters. The breeds most likely to brood are Cochin, Orpington, Old English Game, Plymouth Rock, Rhode Island Red, Wyandotte, and Silkie.
When a hen is beginning to set, she stays in the nest long after she has laid her eggs. If you touch her or try to take her eggs away, she puffs up and growls and may peck your hand. If her eggs are left in the nest, within a few days she will settle down to serious business.
A setting hen typically gets off the nest for a few minutes each day to grab a bite to eat. While she is out, another hen may come along to lay an egg in her nest. When the broody hen comes back to find the other hen in her nest, she may get confused and go to a different nest. The other hen lays her egg and leaves. The uncovered, partially incubated eggs get cold, and the embryos die. For this reason, it’s a good idea to separate a broody hen from the rest of the flock.
Prepare a private place where the hen can brood without being bothered. Move the hen and her eggs at night. If you move her during the day, she may try to get back to the old nest. If you move her at night, she will wake up in the morning to find herself in a quiet place, and chances are good she will stay there. While you are moving her, check her body for lice and mites, and treat her if necessary.
Of course, chickens are like people — you can’t always predict what they’ll do. After you move a hen, she may stop setting. Even if you don’t move her, she may stop setting before her eggs hatch. The best you can do is make sure your broody hen has a comfortable, quiet place and plenty to eat and drink, and then let nature take its course. If she sticks it out for 21 days, she will hatch out a nest of downy chicks.

Silkie hens are such tenacious setters they are often
used to hatch the eggs of rare and exotic birds.
Artificial Incubation
If you hatch eggs in a mechanical device, the process is called mechanical or artificial incubation. The device in which the eggs are hatched is an incubator. Incubators are designed to imitate the temperature and humidity produced by a setting hen. They come in several styles and a wide range of prices and are sold through farm stores and poultry supply catalogs. Some incubators have a window in the cover so you can watch your eggs hatch. Some have a fan that circulates warm air to keep the temperature uniform throughout the incubator.
An automatic turner is a handy feature. An incubator without one costs less, but you have to turn the eggs by hand several times a day. Turning keeps the embryo floating within the egg white so it won’t stick to the inside of the shell. When a hen hatches eggs, she constantly fidgets in the nest, causing her eggs to turn.
If you get an incubator with a window, automatic turning, and a fan, you’ll have it made. Every incubator comes with a set of directions. For best hatching results, follow them carefully.
Egg Selection
Select only eggs that are clean and of the proper size, shape, and color for your breed. Eliminate any that are cracked, unusually large or small, round, or oblong. Candle the eggs and eliminate those with blood spots, which can be hereditary.
Depending on how many eggs your incubator holds and on how well your hens lay, gathering enough eggs to fill your incubator will probably take several days. A hen also has to collect a clutch of eggs before she starts setting, in order for all the chicks to hatch at once. You can store the eggs for up to 10 days in a clean egg carton with their large ends oriented upward. Keep the eggs out of sunlight, in a cool place but not in the refrigerator. The best storage temperature for hatching eggs is about 55°F.
Hatching Rate
No matter how careful you are, not every egg will hatch. Some won’t hatch because they are infertile. The cock may be too young or too old, or perhaps he favors some hens while ignoring others. Maybe he is ill. If you have more than one rooster, they may spend too much time fighting, rather than mating.
Assuming that all the eggs are fertile, even a setting hen is not 100 percent successful. A good hen, however, hatches a higher percentage of eggs than can be hatched in an incubator. The typical hatching rate in a good incubator is about 85 percent of all fertile eggs.
Fertile eggs fail to hatch for a variety of reasons, including the following:
• The breeding flock is unhealthy, weak, or improperly fed.
• The eggs are dirty.
• The eggs are improperly stored or have been stored too long.
• The eggs are nor turned often enough.
• The incubation temperature is too high, too low, or not steady.
• The incubation humidity is too low or too high.
• The incubator is nor properly ventilated.
Egg Anatomy
An egg consists of many parts. The first thing you see is the shell. If you look closely, you can see tiny pores, which allow oxygen and carbon dioxide to pass through the shell. The big end has more pores than the little end, causing more air to be trapped at the big end.
The shell is lined with a leathery outer membrane. Within the outer membrane is an inner membrane. These two membranes help keep bacteria from getting into the egg and slow the evaporation of moisture from the egg. Between the outer membrane and the inner membrane, at the larger end of the egg, is an air cell that holds oxygen for the chick to breathe.
The inner membrane surrounds the egg white, or albumen. Albumen is 88 per cent water and 11 percent protein. One function of the albumen is to cushion the yolk floating in it. The yolk is made up of fats, carbohydrates, proteins, vitamins, and minerals that feed the growing embryo.
On two sides of the yolk are cords, or chalazae, that keep the yolk floating within the albumen. When you crack open an egg, the chalazae break and recoil against the yolk. They then look like white lumps on two sides of the yolk.
On top of the yolk is a round, whitish spot called the germinal disk or blastodisc. If the egg is infertile, the blastodisc is irregular in shape. In a fertile egg, this spot is called the blastoderm. A blastoderm looks like a set of tiny rings, one inside the other. During incubation, the blastoderm develops into a baby chick. If you break an egg into a dish and examine the yolk, you can tell whether the egg is fertile by whether it has an irregularly shaped blastodisc or a perfectly round blastoderm.
After the egg has been broken, of course, it can no longer be incubated. Unfortunately, there is no way to tell from the outside whether the egg is fertile.
You can, however, tell whether an egg is fertile after it has been incubated for a few days. Hold the egg against your candler and gently turn it. If the egg is infertile, it will look clear. If the egg is fertile, you will see a dark spot at the center — a newly formed heart! Watch for a moment, and you’ll see the heart beat. Surrounding the heart are blood vessels that carry food and water from the yolk to the developing embryo.
Embryo Development
A blastoderm needs food, water, and oxygen to develop into an embryo. It gets food and water from the egg yolk. It gets oxygen from air coming through the pores in the shell.
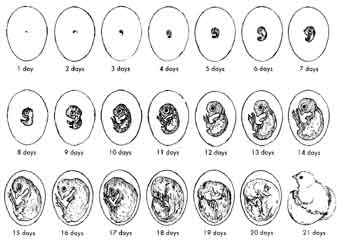
Week 1. Within the shell, the embryo has everything it needs to develop into a chick. By the second day, it has a heart. By the third day, it has a head with eyes and little wings and legs. By the end of the first week, the embryo has all the body parts of a finished chicken, although they are still undeveloped.
Week 2. By the ninth day, the embryo begins to look like a chick By the 14th day, it has feathers.
Week 3. At the beginning of the third week, the embryo turns its head toward the air-cell end of the egg. It continues to grow throughout the week, absorbing the remainder of the yolk.
By the twentieth day, the embryo occupies the entire space inside the shell, except the air cell. It needs more oxygen, so it uses its beak to break through the inner membrane into the air cell. There it takes its first real breath and starts to peep. You can hear it peeping inside the shell.
On the twenty-first day, the chick makes a tiny hole, or pip, in the shell by using its egg tooth — a sharp projection at the top of its upper beak. The egg tooth, having served its purpose, falls off soon after the chick hatches.
After the chick pips the shell, it rests for 3 to 8 hours. It then turns its head and breaks the shell all the way around. As it chips away at the air-cell end of the shell, the chick shoves against the small end with its feet. After about 40 minutes of hard work, it kicks free of the shell. Then, wet and exhausted, the chick rests.

The development of an embryo
Next: Raising Chicks
Prev.: Managing Breeders