Pushing with 55 pounds of pressure on every square foot of a surface it strikes, a 100-mile-an-hour wind drives debris be fore it like missiles. Window glass is no match for that kind of force. If you live in a place where powerful winds are a threat, you must be ready to cover all windows quickly at the first warning.
Shutters serve to protect small windows, but picture windows usually are too large to shutter—and simply nailing boards across them may damage the frame or siding. For first-floor picture windows, which are the most common sort, the type of plywood cover illustrated below offers complete protection. The cover fits between the sill and the drip cap outside the casing so that it can't scratch the glass. Angled 2- by-4s, anchored to the ground by stakes, hold the cover firmly.
Because the cover is designed as a knockdown, you can build it at any time and store it, ready for quick assembly, until you need to use it.
Building a Window Cover
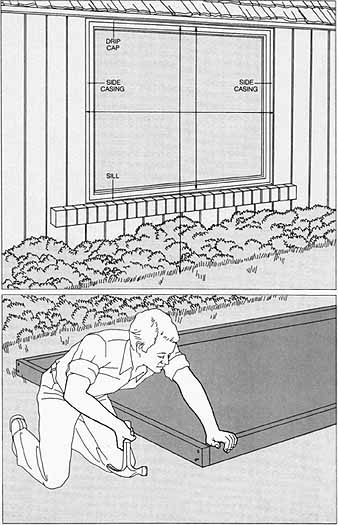
1. Measuring the window.
Measure the exterior height of the window from the bottom of the drip cap
to the top of the sill. Measure the width from the outer edge of one side
casing to the outer edge of the other. For the length of the supports, measure
from the bottom of the drip cap to the ground and multiply this figure by
1½. 2. Assembling the cover. To make the cover,
cut ½-inch plywood to the dimensions determined in
Step 1, if necessary piecing two panels together with wood battens. To frame it, make a rectangle of 2-by-4s the size of the plywood and butt-nail it with 3½-inch nails. Secure the plywood to the frame with 1¼-inch nails at 6-to 8-inch intervals.

3. Attaching supports.
Cut two 2-by-4s to the length determined in Step 1. Then stand the cover
on its side and place one support in the upper corner of the frame at a 45°
angle. Hold the support level with a scrap of 2-by-4. Bore two 3/8-inch holes
through both support and frame. Label the holes with a letter or number so
you can identify and match them later. Turn the cover onto the opposite side and repeat the process. 4 Fitting the cover. Stand
the cover, frame side out, in front of the window, using sawhorses or trash
cans to help hold it. Set the supports in place and , using the holes bored
in Step 3, se cure them with nuts and 1 bolts, 4 inches long. Position the
cover against the window. Set the cover on the sill and measure from the
bottom corner of the frame to the far edge of one support to find the length
for bottom braces. Take the cover down, unbolt the supports and cut two 1-by-3-inch
bottom braces.
Final Steps Before the Storm
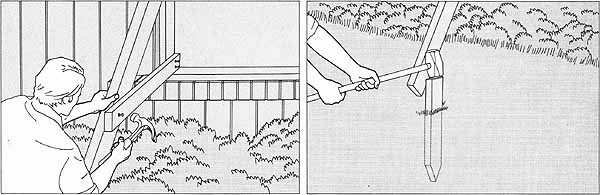
1. Bracing the cover.
Follow the procedure in Step 4 (top right) to bolt the supports to the frame and fit the cover over the window. Using double- headed nails 2 inches long
(they are easy to remove later), fasten a brace between each lower corner
of the frame and the adjacent support. 2. Anchoring the supports.
Drive a pointed stake 18 inches long deeply into the ground beside the base
of each support. Use double-headed nails 3½ inches long to nail the stake
to the support.
Next: Tying Down a Mobile Home
Prev.: Defending a House from Disaster (Intro and Article index)