For precious possessions and vitally important documents, the optimal safeguard against burglary and fire is a bank sale-deposit box. But most safe-deposit boxes are too small for bulky objects and too inconvenient for frequently used items—financial records, computer disks, and the like. The best way to protect such articles is to store them in a safe or in a strongroom that is burglary and fire resistant.
Before choosing a sale, decide whether you are concerned more about burglary or fire, since few sales protect against both. Burglary sales have thick steel bodies, combination locks, and hardened-steel bolts, but papers inside may char in a fire. A fire sale has a double shell of thin sheet metal filled with insulation. Some have reinforced doors and combination locks, but thieves can crack them by peeling away the sheet metal.
Fire Safes: The insulation in a fire safe—lightweight concrete and vermiculite, a form of mica—contains as much as 30 quarts of water, which is released as steam in a fire, absorbing heat in the process. The vapor filters through vents inside and outside the sale and may crumple and discolor papers, but they will remain legible and flexible enough to handle.
Look for the Underwriters Laboratories (UL) label on any fire safe you consider buying. It will indicate how long the unit can withstand a fire and how high the interior temperature may go. The label also specifies the sale’s type: An “insulated filing device” shields papers from 1,700° F heat but may be torn open by falling debris; a “fire-resistant sale” and an “insulated record container” not only resist heat but protect against the effects of a collapsing building.
Burglary Safes: The most secure burglary safes are UL-rated models, which weigh 800 pounds or more; they are primarily designed for business use. Sales designed for the home tend to be lighter and less expensive, but they are also more vulnerable, able to withstand sledge hammers, drills, and pry bars for only a few minutes. If you buy a sale without an overall UL rating, evaluate it part by part. Look for a combination lock with a UL label; a UL listed relocking device, which will fasten the bolts automatically if a burglar tries to drill through the lock or punch it out of its housing; a concealed hardened-steel plate to protect the lock and bolts; and bolts or steel hooks that secure the hinge side of the door.
Installing the Safe: Most people choose a freestanding sale of moderate size. To prevent a burglar from carting it away, fasten it to a floor or build it into a false wall; many dealers will arc weld angle irons or mounting brackets to the sale according to your specifications. Another option, if the sale is to stand on a concrete floor, is to in crease its weight and strength either by having the supplier encase it in concrete or by building a shell of concrete blocks around it.
Choose an inconspicuous or concealed location for the sale—beneath a stairway or behind a false electrical panel, for example. Protect the area with a photoelectric, infrared, or microwave sensor, discreetly placed so that it does not be tray the sale’s presence.
TOOLS:
- Keyhole saw
- Hammer
- Electronic stud finder
- Circular saw
- Electric drill with bits (4’, -‘, and conical grindstone)
- Mortise chisel
- Trowel
- Cold chisel
MATERIALS:
- 2 x 4s
- Common nails (2” and 3”)
- 1 x 4 lumber
- Angle irons ( ¼” x 1½” and ¼” x 3”)
- Carriage bolts (½” and 3”)
- Sheet-metal screws
- Shims
- Lag screws (1/2” x 2”) and washers
- Steel plates
- Mortar
- Wire mesh (6” x 6”)
- Bond-beam blocks
- Reinforcing bars (3/8”)
- Tie wire
- Concrete bricks or half-blocks
- Plywood (4”)
- Type X wallboard (5/8”)
- Wallboard (4”)
- Solid-core door (1¾”)
- Steel rods
- Hinges (4 1/2”)
- Deadbolt lock and maximum-security strike
- Ventilators (6” x 8”)
SAFETY TIPS: Goggles protect your eyes when you are hammering, chiseling, and using electric drills and power saws. Earplugs shield your ears from the noise of power tools operated in an enclosed space.
Repositories for Your Valuables

A fire-resistant file. Sheet-metal shells sandwich
2-inch layers of fire-resistant insulation in this cabinet, which is available
in one-, two-, and four-drawer sizes and can hold big objects or large amounts
of paper. Additional insulation in the front panel of each drawer and in
the horizontal partitions between drawers makes each drawer an independent
compartment.
A safe for papers. The safe above is called a Class 350 record safe because temperatures in side it will not exceed 350°F during a fire. In addition to its fire-resistant features, it's reinforced to protect against falling debris, and it possesses a UL approved combination lock. The safe comes in models that can be mounted in a wall, fastened to the floor, or fit ted with casters.
A safe for films and stamps. This expensive low-temperature safe— a Class 150 record container—protects articles that are easily damaged by heat and high humidity. The outer container is built like an ordinary fire safe, but an airtight inner container of wood and insulating plastic shields the con tents from the steam generated by the outer insulation.

A burglary-resistant wall safe. This 200-pound safe
is made of 1/2-inch steel, with seamless electric welds at all joints. Its
door, a steel plate 1 inch thick, is fastened with a three-tumbler combination
lock and a hardened-steel bolt. Heavy steel hooks interlock with a flange
on the body to prevent an attack on the hinges.
A safe to bury in the floor. Though awkwardly shaped and small, the safe above is inexpensive, easy to conceal, fire resistant, and difficult to crack. Almost all its strength is built into the 1¾” steel door, secured by three 1-inch bolts of hardened steel. A solid block of concrete reinforced with steel bars protects the body.
A security cabinet. Meant for objects too large to fit in side an ordinary safe, this cabinet is 80 inches high, 30 inches wide, and weighs 1,000 pounds. Its body is 1/4-inch steel plate, and its 3/8-inch steel door is fastened by 12 steel bolts, 6 on each side.
Building a Safe into a Wall
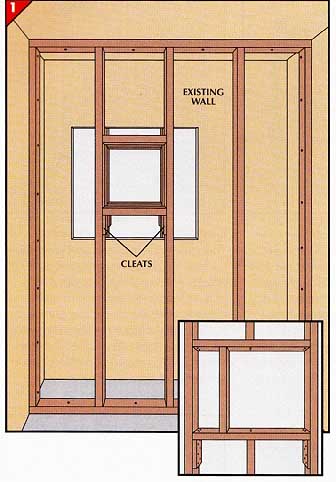
1. Building a false wall. For a burglary or fire safe
that is narrower than the space between two wall studs, follow these steps:
• Cut away the wall covering around the planned location of the safe.
• Nail horizontal 2-by-4s between the studs of the existing wall, ½-inch above and below the safe location; add 1-by-4 cleats under the lower 2-by-4. (If the safe is much narrower than the stud spacing, decrease the width of the frame by nailing a vertical 2-by-4 between the horizontal ones.)
• Cut a pair of 2-by-4s to serve as the top and bottom plates for the false wall.
• Use a stud finder to locate the ceiling joists and the unexposed wall studs. Mark the joists on the ceiling. Mark the plates with stud locations that match the existing studs.
• Nail the bottom plate to the floor, spacing it out from the existing wall to accommodate the depth of the safe.
• Nail studs to the top plate and slide this assembly over the bottom plate. Then nail the top plate to the ceiling joists and toenail the studs to the bottom plate.
• Make a cleated 2-by-4 frame in the new wall to match the one in the original wall.
For a safe wider than the stud spacing (inset), cut away an existing stud 2 inches above and below the planned location of the new safe and build a frame as described above. Then nail the frame to the cut-off stud and add a vertical 2-by-4 to complete an opening the width of the safe.
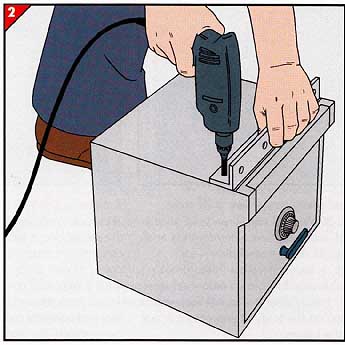
2. Attaching the mounting brackets. If you are installing
a burglary safe that did not come with mounting flanges already attached,
follow these steps:
• Drill 1/4-inch holes at 4-inch intervals along the center of each flange of two ¼” by 1½-inch steel angle irons.
• Position one of the angle irons on one side of the safe, ¼-inch farther from the front than the thickness of the wall board you are planning to hang, and use it as a template to drill matching holes through the sides of the safe.
• Use the other angle as a template for drilling holes in the opposite side of the safe.
• Fasten the angles to the safe with 1/2-inch carriage bolts, round bolt-heads facing out.
If you are installing a fire safe, attach brackets the same way, but drill ¼- holes in the angle flanges that fit against the safe. Then drill pilot holes into the shell of the safe—do not drill into the insulation—and secure the flanges with washers and self-tapping sheet-metal screws.
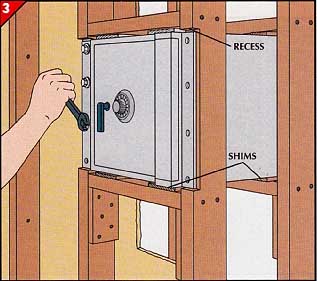
3. Installing the safe.
• Chisel a 4-inch recess for the angle irons at the front of the mounting studs to make a flat surface for the wallboard.
• With a helper, slide the safe into the frame and shim the safe until it's level.
• Fasten the safe to the studs with 1/2-inch lag screws 2 inches long and washers.
• Round the heads of the screws with a grinder to impede removal.
Bolting a Safe to the Floor
• Drill 1/2-inch holes at 4-inch intervals along the center of each flange of two ¼” by 3-inch steel angle irons.
• Set the irons against the skirts at the sides of the safe as shown at left, and use the angles as templates to mark mounting holes on the skirts and the floor; in addition, mark the corners of the angles on the floor.
• Fasten the angles to the skirt with ½-inch carriage bolts, the round bolt-heads facing out.
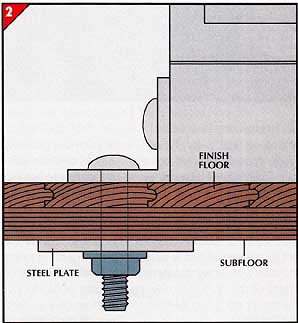
2. Fastening the safe.
• For a wood floor that is accessible from underneath, drill 1/4-inch holes at the marks for 3-inch-long carriage bolts and attach the nuts from beneath, using drilled steel plates 3 inches square as washers.
• If you don't have access to the floor’s underside, use 1/4-inch lag screws and washers to fasten the safe to the subfloor or joists.
For a concrete floor, use one of the masonry fasteners shown above. Drill pilot holes at least 3 inches deep, using a carbide-tipped masonry bit and a rented hammer drill, then fasten the safe with machine bolts.
An Enclosure of Concrete Blocks
• At a corner of the basement floor, lay a 3/4-inch mortar bed at least 32 inches wider and 8 inches deeper than the safe.
• Cover the bed with 6- by 6-inch wire mesh and add another ¾-inch of mortar.
• Working from the corner, cover all of the mortar except the shorter of its two outer edges with a course of bond-beam blocks (concrete blocks with built-in channels for reinforcing bars). Leave 3/8-inch mortar joints between the blocks and between the blocks and the basement wall.
• Use a hammer and cold chisel to make channels for reinforcing bars in square-ended corner blocks as shown above. Set the blocks in place along the short outer edge of the mortar.
• Use a pipe to bend pieces of 3/8-inch reinforcing bar to 90-degree angles and lay the bars in the channels (inset). Fasten the overlapping ends with tie wire.
• Fill the blocks and joints with mortar, troweled off flush with the tops.
• Make a platform for the safe from broken block cemented with mortar.
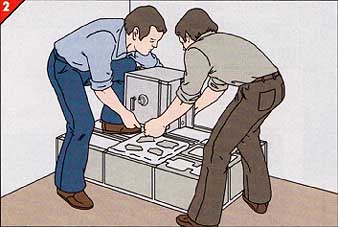
2. Installing the safe.
• Bolt vertical 1/4- by 3-inch angle irons to each side of the safe, 7¼-inches in from the front, or have the dealer weld them on.
• With a helper, set the safe on the mortar bed.
• Lay courses of block behind the safe and along the short edges of the enclosure, leaving 3/8-inch mortar joints between the courses.
• Fill the gaps between the blocks and the safe with mortar, concrete bricks, or concrete half-blocks, depending on the size of the gaps.
• Lay a mortar bed or a course of concrete brick, level with the blocks on each side, over the safe, then lay a final course of blocks matching the bottom course (Step 1), but don't fill the blocks with mortar.
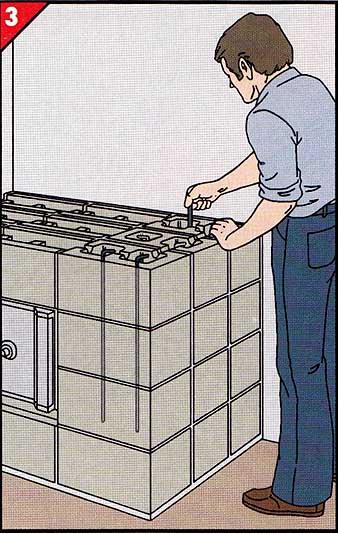
3. Reinforcing the blocks.
• Bend one end of several reinforcing bars 90 degrees and push the bars down through the cores of the outside blocks as far as possible.
• Lay horizontal reinforcing bars in the channels around the edges of the top course of blocks (Step 1).
• Fill the cores of all the blocks with mortar, then cover the cores with a course of concrete brick.
Homemade Strong-rooms

Building a strong room. To protect oversize objects—and
to provide extra protection for a safe or to keep hazardous items out of
a child’s reach—you can build a strongroom from scratch or convert an existing
walk-in closet. Follow these steps:
• Working on the outside of a new room or the in side of an existing closet, cover the wall studs with 1/2-inch plywood nailed every 6 inches.
• Add a layer of 5/8-inch Type X wallboard, nailing it every 8 inches. Sheathe the ceiling and —in the case of a new room—the other side of the studs with 5/8-inch wallboard.
• Install a 1¾” solid-core wood flush door that has been reinforced with steel rods, mounted to swing inward on 4½-inch hinges and fit ted with a deadbolt lock as well as a maximum-security strike.
• Frame holes in two of the walls and install 6- by 8-inch louvered ventilators to prevent moisture from collecting inside the room.
• Add a light fixture and smoke detectors, one in side and one outside the room, wired to a centrally controlled alarm system. A magnetic sensor on the door and an infrared or a microwave sensor inside provide maximum burglar protection.
Previous: Ready-Made Window GrillesNext: Silent Sentries, Loud Alarms: Self-Contained Warning Systems

