Improving the utility or security of a lock may be as simple as changing the key, but frequently a new lock is the answer. A rim lock, a deadbolt lock, or vertical bolts for a French door can be added with out your having to change the hard ware that is already there. If you are replacing a key-in-knob lock, purchase a model that fits in the existing holes; otherwise you may need a new door. A mortise lock always requires a new door.
Rekeying: If you lose a key, have the cylinder of the lock rekeyed by a locksmith. Make sure that the cylinder is of the tamper-resistant type described on above; other wise, replace it.
Rekeying or replacing a cylinder necessitates disassembly of the lock. In deadbolt locks, you can free the cylinder entirely. In many key-in-knob locks, however, you will have to stop once you free the outside knob. Take the knob, with the cylinder still inside, to a locksmith, along with an old key.
Matching Lock and Door: Before buying a new lock set, make sure the door is thick enough for the bolt mechanism. In a panel door, the vertical stile on the edge of the door must be wide enough for knobs and their decorative roses. With a mortise lock, the stile must be sufficiently wide so that the mortise does not weaken the joint between the stile and the connecting horizontal rail.
If you plan to purchase a lock with a beveled latch (found on key-in-knob locks, mortise locks, and some rim locks), you will need to specify the so-called hand of the door. To determine this, first note which way the door swings. If, like most exterior doors, it opens in ward, stand outside and look at the hinge position. Hinges on the right identify a right-hand door, hinges on the left a left-hand door. If the door opens outward, it takes a lock that is normally installed on a door of the opposite hand.
Improving the Lock Strength: Check the screws that come with the lock and replace any that are too short to provide good security. When installing a rim lock, replace the mounting screws for its case with carriage bolts and nuts.
TOOLS:
- Screwdrivers
- Open-end wrenches
- Groove-joint pliers
- Hammer
- Hole saw
- Electric drill with twist bits and spade bits
- Utility knife
- Wood chisels
MATERIALS:
- Electrician’s tape
- Lipstick or grease pencil
38 SECURITY WITH OR WITHOUT A KEY: Fumbling for a key slot in the dark or trying to fish keys from purse or pocket with an armful of groceries can be a nuisance; to forget or lose a key and be locked out of the house is more exasperating still. One way to avoid such problems is to install a combination lock like the one shown at right, in which the knob serves as the dial. In addition to a regular three- or four-digit combination, set by the homeowner, the locks can be given a second combination that allows maintenance workers or other non-residents access to the house at times controlled by the homeowner.
These locks also function with a normal key, for those who want quick access without having to dial a combination.
Replacing Cylinders
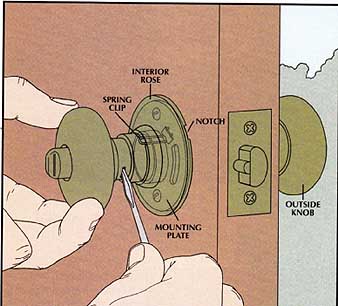
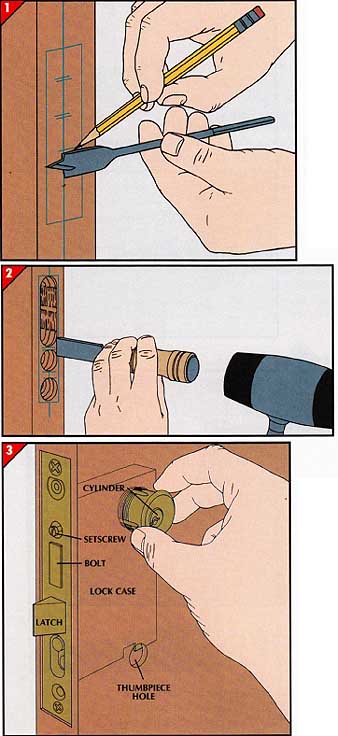
Key-in-knob lock.
If screws secure the interior rose, remove them. If none are visible, use the tip of a screwdriver to depress the small metal tab projecting through a slot behind the knob. Pull the knob from the lock set, push in the spring clip that protrudes from the rose, and insert a screwdriver into the notch at the rim of the rose to pry the rose away. Remove the two screws in the mounting plate under the rose, and from the exterior side of the door, pull the outside knob, which contains the lock cylinder.

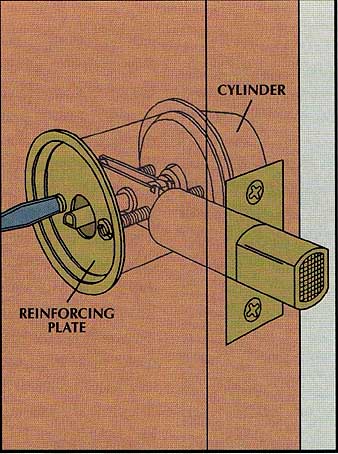
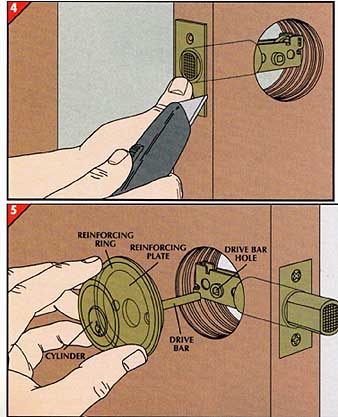
Rim lock.
With the door unlocked, remove the screws or nuts that secure the lock case (above, left). Wiggle the case off the door and the cylinder drive bar, then remove the screws of the rein forcing plate (above, right), and from outside the door, pull out the cylinder.
Deadbolt lock.
Remove the rose to expose the reinforcing plate; remove the screws holding the plate to free the cylinder. If the lock has no reinforcing plate, removing the interior rose frees the cylinder.
On a double-cylinder lock with both interior and exterior cylinders, loosen the screws that extend through the inside cylinder to free both cylinders. If these screws are nonreversible or if they have been damaged so they can't be removed, have a locksmith remove the cylinder.

Mortise lock.
Find the small setscrew located on the edge plate of the door at the same height as the lock cylinder. (Sometimes it's hidden behind a decorative face plate.) Back the setscrew out three or four turns (left). From outside the door, unscrew the cylinder. If it does not turn easily, grip it with groove-joint pliers whose jaws have been covered with electrician’s tape to prevent them from marring the cylinder (right).
Adding a Deadbolt
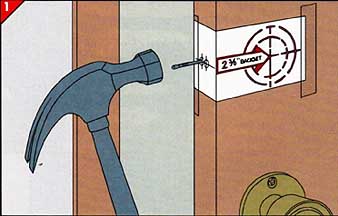
1. Marking the holes.
• Tape the paper template that came with the lock to the edge and face of the door about 6 inches above the knob.
• Mark each screw hole by driving a finishing nail ¼-inch through the marks on the paper template, making sure the nail remains perpendicular to the surface. To allow for variations in door thickness, some templates are marked with alternate locations for drilling the edge holes; be sure to use the mark specified for the size of your door.

2. Boring the cylinder hole.
With the door closed, or firmly wedged open, use a hole saw to bore a cylinder hole the size that is specified by the manufacturer. To avoid splintering the thin veneer of the door face as the teeth of the saw exit, stop drilling as soon as the small center bit of the saw breaks through the opposite side and complete the hole from that side of the door.
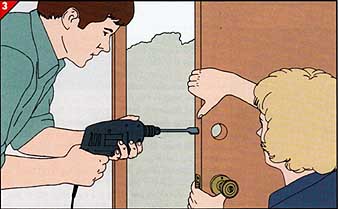
3. Drilling the bolt hole.
Wedge the door open. To make sure that the bit stays on course as you drill into the narrow edge of the door, en list a helper. While you watch from above to keep the bit from straying right or left, have the helper check that it remains horizontal.
Alternatively, use a drill guide to ensure that holes are drilled perfectly.
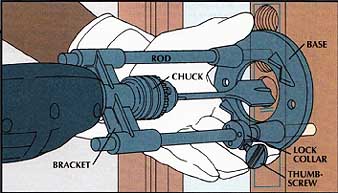
Tricks of the Trade: Taking the Guesswork out
of Drilling -- A drill guide offers a sure way of drilling a hole
straight and perpendicular. The mod el seen here consists of a bracket
to hold the drill, a pair of runners that slide along two metal rods, a
lock collar to stop the drill when the bit has reached a predetermined
depth, and a round base. The rod ends are set flush with the base when
the drill guide is used on a door face. They are pushed partway through
the base when the guide is used to steady a drill bit on a door edge, as
shown here.
Before using the guide on a door edge, wrap the protruding rods in masking tape to avoid marring the door. Then, holding the base against a door edge with one hand, rotate the base clockwise to press the rods firmly against the door faces. The drill’s torque will help hold the guide rods in position as the hole is drilled.
4. Seating the bolt assembly.
• Insert the bolt assembly into the bolt hole, then scribe the outline of the faceplate with a utility knife. The line left by a sharp knife is thinner and more precise than a pencil line.
• Chisel a mortise in the marked area for the face plate, carving only as deep as the plate is thick.
• Fasten the assembly with screws.
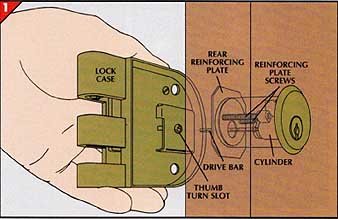
5. Installing the lock.• For a deadbolt with thumb turn, assemble the cylinder, drive bar, and the reinforcing plate and ring as directed by the manufacturer.
• Fit the assembly into the cylinder hole from out side the door, inserting the drive bar through the drive bar hole in the bolt assembly.
• Screw the rear reinforcing plate, if any, to the cylinder hole from inside the door, then set the thumb turn against the door, fitting the drive bar into the hole in the thumb turn.
• Insert mounting bolts through the thumb turn, the reinforcing plate, and the bolt assembly and screw them into the back of the cylinder. For a double-cylinder lock, fit the drive bars of both cylinders into the drive bar hole.
• Test the deadbolt with both the key and the thumb turn. If the bolt will not move in or out, remove the drive bar from the cylinder, rotate the bar 180 degrees, and reassemble the lock.
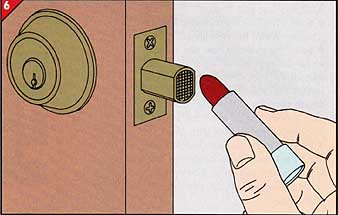
6. Marking for the strike box.
• Coat the end of the bolt with lipstick or a grease pencil, close the door, and turn the bolt against the jamb, leaving a mark on it.
• At the mark, bore a hole for the strike box in the jamb, drilling with the same bit used for the bolt hole in the door. If you hit a finishing nail, chisel around it until you can pull it out with pliers.
Installing a Spring Latch
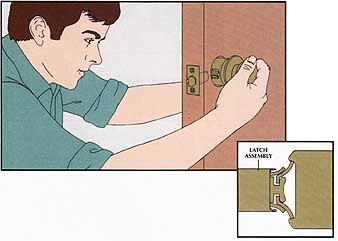
Fitting the lock.
• Drill a cylinder hole and a bolt hole and mortise the latch assembly as for a deadbolt lock.
• From the outside, set the lock body in place, engaging the end pieces of the latch assembly (inset).
• From the inside, screw the inner mounting plate to the lock body.
• Install the interior rose and knob, reversing the steps described above. Install the strike plate in the same way as for a deadbolt strike.
The Right Way to Attach a Rim Lock
1. Mounting the lock.
• Bore a hole for the cylinder about 6 inches above the doorknob.
• Insert the cylinder from the outside, screw the rear reinforcing plate to it, and set the lock case against the door so that the drive bar fits into the thumb turn slot of the case. If necessary, shorten the drive bar by snapping it at one of the grooves with pliers.
• Bore holes for the attachment bolts, using the lock case to locate the holes.
• Bolt on the lock case, placing lock washers and nuts on the interior side of the door.

2. Mortising for the strike.
When you are chiseling the mortises for the strike, pare away small amounts of wood and periodically test the mortise depth until the lock bolts slip easily into the rings. If you cut too deeply, shim behind the strike with cardboard.
• With the door closed, score lines in those places where the top and bottom of the lock case meet the door casing (above, left).
• With the door open, hold the strike between these marks and score a vertical line along the outer edge of the strike (above, right).
• To allow for the part of the strike that wraps around the jamb, mark a second vertical line farther out on the door casing by a distance equal to the thickness of the strike (dashed line).
• Tap a chisel, bevel side in, along the outermost marks to cut straight into the casing; then, holding the chisel bevel side down, pare out the wood within the marked area.
• Mark the jamb mortise by holding the strike in the casing mortise. Score around it, and chisel out a recess in the jamb as you did in the casing.
A Mortise Lock
1. Starting the mortise.
This Jock fits inside a deep mortise in the thin edge of the door and requires precision work best done with a special drill guide; a bit wandering even slightly can ruin an expensive door.
• Use the manufacturer’s template to locate the knob and cylinder holes, then outline the mortise on the door edge.
• Use a spade bit as wide as the mortise to make a series of marks down the mortise to indicate drilling locations, spacing the top and bottom marks for adjoining holes about inch apart.
• Use the bit and drill guide, set to the depth of the mortise, to drill the holes.
2. Chiseling the mortise.
• Chip the remaining wood out of the mortise with a chisel and mallet. Make many small cuts rather than a few large ones to keep the chisel from biting too deeply.
• Finish up the mortise by holding the chisel with the beveled side facing into the cavity and shaving the walls flat without a mallet.
• Drill holes for the thumb-pieces, knob, and cylinder, taking care to drill all the way into the mortise.
• Set the lock into the mortise and , holding it straight up and down along the edge of the door, mark the shallow faceplate mortise.
• Chisel out the faceplate mortise and screw in the lock.
3. Installing the cylinder and trim.
• From outside, screw the threaded cylinder into the lock case and secure it with the setscrew, which runs from the edge plate into the lock.
• Attach the outside thumb-piece or knob, the in side thumb turn and knob, and the trim.
• Install the strike as you would for a deadbolt.
Vertical Bolts for French Doors
1. Marking the mortise.
• Remove the inactive door—the door that is usually closed—from its hinges.
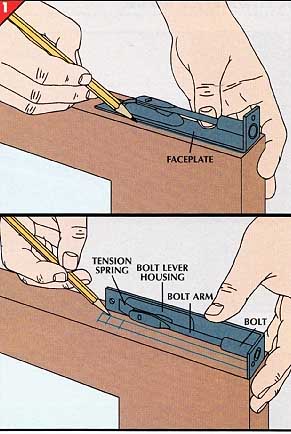
• Center the bolt assembly facedown on the edge of the door, flush with the top edge, and trace the outline of the faceplate to indicate the area of the main mortise (right, top). Draw a centerline through this area, parallel to the door edge.
• Lay the bolt assembly on its side (right, bottom), and make marks at the end of the bolt arm tension spring, at the end of the bolt arm, and at the point where the bolt arm engages the bolt. In addition, mark the position of the bolt lever housing. The marks serve as guides for cutting the sloping lock assembly mortise.
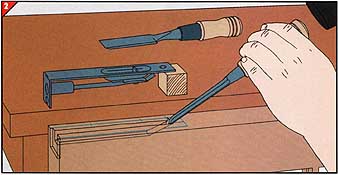
2. Cutting the mortise.
• Using the marks as guides, chisel the mortise to accommodate the tension spring, the bolt lever housing, the bolt arm, and the bolt. For each mortise section, use a chisel that is as wide as the corresponding part of the assembly, and cut each section only as deep as is necessary for fit.
• Mortise the door edge and top for the faceplate, then screw the assembly in place.
• Repeat Steps 1 and 2 at the bottom of the door, then re-hang the door and install strike plates in the top jamb and in the threshold.
Previous: Basic Locks and BoltsNext: Windows That can't Be Forced Open