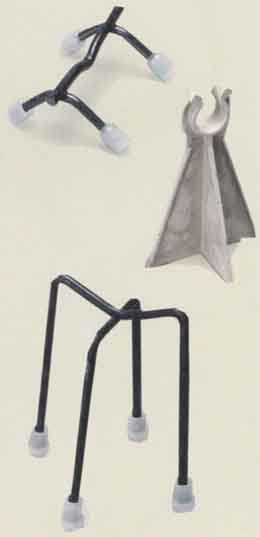
Why should you have a spare tire in the bed of your truck? It’s not required by law, and the truck will run lust fine without it. Using essentially the same logic, some people might ask why we use rebar in our residential foundations. Many houses are built without it (East Coast building codes don’t require it), and if a house is built with rebar, building inspectors often don’t inspect its placement.
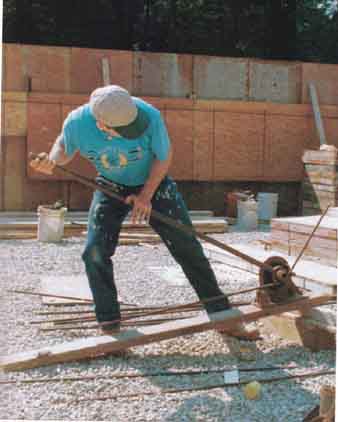
Cutting and bending rebar is a matter of lever age and muscle.
The cutter/bender’s head pro vides a lever and fulcrum that makes simple
bends; more complex bends can be made from individual pieces lapped together.
The simple answer is that rebar is cheap insurance against the potential problems that can develop after concrete is poured or, worse, after the foundation has been back- filled. A foundation that has gone wrong is extremely expensive to repair. Just to be safe, my crew and I reinforce concrete in footings and walls, in piers and columns, and in structural slabs, and we also use rebar to tie new work to old.
Concrete used in residential construction is usually specified in a range of compressive strength in 500-lb. increments from 2,500 psi to 4,000 psi. It’s obvious that concrete can support phenomenal compression loading. However, when it's under tension or shear forces, concrete has lower values com pared with other common construction materials. If the underlying soils are of uneven densities, differential settling beneath the foundation can cause large cracks in the walls. Concrete is also subject to shrinkage cracks, especially when poured with a high water-to-cement ratio. When properly sized and embedded in concrete, rebar partially compensates for these deficiencies. (Remember that excess water produces lower-psi concrete that is weaker and more prone to shrinkage. Even reinforced with rebar, high-water-ratio concrete shouldn’t be used.)
Sizes and Grades of Rebar
Rebar comes in many sizes and grades. In residential work, we mostly use bar sizes #3, #4, or #5. These sizes translate to the diameter of the stock, measured in ½-in, increments; #3 bars are % in. in dia., #4 bars are % in. (½ in.), and #5 bars are in. The grades 40 and 60 refer to the yield (tensile) strength (40,000 psi and 60,000 psi, respectively). Grade 60 is harder to cut and bend. Both grades are priced the same. The designer usually specifies which one to use for a particular purpose. If the grade is not specified, I buy the softer grade 411 for short lengths and bends, and grade 60 for long straight runs with few or no bends.
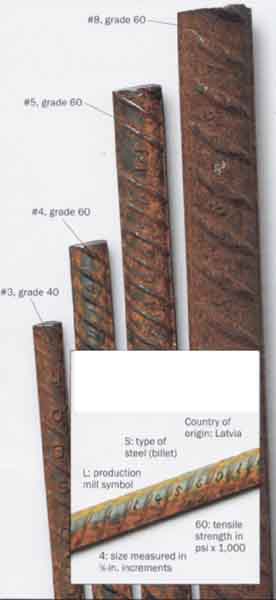
Know your Rebar
DECIPHERING THE CODE
A series of letters and numbers stamped along a length of rebar tells a great deal of information:
- #8, grade 60
- #5, grade 60
- #4, grade 60
- #3, grade 40
- Country of origin: Latvia
- S: type of steel (billet)
- L: production mill symbol
- 4: size measured in
- 1/8-in. increments
- 60: tensile strength in psi x 1000
Make Sure the Rebar Is Delivered where You Want It
Rebar is available at some lumberyards and from most masonry suppliers. However, nine times out often, I order it from a steel yard that stocks both grades, that always has #5 bars, and that delivers to the site. If the site has good access and if we have an excavating machine available during the delivery, the machine can lift the rebar from the truck with a chain sling. If we don’t have equipment on site, I let my suppliers know so that they can deliver my order on the outside edge of the truck bed, where it can be levered off and onto the ground.
If the delivery is early or late or if the machine is unavailable, we drop the bundles off the side of the truck onto blocks of wood; it’s easier to maneuver the chain and slip hooks under the load when we are ready to move it to the foundation area. We also store the rebar off the ground at its staging area so that it doesn’t get muddy or sit in puddles. Dirty rebar must he cleaned be fore use.
The Concrete Reinforcing Steel Institute has something to say about clean rebar in its manual Placing Reinforcing Bars: “The surface condition of reinforcing bars may affect the strength of the bars in bond. The main factors affecting bond are the presence of scale, rust, oil, and mud.” Scale is caused by the manufacturing process; loose scale usually falls off when the bar is handled or bent. Fight scale and light rust are acceptable and actually enhance the bond with concrete because they add more surface area. Too much form oil on rebar can adversely affect the bond, according to the CRSI manual.
The Grunt Work of Cutting and Bending Rebar
If there’s power on site, steel can be cut using a circular saw outfitted with a metal abrasive wheel or a 14-in. chop-saw with the same blade. The latter cuts the bar more easily, but we need to bring the steel to the saw. Using either saw, we can cut three to six pieces of rebar to common lengths simultaneously. Incidentally, wearing goggles and earplugs is a must when cutting steel with a saw.
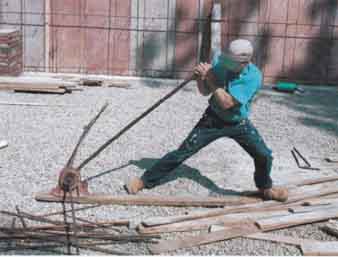
Although chopsaws or torches can make quick work of cutting
rebar, at a site without electricity, the stock can be cut with the cutter/bender.
Without electricity, rebar can be cut to length with an oxyacetylene torch or a cutter/bender (photo above). Lacking a torch, we use the slower cutter/bender, mounted on a 2x8 for stability, and cut one piece at a time. Available from masonry-supply houses and some tool catalogs, cutter/benders have cast-steel heads, feature replaceable cutters, and cost $250 to $300. Many cutters have a 52-in-long handle that gives you plenty of leverage. Even so, the process is slow, and if we’re cutting #5, grade-60 bar, we really have to throw our weight into it.
TIP: The best way to mark steel for cutting is with a quick shot of spray paint from a can designed to work upside down. |
We’ve found that the best was’ to mark steel for cutting is with a quick shot of spray paint from a can designed to work upside down. With anything else, the marks can be pretty hard to see. Exact length is seldom critical with rebar. Because it’s designed to overlap, if you’re off by an inch, it usually doesn’t matter.
The easiest way to bend rebar is with the cutter/bender. After measuring and marking bends with paint, we lay the stock under the head and lever it into shape, using the tool head as a fulcrum. The stock has to be in a straight line when bent. Although some of the newer models have stops at 90-deg and 180-deg, we just eyeball the bend and adjust as needed. We’re careful not to overbend an angle, though, because you can’t use the bender to bend it back and because it’s hard to do using your hands and feet.
To save time, we’ll often bend corners while were waiting for the forms to be completed. If we need more than one bend in a piece of rebar, we’ve found it’s easier to lap with another bent bar; it’s awkward to make multiple bends on site, especially with long lengths. In a pinch (such as when we don’t have the cutter/bender), we have bent bars around the pintle on my truck’s hitch plate, but I wouldn’t want to do more than a few bends this way.
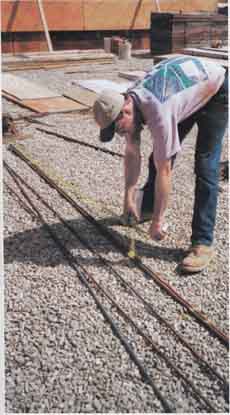
Spray paint marks the spot. A spray can that’s made to shoot
upside down marks the position of bends or cuts on a piece of rebar. The
mark Is waterproof, easy to read, and nearly indelible.
Wiring the Rebar Together until the Pour
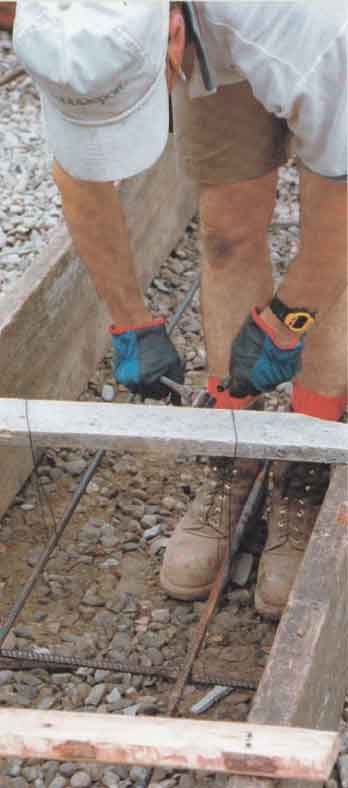
To lap or cross rebar, we use pre-looped wire ties photos, facing page). Commonly available in lengths of 6 in. and 8 in., the latter are handy for tying together pairs of #4 or #5 bars. A bag of 5,000 8-inch ties costs about $45 and will last for several residential-size foundations. Wire is also available on spools, but we find that less convenient.
The simplest tie requires merely bending the tie diagonally over the bars and , using a tool called a twister, hooking the loops and spinning the wire.
Over-twisting the wire will simply break it. (The wire adds no strength or integrity once the concrete has been placed.) The twisted wire is then wrapped around the bar so that it doesn’t ex tend toward the exterior surface of the concrete. The wire might rust if it remains exposed to the elements or could lead water into the embedded rebar if exposed below grade. Incidentally, spools of wire are also handy for hanging the rebar at a consistent height in the footings. Because the tooting is covered later by the waterproofed Inundation wall, the wire is never exposed to the elements.
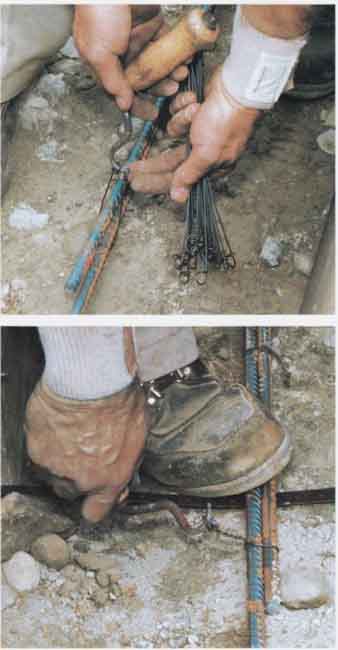
Pre-looped wire ties are twisted around the Junction of
two pieces of rebar to hold them in place until the concrete is poured. The
wooden-handled hook (top), known as a twister, speeds up the process. On
longer runs or in place of multiple bends, rebar can be lapped (bottom).

The overlap should be a mini mum of 36 bar diameters and tied together with wire in two places.
Keeping Rebar at a Consistent Height:
Rebar Maintains Control of Concrete Shrinkage
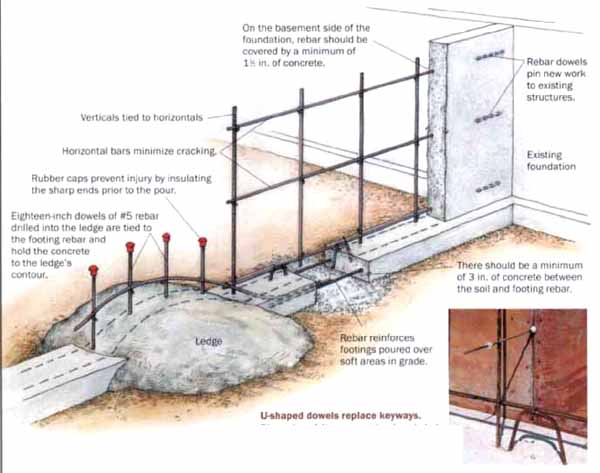
In addition to solving problems related to shear or tension, rebar is also specified for shrinkage control of concrete (drawing below). Because the water in poured concrete is lost by evaporation as it cures, concrete shrinks in volume. Rebar doesn’t prevent shrinkage but binds both sides of the eventual cracks into a single wall plane.
According to Tom Bierce, a structural engineer from Boston, Massachusetts, “This shrinkage will result in 1/16”, to 1/8” cracks at about every 20 ft. at the top of an unreinforced wall. Add more water to the concrete, and you get more shrinkage— cracks that are perhaps every 10 ft. to 15 ft.—and the concrete is weaker. Horizontal bars will minimize the cracking by causing multiple fine line cracks instead.”
Bierce also says, “Temperature and shrinkage-designed steel for the average 10-in-thick residential foundation is commonly spaced on 12-in, centers, or every 10 in. horizontally for #4 bars and every 15 in. for #5 bars.” For horizontal placement in wall forms, we almost always tie rebar to the tie rods (or form ties) that hold the outer and inner concrete formwork together. After the concrete subcontractor sets up the outer wall and pushes the tie rods through, we place the steel on these tie rods and wire the rebar to them. The verticals are tied to the horizontal bar and to U-shaped dowels in the footing (see ill. below).
Although steel is specified for its temperature and shrinkage control, Bierce says, “ninety-nine % of the time, steel is de signed for shrinkage, not temperature.” Some exceptions would be bridges, concrete roadbeds, and large retaining walls built on highways exposed to direct sun.
Rebar Makes the Average Foundation Better In a typical situation, rebar is placed in a foundation wall to prevent cracking and to strengthen the wall. The exact type and placement of the rebar varies from job to job and is always determined by the structural engineer.
|
Tip: Spools of wire are handy for hanging the rebar at a consistent height in the footings. Because the footing is covered later by the waterproofed foundation wall, the wire is never exposed to the elements.
Rules for Placing Rebar
Here are some general rules about placing rebar that can be applied to most situations:
• In footings and walls below grade, rebar should be covered with at least 3 in. of concrete to protect it from groundwater and soil.
• Inside a wall, rebar is positioned on the tension or inner (basement) side with approximately 1 1/2 in. of concrete cover.
• The horizontal shrinkage-control steel is placed first in the wall, followed by shorter vertical bars placed to the inner unrestrained side of the wall.
One note: If there is a dense mat of steel in a slab or wall, it may be necessary to vibrate the concrete with a pencil vibrator to consolidate the concrete without leaving voids.
Prev: Avoiding Common
Masonry Mistakes
Next: Placing a Concrete
Driveway
