Except for doors and windows, a house—that is the frame, walls, roof, and foundation—has no moving parts. it's basically a static structure that sits on the land. The only movement in the frame and structure of a house is caused by dynamic forces in the earth. Any wear and tear on the house is caused by the elements, the pressures in the earth, and by the occupants in the house.
THE SYSTEMS
There is more to a house than just the structure. A house has systems: the plumbing system; electrical system; and heating, ventilation, and air conditioning system which route water, electricity, and climate control throughout the house. These systems are prone to breakdowns because they have a number of moving parts and the mediums they carry -- water, electricity, and air -- also exact a toll on the hardware as they course through the system.
For this reason, the house systems of ten seem to malfunction or breakdown when they are being used. There is no way to eliminate malfunctions entirely, but they can often be reduced with a timely inspection of each system and a little preventive maintenance. The inspection checklist for each system will offer some guidelines for checking potential trouble spots in each system, and suggest possible remedies.
HOW THEY WORK
The homeowner should have some understanding of how each system works.
In addition, the homeowner should know how to shut down each system either for maintenance or in the event of an emergency. This means knowing exactly where the main shutoff valve is for the plumbing system. For the electrical system, it's essential to know the location of the electrical service panel and which breakers to flip to shut down the entire system or just an individual circuit. By the same token, the homeowner should know where the operating controls or power switches are for the heating and air conditioning systems.
When making an inspection of any system, be it the electrical, plumbing, or heating, ventilation, and air conditioning systems, it may be helpful to visualize it as a loop with a supply point and an exhaust or discharge point. The sys tem takes energy—electrical or heat or water—and distributes it throughout the house.
The system must also vent or discharge the by-products of the loop from the house. The electrical system must return electrical current to the ground. The plumbing system has to discharge dirty water and waste through the drain. The heating system must vent combustion gases to the outside of the house. Any break or obstruction in the loop can cause a malfunction or even shut down the system. Admittedly, this sounds like an oversimplification, but it can be useful in visualizing the basics.
In order to evaluate, inspect, or troubleshoot a system, it’s best to start at the supply point. Make sure that the system is supplying the energy or water. Look first at the service panel in the electrical system, the incoming, pressurized water line in the plumbing system, and the furnace in the heating system. Proceed along the supply network, examining the various components, such as outlets, switches, faucets, heat registers, and radiators, to make sure that they are in good repair and functioning properly.
Next, consider the discharge or vent part of the loop. This is the segment that is often neglected in the inspection because it's less dynamic than the sup ply side, but it's just as vital. Make sure that the electrical system has a good ground, the heating system is properly vented, and all the drains in the plumbing are working up to capacity.
LEARN MORE
As you conduct your inspection, make an effort to analyze how all the parts and components function and how they integrate into the overall picture. If you don’t understand how something works or what it's supposed to do, make a note of it. When you visit a home center or hardware store, describe the component and ask the dealer or service representative for an explanation. In addition, read through this book to gain a greater understanding of the systems in your house.
Gradually you will acquire a working knowledge of how electricity, heat, and water are delivered to the parts of your house. You will also have some idea as to what can go wrong, where to begin troubleshooting, and how to fix the problem. Even if you can’t fix the problem yourself, you will be able to work with a service technician to describe the malfunction and later to evaluate if the repair work is satisfactory.
PLUMBING CHECKUP
Malfunctioning drains and faucets are the most common problems in the plumbing system. Start by partly filling the sinks or bathtub with water with the stopper in place. Wait a few minutes to see if the remains slowly seep out. Seeping water is an indication that the drain assembly is faulty. Drain the water, then remove and clean the assembly.
If the water remains in the basin, open the stopper and watch the water flow out. If the drain flow is slow, either the drain assembly, the trap, or the drain line is partially clogged. If all the drains in the house run slowly, then the clog is in the main line, not in an individual trap or line.
FAUCETS
Look at all the faucets, this includes hose bibs or exterior faucets, for drips or leaks. If water drips from the spout of a compression faucet, the seat washer needs to be replaced. If this does not fix the problem, grind or replace the valve seat. If water leaks around the stem, replace the packing washer.
Rotating ball faucets and ceramic disk faucets that drip need new inlet seals. Repair by replacing the cartridge element in a leaking cartridge faucet.
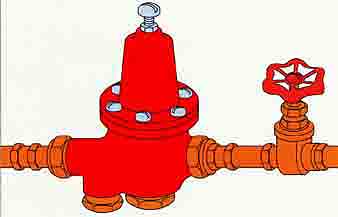
THE MAIN SHUTOFF VALVE controls the water supply coming into
the house. Near the valve may be a pressure-reducing valve. You can change
the water pressure by turning the adjustment screw on top of the pressure-reducing
valve.
TOILETS
Check the toilet by flushing it a few times. Common toilet problems include: a loose handle, a handle that sticks or is hard to push, improper flushing action, continuous running, and leaks from the tank or around the base of the bowl.
A toilet handle that is loose can be fixed by tightening the mounting nut inside the tank. A corroded mounting nut can cause the handle to stick or be come hard to turn. The mounting nut should be replaced.
If the toilet doesn’t flush completely, the flapper valve lift chain needs adjustment. If the toilet flushes sluggishly or if it overflows, the toilet trap is probably clogged. It can be cleared with a plunger or with an auger.
Leaks around the tank may be caused by condensation forming on the outside of the tank (this usually happens in hot, humid weather). Insert panels of rigid foam insulation inside the tank against the walls to insulate the tank and prevent condensation from building up. Water will drip from the tank if the mounting bolts underneath are loose or if the washers around the bolts are worn. Replace the washers, if necessary, and then tighten the bolts.
Leaks around the base of the bowl will occur if the wax gasket around the toilet base horn deteriorates. The solution is to lift the toilet off the floor and replace the gasket.
HOT-WATER HEATER
Inspect the hot-water heater yearly. Look at the base of the tank for leaks. Any drips or puddles are an indication of a damaged or corroded tank. The tank can't be repaired, but should be replaced as soon as possible.
Test the pressure-relief valve by lifting the valve, then letting it snap back to position. The valve should discharge a burst of water. If not, have the valve replaced by a plumber. Flush the tank at least once a year by opening the faucet near the bottom of the tank. Allow a gallon or two of water to run in to a pail. This flushing will remove the sediment that collects in the bottom of the tank.
If you have a gas heater, remove the burner cover and inspect the flame. It should be bright blue. If it's yellow, the burner may be dirty and it should be cleaned by a technician immediately.
PIPES, DRAIN, and VENT STACK
Position yourself in the basement and have someone in the house above open a faucet and let the water run. The faucet should then be quickly shut off. Listen for banging or knocking in the pipes as the valves are opened and closed. The sudden change in water pressure causes the pipes to knock against the framing members. This condition is called a “water hammer.” You can correct it by installing rubber pads between the pipes and boards, securing the pipes with sturdy hangers, or installing air chambers or hammer arrestors.
In addition to inspecting the supply pipes it's also a good idea to inspect the drain system. Start by inspecting each drain trap in the house. These are often ignored because they don't contain water under pressure; leaks go un noticed unless a lot of water is being flushed down the drain. Look at the traps for signs of corrosion, rust, or deterioration. Run water into the basin or sink and let it drain. Inspect the trap carefully as water is running through it to make sure it’s watertight. Listen to the sound of the water as it drains. Heavy gurgling sounds are an indication of improper venting in the drain system. Call a plumber to correct it.
Check all connections to make sure they are tight. You can usually do this with your hand, because most traps have chrome or brass connecting nuts. Over-tightening them can strip the threads. If you do find a loose connection, hand-tighten it, then give it an extra quarter turn with a wrench.
Take the time to sniff at the drain opening in the sink for the odor of sewer gas. There should be no odor; if there is, call a plumber. Check the diameter of all drain pipes and make sure they are adequate for the fixture. Bathroom sinks should have a 1 ¼ -inch diameter drain. Bathtubs, kitchen sinks, and clothes washers should have a 1 ½ inch diameter drainpipe.
Next, go to the basement and locate all of the floor drains. These drains have hubbed fittings that can be opened with a wrench. Open them up to make sure the traps only have water and not sludge or debris. After cleaning them out, pour fresh water in the trap.
The drainage system has to be vented so the waste water will flow properly. The vent stack runs from the waste pipes vertically through the roof. You should inspect the vent stack annually to make sure it's free of obstructions. If it's blocked, the plumbing system can not operate properly. Inspecting the vent stack is simply a matter of looking down the pipe with a strong flashlight. Unfortunately, this inspection can only be made from the roof.
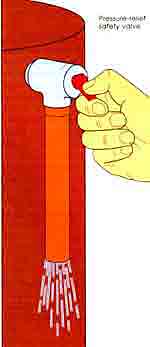
TO CHECK THE PRESSURE-RELIEF VALVE on a hot-water heater, pull
on the valve level, then release and allow it to snap back into place. The
valve should release a burst of water.
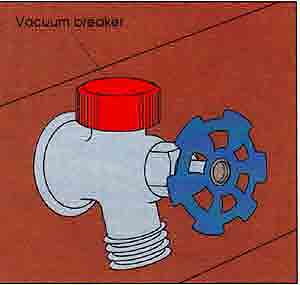
OUTDOOR FAUCETS should be equipped with a vacuum breaker. This
will prevent contaminated water from being drawn back into the water supply
if the water pressure suddenly drops.
ELECTRICAL CHECKUP
The electrical inspection begins at the service panel. Look at the panel to make sure the metal casing is not rusted or corroded. Rust indicates possible water damage that may affect the wiring inside. If any part of the box is rusted, have it inspected by a professional electrician. In addition to a visual inspection, place your ear close to the panel (but not in contact with it) and listen for any buzzing sounds. A buzzing sound can be caused by electrical arcing or vibration and is indicative of a loose connection inside the box.
If your service panel has fuses, there should be an ample supply of spare fuses nearby in case of an emergency (Never insert pennies or any other metal object in the fuse socket in an at tempt to bypass a blown fuse. This could cause an electrical fire.) As an added safety precaution, you should al ways keep a spare flashlight by the ser vice panel in case you have to check the fuses or breakers in the event of a major power overload.
PROPER GROUNDING
Next you will want to check the receptacles throughout the house to see if they are properly grounded. For this, you will need a circuit analyzer, a small hand-held device that is available at any electrical supply store for less than five dollars. Plug the analyzer into the outlet and read the pattern formed by the lights across the display panel of the instrument.
Match the light pattern against the chart on the body of the instrument to see if the outlet is grounded. don't assume that an outlet is grounded just be cause it has a three-hole receptacle. Circuits without proper ground connections should be corrected by a licensed electrician.
When checking any outlet, see if it's warm to the touch or if there is a humming sound. Sometimes this is caused by an internal fault in the receptacle. It should be replaced. Dust or debris in the electrical box or loose wires can also cause the outlet to hum or overheat. Shut off power to the circuit, then pull the receptacle from the box. Vacuum the box and check all wires to make sure they are secure.
If the outlet is installed in a paneled wall, remove the cover plate and look at the outlet box. It should be flush with the wall surface. Sometimes when do-it-yourselfers panel a wall, they neglect to pull the box forward and there is a gap between the edges or the box and the cover plate. This is a code violation. An easy way to correct this is by buying an electrical box extender at an electrical supply store. This is simply a metal sleeve that fits within the box and ex tends to the cover plate.
In the bathroom and kitchen, you will have special receptacles called Ground Fault Interrupters (GFI). GFI outlets should be tested weekly to make sure they are functioning properly. Fortunately the test is simply and does not require any special equipment. Simply plug an appliance, like a hair dryer, into the GFI and turn it on. Press the test button in the center of the GFI—the appliance should go off. Press the reset button on the GFI and the appliance should start up again. If not, replace the GFI.
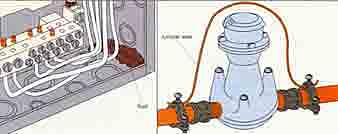
INSPECT THE MAIN SERVICE PANEL for rust spots. These might indicate
that water has leaked into the box and could possibly cause a short circuit.
WHEN A WATER METER is connected to the incoming water line, it can break the
electrical ground connection. Install a jumper wire around the meter to restore
ground continuity.
LIGHT FIXTURES and WALL SWITCHES
Check all wall switches to make sure that they operate without humming and that they are cool to the touch. Replace any switches that you suspect are damaged.
Check all installed incandescent light fixtures by turning the wall switch on and off. The light should come on with out flickering. Flickering indicates a loose bulb or faulty wiring in the socket. Tighten the bulb, then check the wiring in the socket.
There is no need to open up every light fixture to inspect the wiring unless you suspect a malfunction. If, however, you have reason to check out the wiring, check to see that all connections are made with solderless connectors (also called wire nuts) and not electrical tape. Electrical tape is dangerous be cause it disintegrates over time and leaves bare wires exposed. This is usually not a problem in newer homes, but it can be prevalent in older homes. If you find a fixture with taped over connections, switch off the power, remove the tape, and install solderless connectors. Then inspect the other fixtures in the house for the same problem.
Inspect all fluorescent light fixtures. Black deposits around the ballast indicate that the ballast is worn and should be replaced. If the light flickers or hums it could mean that the light tube is defective or it may not be properly seated. These are easy problems to connect. In some cases flickering or humming may be caused by cracked sockets. In this case the entire lamp should be replaced.
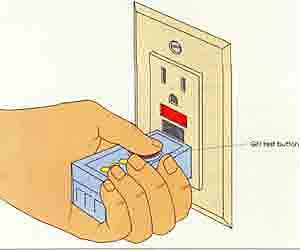
USE A CIRCUIT ANALYZER to test outlets for proper ground connection.
Some circuit analyzers have a button to make a GFI test.
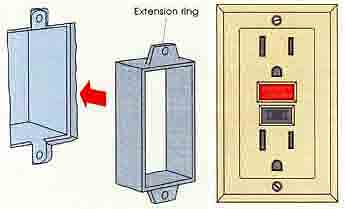
IF AN ELECTRICAL BOX IS RECESSED below the wall surface, install
an extension ring to bring it flush with the surface. THE GROUND FAULT INTERRUPTER
(GFI) has a small internal transformer that senses current leaks.
HAVC CHECKUP
The heart of a heating system is the burner unit, so check it first. In general, it's best to have a service technician look at the unit every year to clean it and make any adjustments. Still, you can inspect it by yourself from time to time to familiarize yourself with the unit and make sure it's functioning correctly.
If the heater is a gas-fired heater, look at the color of the flame. It should have a blue-green inner flame surrounded by a yellowish flame. If the flame is all yellow, the air orifice may be clogged. If the flame is all blue, the burner is getting too much air.
HEATING UNITS
Oil burners need a little more maintenance. Again, it's a good idea to have a service technician inspect the unit every year. He should clean the firebox and also clean and adjust the flame orifice on the burner unit. In addition, he should also lubricate the motor (unless it's a sealed unit) and change the oil filter; if not, you can do this yourself.
Electric units require little maintenance since they have no moving parts. However, the electrical connections can loosen or break over time. At least twice a year, check all terminal bars (do this with the power off) for loose or dam aged connections. Tighten loose terminal screws and replace worn or frayed wires.
The burner heats the medium—air, water, or steam—that distributes the heat through the house. You will next want to inspect the heat distribution system for your unit.
For a forced hot-air system, you need to first check the blower assembly then the heating ducts. At the blower assembly, check the drive belts for proper tension. Adjust the belt tension, if necessary, and replace the belt if it's worn or frayed. Next, check the blower fan (also called the “squirrel cage”). Use a vacuum cleaner to remove any dust or debris. For stubborn dirt or oil deposits clean the unit with a degreaser. Finally replace the air in the return duct.
Next look at the registers in the individual rooms. Use a vacuum cleaner to remove any dust that may be lodged in them. Check all the dampers and registers to make sure they are positioned correctly. The position of each may vary depending on the amount of heat being delivered to a particular area. If that area is too warm or cool, you can re adjust the damper.
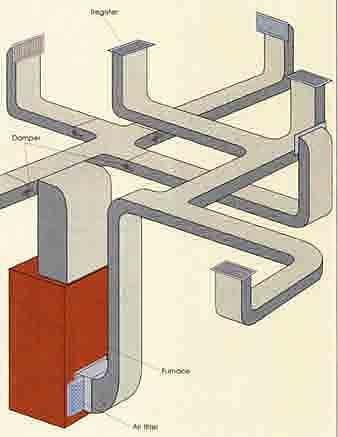
FORCED-AIR SYSTEMS should be inspected each year. Make sure
the registers are clean and warm air is coming from them. Air filters should
be changed when they are dirty.
A hot-water heating system will not operate efficiently if sediment and sludge accumulate in the water lines, or if air builds up in the radiators or con- vectors. At least once a year, you should drain water from the boiler system. Go to the boiler and place a pail under the drain faucet. Close the water inlet valve, then open the drain valve and allow at least a gallon or two of water to flow in to the bucket (be very careful because this water may be boiling hot). At first, the water may be dirty or rusty. Continue draining until the water runs clear, then close the faucet and open the faucet on the supply line to replace the drained water in the system.
Next, bleed the radiators or convectors. Position a pan under the bleeder valve, then open the valve. At first, air will come out of the valve, then water will flow. At that point, close the valve. Follow this procedure at each radiator or convector.
Steam systems are also susceptible to sediment and rust accumulations in the water supply. They should be drained yearly. The drainage procedure is the same as for a hot-water system (see instructions above).
Steam radiators can also collect water if they are not leveled properly. This water makes the system extremely noisy (commonly called “knocking”) and inefficient. The radiators should be pitched so they incline toward the inlet valve. The yearly inspection should include a check of each radiator with a level. Units that are level or inclined away from the valve can be corrected by placing a wedge under the legs at the opposite end of the radiator.
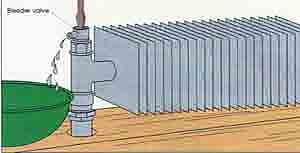
BLEED THE TRAPPED AIR from a hot-water radiator by opening
the bleeder valve. Close it when water flows from the valve.
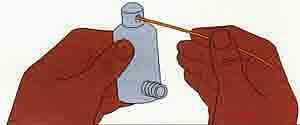
A CLOGGED VENT will prevent steam from entering the radiator.
The air vents in steam radiators can often be cleaned with a wire. You can
sometimes clean mineral deposits from the port by boiling the valve in vinegar.
If these methods fail, replace the valve.
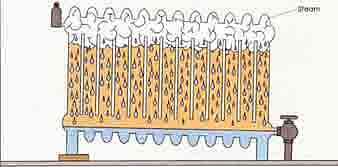
THE RADIATOR SHOULD BE PLACED on an incline toward the valve
so that condensed water can return to the boiler. To prevent knocking, open
the valve all the way.
AIR CONDITIONING UNITS
Whether you have an air conditioning system that consists of several window units or a central air conditioning system that runs throughout the house, both should be checked in the spring before the heat of summer arrives. Individual air conditioning units are very heavy. If you need to remove a unit from the window, enlist the aid of a helper.
To inspect, remove the housing and check the filters and vents. Be sure they are intact, then brush and vacuum out all dust and debris. Before attempting to clean and prep the air conditioner, make sure that it's unplugged from the socket. Clean the drain pan and inspect the drain hole. If the hole is clogged, clear it by running a stiff wire through it. Wash or replace dirty filters and oil the fan motor.
Previous: Home Structure Inspection
Next: Environmental Checklist