Burglary and vandalism cost home owners many millions of dollars each year. Every effort you put into making the security improvements discussed in this section will repay you many times in increased protection against loss and damage, and greater safety and peace of mind for you and your family. As a bonus, adding security measures may reduce your homeowner’s insurance premiums.
DETERMINING SECURITY NEEDS
A burglar has to approach a home un noticed, gain entry, and remain undetected once inside. So, in assessing your present security and what to do about it, consider the following points.
Approach. Is the house isolated or out of the view of neighbors or passing motorists? Do fences, walls, shrubs, or inadequate lighting at night provide concealment? Will exterior conditions or a lack of interior lighting reveal an empty house?
Entry. Are doors and windows equipped with true security locks, or only convenience latches? Pay special attention to sliding doors and windows. Do trees, trellises, decks, or other features make upper-story entry possible? Are basement windows and doors se cure? Is the garage secure? Does it contain tools that could be used in a break-in? If it's attached to the house, how secure is the connecting door?
Detection. Is there an alarm to scare off an intruder before entry is attempted? Are there detectors to signal that en try has occurred? Most burglaries take place when no one is home, or at a time when no one is awake to hear a break-in.
Many police departments offer free assistance in making a security survey.
Evaluating Home Security
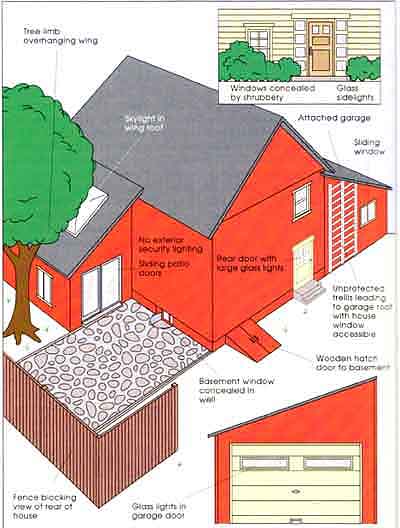
CAREFULLY CHECK EACH OF THE FACTORS SHOWN ABOVE. In addition
to inadequate locks and latches on doors and windows, they are the weak points
in most homes. See the info below for information on dealing with these and other problems. Tree limb overhanging wing; Windows concealed by shrubbery;
Fence blocking view of rear of house; Glass lights in garage door.
SECURING DOORS
A good door lock is very important, but only if the door itself is strong and secure. Here are some ways to secure hinged doors (see below for sliding door security). For working techniques, see sections 19 and 24.
• Use only solid-core doors at least 1 3/4 inches thick for exterior entries, including into an attached garage. Choose metal-clad doors if possible, especially for side and rear entrances. Many have hand some designs suitable for front entries.
• Be sure frames are solid. Pry between the door and jamb on each side. If the jambs move or the gaps widen at all, re move the inside casing, insert solid blocking, and nail through it into the studs.
• Replace glass in sidelights and the door with shatterproof plastic (see below). If you want to see the exterior, in stall a peephole door viewer.
• Be sure hinge screws in the door leaf are at least 2 inches long, and that those in the jamb leaf reach well into the studs behind—a minimum of 3 inches.
• If the barrels of ordinary hinges are on the exterior side of a door, the pin can be driven out and the door opened. You can install either hinges that have non-removable pins, or security stud hinges. With the latter, when the door is closed a stud attached to one leaf projects into a hole in the other leaf. You can make your own security studs by replacing one screw in each existing hinge with a lag screw. Drive it 2 inches into the door, and cut off the head to leave a 3 stud. Remove the opposite screw in the jamb leaf for the stud to enter, or drill a hole if the leaf holes don't match.
• Replace glass in garage doors and windows with shatterproof plastic. Cover the inside to block the view of the interior. Change the factory-set frequency of a remote-control door opener. When you leave on vacation, or any other extended period, turn off the power to the door opener or fasten a padlock through the track just above one of the rollers.
• Use metal or metal-clad doors over exterior basement steps. Sink the hinge barrels flush in a concrete curbing. Put security crossbars at two points on the underside of the door or doors.

INSTALL BLOCKING, with nails through the jambs into the studs,
if the frame flexes when you pry between it and the door. REPLACE GLASS LIGHTS
with shatter proof plastic so the lock and hinges can't be reached. Install
a peephole to see outside. USE LONG HINGE SCREWS: 2-inch screws into the door,
3 inches or longer to reach through the jamb well into a stud.

PROTECT EXPOSED HINGES by replacing one screw in each huge
with a stud that fits into the jamb leaf when the door is closed. USE SHATFERPROOF
PLASTIC in garage windows. Padlock the track or turn off the power for long-term
security. SECURE BASEMENT DOORS with sliding crossbars on the underside. Recess
hinge barrels in concrete to protect them.
LOCKS FOR DOORS
A door is held shut by a spring latch that moves when you turn the handle or that is pushed back when its slanted face hits the strike plate on the jamb. A door can be locked securely only by a bolt that en gages the strike plate. A deadbolt has no spring and is moved by turning a key in a cylinder lock, or an equivalent lever. To provide real security a deadbolt must extend at least 1 inch into a substantial strike. An exposed key cylinder should be protected with a guard plate if possible.
There are four major kinds of key- operated locks used on exterior doors: locksets, mortise locks, rim or surface- mounting deadbolt locks, and cylinder deadbolt locks. Two other kinds, cross bar and brace locks, are more cumber some and less attractive, but offer even greater security. These locks, and related fittings, are covered on this page. Most models come with do-it- yourself installation instructions.

FOUR KINDS OF LOCKS COMMONLY USED ON RESIDENCE EXTERIOR DOORS.
Many models of each kind are available, to suit any style door. All can be
installed with an electric drill, chisels, and a screwdriver or two. Installation
instructions usually include templates for marking hole and mortise positions.
Pushbutton; Strike; Key side; Key; Deadbolt; Latch; Double-cylinder deadbolt
lock; Vertical bolt
LOCKSETS
In a lockset, also called a cylindrical or key-in-knob lock, the entire mechanism is built into the doorknob. The outer knob has a key cylinder and the interior knob has a pushbutton or turn lever to operate a deadlatch—a spring latch plus a deadbolt plunger that prevents opening the latch with a plastic card.
While very popular for their trim, modern appearance, all but the most substantial (and most expensive) lock- sets offer only limited security. The outer handle containing the key cylinder can be sheared off with a few blows from a sledgehammer. Then the mechanism often can be operated with a screwdriver. Exterior-door locksets are installed in the same way as tubular locks for interior doors.
INSTALLING LOCKSETS
Use the template provided to locate the position of the holes for the cylinder (on the door face) and the bolt (on the door edge) and all pilot holes for mounting screws. Use a 3/4-inch drill bit to drill the pilot holes. Use a hole saw to cut the large hole for the cylinder. Start the hole on one side of the door and bore halfway through. Remove the hole saw and finish the hole from the other side.
From the edge of the door, drill the hole for the latch bolt with a spade bit. Insert the bolt mechanism into this hole and mark the outline of the latch plate on the door surface. Remove the plate and the bolt, then cut a mortise for the plate with a chisel. Replace the bolt- plate mechanism and screw the plate into the mortise. Insert the exterior knob and cylinder into the large hole. Mate the cylinder mechanism with the latch bolt. Place the exterior knob and rose plate on the opposite side of the door and secure it with screws.
Mark the position for the strike plate on the door jamb; be sure it aligns with the latch bolt. Use a sharp chisel to cut a recess for the plate, and a spade bit to bore a hole to accept the latch bolt. Fasten the plate in place with screws.
MORTISE LOCKS
The mechanism of a mortise lock fits into a pocket cut into the edge of the door. The spring latch is operated by a doorknob on both sides, or by a thumb lever above a fixed handle on the out side. Pushbuttons in the edge of the door can block operation of the latch from the outside. Security locking is provided by a separate deadbolt that is operated by a key from outside and a lever from inside.
The pocket for a mortise lock can be a weak spot in the frame of a conventional wood door. Adding a reinforcing plate is a wise measure.
RIM LOCKS
A rim lock—a surface-mounting dead- bolt, or night latch—fastens on the back side of a door stile and has a deadbolt that engages a strike mounted on the jamb. it's operated by a small knob (thumb-turn) on the inside and by a key from the outside. The key cylinder ex tends through a hole in the stile.
The deadbolt may move horizontally into the strike, or vertically. A vertical bolt is more secure because it engages holes in the strike and can't be popped out by prying the door away from the jamb. The strike should have an L shape that mounts with screws from two directions. Rimlocks are easy to install and provide good security if bolted rather than screwed to the door, and if strike screws reach into the studs.
INSTALLING RIM LOCKS
Tape the template to the door and use an awl to make the center points for each hole. Use a hole saw to bore a large hole for the cylinder mechanism. Drill four smaller holes 1/2-inch deep with a 1-inch drill bit. These are pilot holes for the lock mounting screws. Slip the cylinder into the large hole and attach the reinforcing plate. Position the lock case over the reinforcing plate, making sure that the tailpiece from the cylinder fits into the corresponding slot in the lockcase. Secure the lock case to the door with mounting screws.
Close the door so the bolt mechanism on the lock case rests against the edge of the door frame. Use a pencil to mark the outline where the lock case mates with the door frame. The strike plate will be positioned within this outline. Hold the strike plate in position and mark the location of the screw holes.
Drill two pilot holes, then screw the strike plate to the door frame.
For added security, you can buy a cylinder guard at a locksmith’s or hard ware store and mount it over the cylinder on the exterior side of the door. Place it over the cylinder and bolt it in place with four carriage bolts.
How to Install a Rim Lock
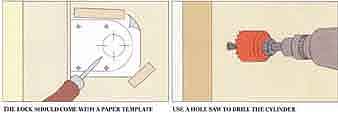
THE LOCK SHOULD COME WITH A PAPER TEMPLATE. Tape this template
on the door and mark the places where the holes should be drilled. USE A HOLE
SAW TO DRILL THE CYLINDER hole in the door. Drill screw holes with a -bit,
or follow the manufacturer’s instructions for the preferred size.

FROM THE EXTERIOR SIDE OF THE DOOR, insert the cylinder into
the large hole making sure it aligns properly. Secure it with the reinforcing
plate. POSITION THE LOCK CASE on the door. Align the slot in the case with
the connecting bar from the cylinder. Screw the lock case and keeper in place.
CYLINDER DEADBOLT LOCKS
A cylinder deadbolt lock is installed in the same manner as a cylindrical lock- set. A single-cylinder lock is operated with a key from the outside and a thumb turn from the inside. A double- cylinder lock requires a key on both sides. This prevents anyone from operating the lock after making a hole to reach inside. However, in an emergency, anyone inside can get trapped. For this reason, some communities ban double-cylinder locks in residences.
Cylinder deadbolt locks offer excellent security when they are properly mounted in a substantial door. Depending on the design of the lock and the thickness of the door, some cylinders protrude on the outside. They must have tapered guard rings of case-hardened steel to protect them from being gripped with a wrench or attacked with a hammer. A cylinder deadbolt or a rim lock is often used in addition to a mortise lock or a lockset, for increased security.
INSTALLING CYLINDER DEADBOLT LOCKS
Installing a cylinder deadbolt lock involves drilling two holes for the lock mechanism. The one through the face of the door contains the locking mechanism within the cylinder. The bolt mechanism will slide into the other hole, which is drilled perpendicular to the first, through the edge of the door.
Use the paper template provided with the lock to mark the position of the holes. Use a hole saw to drill the first hole. Start cutting the hole from one side of the door. Drill halfway through, then finish the hole from the other side. Use a spade bit to drill the second hole. Start from the door edge and drill into the cylinder hole. it's important to drill the holes precisely, otherwise the cylinder and the bolt mechanism will not be properly aligned.
Insert the bolt mechanism into the appropriate hole and mark the outline of the bolt plate on the edge of the door. Use a sharp chisel to cut a mortise for the plate. Insert the cylinder into the hole—you may have to pull the bolt out first. Bolt the retaining plate to the cylinder, then position the thumb turn (or key lock) and bolt it to the cylinder. Make sure the bolt mechanism is engaged in the cylinder, then turn the key and thumb turn to test for operation.
Position the strike plate on the jamb and mark the position for the bolt hole and mounting screws. Drill pilot holes for the screws and use a chisel to cut a recess for the bolt. Secure the plate to the door jamb with screws.

A CROSSBAR LOCK mounts on the back of a door. Operating the
center lock moves bars into brackets on the frame-- Knob on inside, key cylinder
on outside. A BRACE OR POLICE LOCK provides triangular bracing. Like a crossbar
lock, it's very secure but not very attractive. DEADBOLT ESSENTIALS: 1-inch
minimum throw into a strike; L-shaped rim lock strike plate, for screws in
two directions.

PROTECT THE KEY CYLINDER with a guard plate over a flush mount,
or a tapered guard ring over a protruding mount. REPLACEMENT STRIKE PLATES
can improve security. All should be mounted with screws that will reach into
studs. REINFORCING PLATES protect the knob or deadbolt area of a door against
damage when a break-in is attempted.
OTHER LOCKS
A crossbar lock mounts on the back of the door, with a key cylinder in the center. Turning the key or an inside knob extends two hardened metal bars into metal braces bolted to the framing on either side, or above and below. A brace lock or so-called police lock mounts on the lock stile of the door, above the handle. A removable, heavy-duty metal rod fits into a socket on the floor to provide triangular bracing. it's operated by a key from the outside and a lever from the inside. Both kinds of locks offer substantial security.
Interior chain locks or door guards permit opening the door only partway, but offer no security. Surface-mounting sliding bolts offer various degrees of security depending on their size, design, and materials. The same is true of pad locks in hasps, which may be suitable where appearance is not important.
ADDITIONAL FITTINGS
A hardened metal guard plate, or escutcheon, covers a flush-mounted key cylinder on the outside of a door. it's secured with round-head bolts or tamperproof screws.
Extra long or L-shaped replacement strike plates can hold a deadbolt more securely than a standard, short plate. So can a strike box, which has a metal box that fits into the deadbolt mortise. All mount with four or more screws, some or all long enough to reach into the door studs. Various wraparound rein forcing plates fit over the edge of the door to protect the area where a lockset, mortise lock, or deadbolt lock is installed.
LOCKING CONVENIENCE
Some homeowners install keyed sets on two or more doors. These are locks with matching cylinders, so that the same key operates them all. This does not increase security, but avoids having to keep track of separate keys for each entrance. You can buy keyed sets and install them in existing locks of the same make.
How to Install a Deadbolt

USING THE LOCK TEMPLATE, mark the positions of the cylinder
holes and the bolt hole, then drill the appropriate holes using a 3/4-inch
drill bit. MEASURE OUT THE SPACE FOR THE BOLT HOLE on the edge of the door.
Then cut out the mortise for the bolt plate with a sharp chisel.

INSERT THE BOLT THROUGH THE HOLE in the edge of the door.
Secure it with screws. Insert the cylinder guard from the exterior side of
the door. SECURE THE CYLINDER GUARD WITH SCREWS. Install the thumb turn and secure it in place with screws. Test the handle to make sure it operates smoothly.
SECURING WINDOWS
Windows are the weakest points in the security of most homes. They are often left open or unlocked; the typical locks or latches offer little resistance to a burglar; and , of course, they are made of glass. Solutions to window security problems are covered below. For information about window construction, and installation, see Sections 18 and 24.
DOUBLE-HUNG WINDOWS
The center latch on a double-hung window will hold it shut against weather, but don't depend on it for security. Many types can be operated with a knife blade from the outside, and the narrow sash rails don't permit using long, substantial screws to mount them.
One way to secure a double-hung window is to fasten the top sash with angle brackets, and cut a rod to fit between the bottom sash and the top jamb. For more flexibility, install a pin that locks the meeting rails together. Bore a hole at a slight downward angle through the lower sash and three-quarters of the way in to the upper sash. Insert a 3-inch-long eyebolt into the holes. In an emergency, the eye will be easy to grasp. To lock the sashes partway open for ventilation, drill a second hole 5 or 6 inches higher in the upper sash stile.
Instead of an eyebolt, you can use a keyed lock with a pin. It mounts on the lower sash and fits into holes drilled into the upper sash stile at various points. A similar commercial device, a window vent guard, mounts on the upper sash and can secure a window in a partially opened position for ventilation. It can be swung out of the way to permit opening the window fully. However, it's not keyed and can't lock the window shut.
CASEMENT WINDOWS
To secure a single-sash casement window, install surface bolts at the top and bottom that slide into reinforcing plates and mortises in the frame on the latch side. For a double-sash casement window, install bolts on both center stiles that extend into plates on the header and the sill. If a casement sash swings outward, the hinge barrels are exposed. Secure the hinge edge of the sash with studs. Use the same measures with awning windows.
SLIDING WINDOWS and DOORS
Security problems with sliding windows and doors are the same; the only difference is in size. First, be sure the outer, fixed panel is securely fastened with screws from the inside, where they are inaccessible. If necessary, add angle brackets between the panel frame and the header and sill.
The simplest way to lock the moving panel is to put a stick in the bottom track. Cut it just long enough to fit between the frame and the jamb. For large panels, use a commercial bar that is hinged to the jamb and drops into a catch on the moving panel. It can be locked into the catch with a pin, or held in a bracket against the jamb when swung up out of the way. Another commercial bar telescopes to length and has a pressure-sensitive siren that sounds if the panel is moved. Mount a drop bar midway between the top and bottom of the moving panel.
The two panels can be pinned together for security. Use an eyebolt through holes in the frame, as described above for a double-hung window, or a commercial pin with a bracket and chain.
You can also install a keyed lock with a pin that enters a hole drilled in the window frame. Various locks mount on the moving panel or on the lower track.
A track lock permits opening the panel partway for ventilation.
To make sure that the moving panel can't be lifted up out of the bottom track, drive screws partway into the top track above its closed position. Put one screw over each corner, and two screws at points in between.
GRATES and GRILLES
No matter how they are locked, glass windows can be broken. Easily accessible windows can be protected by metal bars or grilles on the outside, or folding gates or adjustable burglar grates on the inside. At least one window in each room must have a quick-release security latch on the inside, for exit in an emergency.
Exterior window guards should be professionally installed with one-way screws, or welded in place. Vertical bars should have welded crossbars at the top, bottom, and center, to prevent their being spread apart with a simple screw jack. Adjustable burglar grates and folding gates, which are installed inside the window, offer a do-it-yourself alternative. To mount them, simply screw the mounting frames to the window jambs. Use screws long enough to penetrate well into the studs behind the jambs.
IMPROVING ON GLASS
Ordinary window glass provides no security. If a burglar puts tape on the glass. it can be broken virtually noiselessly. Tempered safety glass can't be cut or easily broken, but can be shattered with a strong hammer blow. The alternative is to glaze vulnerable windows with plastic or a plastic-glass laminate, or to protection glass with a security film.
Acrylic plastics (Lucite, Plexiglas, and similar products) resist impact but can be burned through with a torch. They are easily scratched and tend to yellow with age. Polycarbonate plastics (Lexan. Lexiguard, and others) in 3 or thicker single or laminated sheets are virtually indestructible, but can be burned or melted. Because they expand and con tract more than glass, reduce height and width measurements 1/16 inch per foot when having a piece cut to fit a sash. Also be sure to get the required silicone material for sealing the edges; standard glazing compound will not hold on these plastics. Plastic materials are flexible and often can be pushed out of standard glazing. To prevent that, they should be through-bolted into window frames.
Laminated glass consists of a sheet of plastic sandwiched between two layers of glass. This provides the scratch resistance of glass and the impact resistance of plastic. If the glass is broken, the plastic will hold it in place. Existing glass can be laminated by having a plastic security film applied to it. Installation must be done by a professional.
HOW TO MAKE WINDOWS SECURE
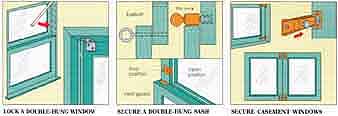
LOCK A DOUBLE-HUNG WINDOW with a stick to prevent raising
the lower sash. Secure the upper sash with angle brackets. SECURE A DOUBLE-HUNG
SASH with an eyebolt or a keyed pin lock. A vent guard limits opening the
sashes but is not a lock. SECURE CASEMENT WINDOWS with surface bolts at the
top and bottom of each sash; use reinforcing plates at the mortises.
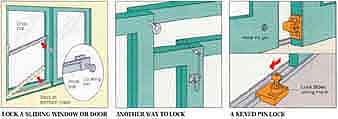
LOCK A SLIDING WINDOW OR DOOR with a stick inserted in the
bottom track, or with a locking drop bar hinged to the jamb. ANOTHER WAY TO
LOCK a sliding panel is to insert an eyebolt or a commercial pin through it
into a hole in the fixed frame. A KEYED PIN LOCK can also secure sliding doors
or windows. A track-mounting lock permits ventilation.
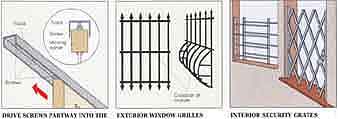
DRIVE SCREWS PARTWAY INTO THE TOP TRACK over a moving panel
so it can not be lifted up out of the bottom channel. EXTERIOR WINDOW GRILLES
should be professionally installed. A sweep type clears an air conditioner
or window box. INTERIOR SECURITY GRATES can be user-installed. One grate in
each room must open quickly and easily, for emergencies.
EXTERIOR SECURITY LIGHTING
Effective outdoor lighting is a major component of good security. The last thing an intruder wants is to be visible while approaching a home or attempting to break in. If bright lights suddenly come on, a burglar will probably be scared away. (Interior lighting is an important deterrent, too) Good lighting is also a convenience and safety factor for you and your family— for example, when you come home after dark with a trunkload of groceries, or late at night when no neighbors are likely to be awake if you should need help.
OUTDOOR LIGHTING
You can choose to have full security lighting on all night long, but that could be expensive to operate, and bright enough to annoy your neighbors. Many homeowners prefer to have inexpensive low-voltage, low-intensity lighting for convenience and safety along sidewalks, steps, and similar places. This is supplemented with bright security lighting in areas such as the back door and garage and the concealed sides of the house. The security lighting is controlled by sensors and comes on only when triggered by some one entering a protected zone. This will surprise and scare off most prowlers.
POWER SYSTEMS
The bright lights used for outdoor security lighting are usually powered by 120-volt household current. To ensure lighting even if household power is lost, you can use lights powered by conventional batteries, which must be replaced periodically, or by batteries that are recharged by the sun. Solar-charged batteries don't have to be replaced, but are not effective where sunlight is scarce in the winter or where they might become covered with snow.
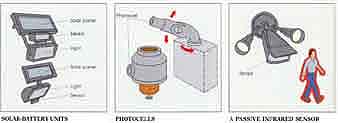
SOLAR-BATTERY UNITS need no wiring, but stay on only a few
minutes, to conserve power. Panel tilts for best angle toward sky. PHOTOCELLS
operate lights at dusk and dawn. A screw-in socket installs quickly; a box-mounting
sensor is widely adjustable. A PASSIVE INFRARED SENSOR turn on security lights
whenever a heat-radiating object comes into its field of view.
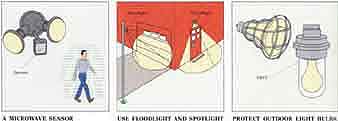 A MICROWAVE SENSOR turns on the lights whenever movement in
its field disturbs the pattern of the signal it emits. USE FLOODLIGHT and SPOTLIGHT BULBS where each will be most effective. Place lights well out of
reach if possible. PROTECT OUTDOOR LIGHT BULBS Wire cages are inexpensive;
shatterproof plastic housings also give weather protection.
SENSOR-ACTIVATED LIGHTING
Outdoor lighting can be activated in several ways: by a hard-wired switch; by a timer; by a remote radio-frequency switch; or by a sensor. The most widely used and effective sensors are a photo electric cell, a passive infrared sensor, and a microwave sensor.
A photoelectric cell, or photocell, acts as a switch to turn on a light when the surroundings become dark. You can get exterior light fixtures with built-in photocells, or you can buy accessory photo- controls that either screw in or are hard- wired (directly connected) for use with existing fixtures. If you want your general outdoor lighting to go on at dusk and stay on until dawn, choose photoelectric control. If you want the lights to go on and off at other times, choose timer control instead (see below).
For lighting that comes on only when someone enters a protected zone, choose an infrared or microwave sensor. As with photocells, you can buy fixtures with built-in sensors, or you can purchase separate sensors and connect them to existing fixtures. Most include a photocell so that they will operate only after dark.
A passive infrared sensor detects heat sources, such as people or car engines, within an unobstructed field of cover age. A microwave sensor detects any movement within a field of high-frequency energy that it emits. (For more about sensors, see below.) Many units can be set to either flash on and off or to remain on continuously for a preselected length of time. You al so can adjust the sensitivity so that a passing cat or swirling leaves will not turn on the light. The exterior units that are least prone to false triggering use a combination of passive infrared and microwave sensors.
Of course you can power an alarm as well as lights from an exterior security fixture. Or exterior fixtures can be connected to a whole-house electronic security system (see below). Then they can be set to flash or sound an alarm at any time when triggered by sensors inside the house as well as out side. Some systems also let you operate the lights from a central control panel or by remote control, from a Touch- tone telephone, for example.
LIGHTING PLACEMENT
The primary security function of exterior lighting is to deny would-be intruders the shroud of darkness. Additional functions are to ensure good visibility if you should have to exit in an emergency, and to clearly illuminate your house number to aid emergency response personnel.
Before installing any security lighting, consider fixture choices and their locations carefully. Then prune shrubs and move obstacles that would cast concealing shadows at sensitive points.
All entrances to your home, garage, and outbuildings should become well lighted as soon as anyone comes near, because those are a burglar’s most likely points of entry. The same is true of any areas that are not clearly visible from the street or neighboring homes. High- wattage floodlight bulbs are best for illuminating areas directly below a fixture. Use spotlight bulbs to reach an area from any height or distance. Use exterior or weather-resistant bulbs, to minimize the need to replace them.
Ordinary entrance lights with 40- or 60-watt bulbs are usually mounted just above the door, or alongside. Place security lighting fixtures higher—high enough on walls or poles to be out of reach. Protect bulbs at any level against breakage with wire cages or tamper-resistant plastic housings. Exposed 120- volt wiring must run through metal conduit. This is a safety requirement of electrical codes. It also protects the wiring from being cut to black out exterior lighting, or from being tapped into as a power source for a burglar’s drill, saw, or other tool.
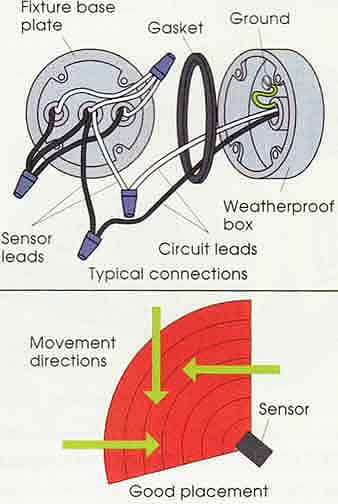
INSTALLING A SECURITY LIGHT There are many types of security light fixtures with either passive infrared (PIR) or microwave (MW) sensors, or a combination of the two. Most are designed to be hard-wired to a circular, weatherproof electrical utility box. The base of the fixture becomes the faceplate of the box. If you have existing exterior boxes in suitable locations, you can replace the present fixtures with security units. Otherwise, have boxes installed where needed. Choose each location so that most movement will be at an angle across the field of coverage, rather than directly toward or away from the detector. PIR sensors in particular are most effective with that orientation. The control switch for a security power circuit should be inside the house, inaccessible to prowlers. To replace an existing light with a sensor-equipped model, turn off the power to the circuit. Then remove the bulbs and the two screws that hold the faceplate to the utility box. Unscrew the twist connectors that join the black (hot), white (neutral), and green (ground) circuit leads to the fixture leads. Most security fixtures are preassembled and have only two or three leads that need to be connected. If there are more, check the installation instructions to identify the sensor/detector leads. Connect them to the power circuit wires: white to white, black to black, green to green. (If the fixture does not have a grounding wire, connect the grounding wire in the circuit cable to the ground terminal in the utility box.) Use screw-on caps, and tape them in place. Fasten the base of the unit on to the box and turn the power on again. A photoelectric sensor in most units deactivates them in daylight, so wait until dark to aim the motion sensor and adjust the sensitivity control. Follow the unit instructions carefully; have a helper walk in and out of the coverage zone while you make the adjustments.
|
INTERIOR LIGHTING
The primary security function of interior lighting is to make your house look occupied when you are away. That means having lights come on and go off in various parts of the house in what seems to be a normal pattern of use. (Lights can also be part of an alarm and signaling system).
You can equip lighting fixtures with screw-in photocell sockets into which you screw the light bulbs, but they will stay on all night—hardly a normal pat tern. For a varied pattern of light use, you need timer control.
MECHANICAL-SWITCH TIMERS
A basic lighting timer is a combination of an electric clock and a switch. The clock drives the timer dial. Timer operation is set by placing pegs or levers at desired times marked around the rim of the dial. As the dial rotates they trip the switch on and off.
A receptacle timer plugs directly into an outlet (or has a short cord). The lamp, radio, or other device to be con trolled plugs into the timer. A socket timer plugs or screws into an outlet or fixture and has a socket for a bulb.
Some mechanical-switch timers can be set for only one On and one Off time; others permit two or more pairs of set tings. Many operate at exactly the set times every day, but better models have optional random operation that varies the times by up to 20 minutes a day, for a more normal pattern. Almost all have an override switch so you can turn the light on or off independently without disturbing the timing.
ELECTRONIC PROGRAMMABLE TIMERS
Electronic timers can be programmed for multiple settings. They have a control ring, pushbutton, or keypad for entering timing settings, which are recorded on a magnetic chip that controls switch relays. Some provide a digital display of the settings as they are made. One such device is a timer switch that mounts in a wall box, in place of a standard switch, for automatic control.
The most versatile and sophisticated timing is provided by a solid-state master unit that controls individual appliance modules throughout the house. From a central location, it can operate lights or appliances plugged into the modules without the need for special wiring.
The control unit is plugged into any electrical outlet. Lights or other appliances are plugged into individual modules, which plug directly into existing outlets. Various control units can handle from four to ten or more modules.
Settings for each module are entered on the keypad of the control unit. At the programmed times, it transmits on/off signals either over the existing electrical wiring or by a radio frequency. Over ride switches on the modules permit manual operation of the lights when de sired, and the control unit permits independent manual operation as well. Some control units can also be operated by a remote control, or by signals from a Touch-tone telephone.
(Some garage-door openers can act as control units for up to four modules. When the opener receives a signal from its remote control, it transmits signals to modules in the house to turn lights or other devices on or off.)
BUYING LIGHTING CONTROLS
Before you purchase a light-controlling device or system, decide what functions you need—for instance, programming to the nearest minute or the nearest hour; fixed vs. variable day-to-day cycles; and remote control.
If you decide on a programmable system, the control unit and modules will each cost a good deal more than simple manual-set timers. However, security is not an expense, it's an investment. The flexibility and sophistication of a programmable electronic system make it worthwhile to get a large-capacity control unit and just a few modules as start, and to buy additional modules when necessary or convenient. The best systems can integrate lighting control with security sensors and alarms.
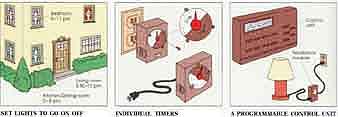
SET LIGHTS TO GO ON OFF at times that imitate a normal pattern.
Adjust ac cording to the time of year. INDIVIDUAL TIMERS are inexpensive and easy to use. Those with a random-timing option are most useful. A PROGRAMMABLE
CONTROL UNIT offers great flexibility. Lamps and appliances plug into individual
modules.
ALARMS and ALARM SYSTEMS
In addition to physical security for windows and doors, and security lighting, a well-protected house should be equipped with security alarms to signal when a break-in is attempted or takes place.
KINDS OF PROTECTION
Alarms should be used for three levels of security: perimeter protection, space protection, and point protection.
Perimeter protection is provided by alarms placed at points of entry—windows and doors. The alarms may react to detect vibration or noise, the opening of a door or window, or physical dam age to a screen or glass. Space protection is provided by alarms that monitor an area, such as a room, a hallway, or a stair. Point protection is provided by alarms set at specific, high-priority areas, such as a wall safe, a jewelry box or silver chest, and a gun cabinet. Various kinds of devices are used: motion or vibration detectors, narrow-field area sensors, pressure switches, and others.
KINDS OF ALARMS
A security alarm has two major components: a sensor or detector, and a signal unit. The signal unit may be an audible device such as a siren, bell, or horn; it may be a flashing light or beacon; or it may be a device that transmits a signal by telephone line or radio to an outside monitoring point.
Many signal units are activated when the circuit between it and the sensor is broken; others are activated when a circuit to the sensor is completed—by a switch being closed, for instance.
Some alarms are self-contained and battery powered, such as a telescoping arm that is placed between a sliding window or door and the adjacent jamb, or the meeting rail of the bottom sash and a bracket on the top sash in a double-hung window. Any sash movement sets off a piercing whistle-siren alarm built into the rod. A similar doorstop can be wedged between the floor and the back of the door. Another device hangs over the doorknob on the inside; it goes off in response to any movement of the handle.
Other alarms have sensors that are connected to nearby signal units or transmitters. The most common sensor for windows and doors is a two-piece magnetic switch. A small magnet is mounted on the window sash or door, and the switch unit is mounted on the casing, no more than /8 inch away. The switch is connected to an alarm or transmitter and is held shut by the magnet. If the window or door is opened, the switch opens and the signal unit goes off. The illustrations below show various ways of installing the switches.
Glass alarms include a vibrational breakage-sensitive disk that is adhered to a pane, and metal-foil tape that is applied to the glass all around its perimeter and makes a complete circuit as long as it's unbroken. Both are connected to a signal unit. Windows can also be protected by screens that have sensor wires woven into the mesh. Cutting the screening cuts the wires and breaks the circuit to the signal unit.
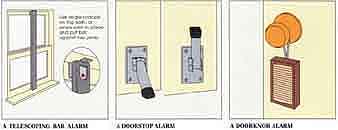
A TELESCOPING BAR ALARM can be used in a double-hung window,
as here, or between a sliding window and the side jamb. A DOORSTOP ALARM is
similar to a window bar alarm: pressure sets it off. It folds up out of the
way for normal door use. A DOORKNOB ALARM hangs on the in side; any movement
will set it off. it's good where nothing can be fastened to the door.
Area sensors/detectors use either field or beam coverage. A passive infrared unit detects the heat from a body that enters its field of coverage. An active infrared unit emits a beam that is reflected back to a receiving cell in the unit. Anything passing through the beam breaks the circuit, which sets off the associated signal unit. An active microwave or ultrasonic unit emits a field of energy and reacts if anything moves within its area, disturbing the overall reflection pattern.
Some pressure-sensitive sensors are thin switch assemblies that are held closed until a lid is raised or an object is lifted. Others are floor-mats or similar pads with multiple switch contacts in side. When they are stepped on, the circuit is completed to the signal unit.
ALARM SYSTEMS
If you want protection by a commercial security service, you must pay to have your house wired with sensors and alarms, and you must pay a monthly monitoring fee. The house system has a telephone or radio link with a central monitoring station. In most systems, when a sensor is tripped one or more alarms goes off in the house and a signal is flashed to the center. The telephone goes dead to outgoing calls until after the center calls the house. If there is no answer, or if whoever answers can't pro vide the code number that identifies the house, the center notifies the local police, who will then investigate.
Instead of the expense of a commercial system, you can install a system yourself with alarms wherever you want them, all linked to a control unit in what ever room you choose. You can buy components individually and assemble your own system, or you can buy complete kits with a control unit and a few or many alarms of various types, and complete installation instructions. Good basic kits permit easy expansion with additional components when desired.
SYSTEM OPTIONS
You can place independent alarms every where you want protection, but that means you need both a sensor/detector and a signal unit at each location. it's far more effective to place a sensor at each location and connect them with a central control unit and a common signal unit.
Depending on the kind of equipment you choose, you can have a wireless or a wired system. In one kind of wireless system, the sensors are connected to transmitters that are plugged into household outlets and communicate with the control unit over the house hold electrical circuits. The system is wireless in the sense of not requiring any new, special-purpose wiring, but an outlet must be near each sensor location. In the other kind of wireless system, the sensors are connected to transmitters that exchange signals with the control unit by short-range radio.
These transmitters may use house hold power or batteries (which must be checked and replaced faithfully, to maintain security). Wireless systems are quick and easy to install, but the cost of multiple transmitters may limit you to using alarms at only the most important places, and relying on physical measures to prevent break-ins at other points.
In a wired, or hard-wired, home security system the sensors are connected to the control unit by low-voltage wires. This is far less expensive than a wireless system, but it involves running wires throughout the house and connecting them. There is no complex electrical work to be done, and the thin, low-voltage wires are easy to handle. But it takes time and care to conceal the wire by drilling holes and pulling them b hind door and window casings with a fishtape or cord, or by removing and replacing moldings.
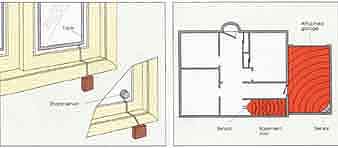
METALLIC TAPE OR A DISK-TYPE SHOCK SENSOR are best on a fixed
door panel or window sash. Both will respond to glass breaking; a shock sensor
will respond to a frame’s splintering as well. AN AREA SENSOR is an excellent
way to monitor the interior of an attached garage or a basement stairway.
Both are common wars to get into the interior of a house.
SYSTEM CONTROL
The control unit is the component that determines whether a security system s reliable and easy to use. The best units have extension keypads. The control unit is located in a safe, concealed place—often a closet. The keypads are located by the front and back or side ex its. They give you time to arm and disarm the door sensors as you come and go. However, they allow window sensors to respond without delay.
In addition to sensor/alarm controls, a controller may have timing circuits for turning lights or appliances on and off. When power is lost, the best controllers will switch to built-in batteries and revert to household current and recharge the batteries when power is re stored. They also will silence an alarm after several minutes and reset the sensors automatically if no one is home to deal with the situation. Some controllers also respond to signals from smoke detectors wired into the system.
How the control unit communicates with you is important. Some units pre sent messages in words on a display panel. If an open window in daughter Molly’s bedroom prevents arming the system, the display will read MOLLY’S BEDROOM, rather than ZONE 4, or UNABLE TO ARM. Some controllers that send signals through the household wiring can be set or activated by any Touch-tone telephone in the house. This would let you use your bedside phone to find out which sensor was just triggered in the middle of the night, or let you disable the alarm from the phone in any room when you see a guest approach.
A controller that is linked to your telephone will also accept commands from an outside telephone, or let you check the status of the system while you are away. With an autodialing unit, it can even signal you at the office, or call the police or any other programmed number.
Before buying equipment for a security system, survey your home and decide carefully where you need protection, and what kind. Then investigate what is available at home centers, electronic stores, and security equipment dealers. Ask questions, ask for recommendations and advice, and compare features and prices carefully. By doing the installation work yourself, you will be able to invest more in what will really be best for your home.
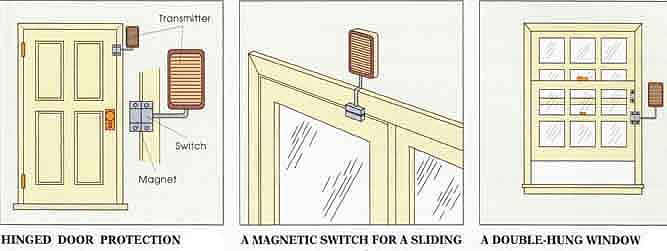
HINGED DOOR PROTECTION with a magnetic switch. Wires to a
transmitter or central control unit can run over the surface or be concealed
(detail). A MAGNETIC SWITCH FOR A SLIDING DOOR or window panel should mount
on the inside frame, at the top. See above for fixed-panel protection. A DOUBLE-HUNG
WINDOW can be protected even while open partway for ventilation, by mounting
two magnets on one sash. The upper sash must be fixed in place.
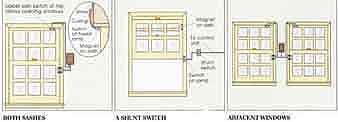
BOTH SASHES of a double-hung window can be protected by connecting
two switches in parallel to a single transmitter; see installation instructions.
Upper sash switch at top allows opening windows. A SHUNT SWITCH in a hard-wired
system or in a wireless transmitter overrides a sensor so a window can be
opened fully—but without alarm protection. ADJACENT WINDOWS can be monitored
as shown. Most wireless system transmitters can accept up to four sensors;
check the unit instructions.
Previous: Home Safety and Health Next: Homeowner’s Inspection Guide -- Introduction
