Ordering Your Ideas
As you draw, you may be flooded with new ideas, and there are some basic principles that will help keep you from being overwhelmed by this flood. The bathroom is generally a small space with a high concentration of use. The best treatments are the simple ones that employ continuous and harmonious lines, with accents of color and shape. When you’re doing a floor plan, just think about the main areas of use at first—the washbasin, tub and shower, toilet, and counter space—and the traffic patterns to and from those areas. Think about who uses the bathroom and when, and try to arrange fixtures to limit congestion in one area. Then build other structural elements around these areas, creating adequate storage space where you need it and easy access to frequently used elements—mirrors, towel bars, light switches, and outlets. The first step in any plan is to establish a sound floor plan that functions well for whoever is using the space. Everything else will follow. If you focus on function at the outset, you won’t go off in too many directions at once.
If you just want to change the look of your bathroom without making structural changes, you can start with your Existing Plan and draw new elevations: Sketch each wall head on, and play around with ideas for a new vanity, mirror, lights, surface coverings, and so on. Even superficial work on finish treatments may entirely satisfy your urge to remodel. You’ll find guidelines for this part of your design below. If you want to make more substantial changes, you’ll probably want to do a variety of floor plans first, establishing the more fundamental changes before you do elevation sketches. Take a look at the plans below. They illustrate ten variations of the single Existing Plan shown earlier. These illustrations show you how much you can do with a single bathroom. Plan 1, for example, entails “cosmetic” changes only. The remodeling consists of upgrading finish treatments alone. The idea of remodeling does not necessarily mean everything old must go and only the new can be incorporated into your design. Be sure to look for ways to use what you have. There’s no point in spending a lot of money when you can refurbish or enhance what is already there, For example, a pedestal washbasin may be inconvenient because it lacks surrounding counter space. But there may be ways to build shelf space above the basin or nearby and then feature this bathroom element. Every new bathroom need not have a basin embedded in a vanity.
Plan 2 leaves all the plumbing intact, but replaces the tub with a shower and shows yet a third cosmetic change. Plans 3-10 illustrate more substantial changes demonstrating how the same space can be totally altered to meet different needs or tastes. These sample plans should get you going and help you see new possibilities for your own bathroom. Check your brochures and the charts below for dimensions of the various elements you want to use, and then follow this same process, creating as many plans as you want. You’re likely to be surprised at what you can do with your old bathroom.
Plan 1
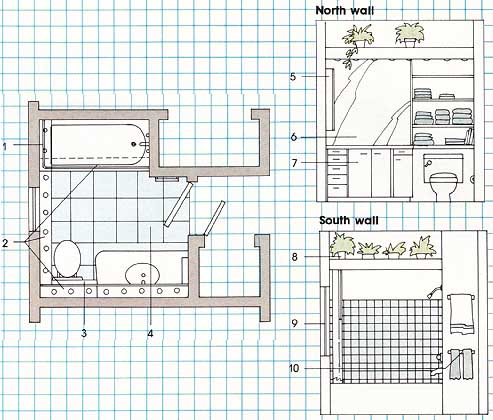
The goal of this plan is to gain storage space and to give the bathroom
a softer look. Note that none of the fixtures (tub. basin, toilet) are moved
or changed, and the tile around the tub/shower combination is retained.
By building a soffit on two walls to house lights, and over the tub to house
the shower curtain, the beginning of an integrated look is achieved.
1. Exchange glass shower doors for softer feel of shower curtain. Wrap shower curtain around end of tub.
2. Build soffit rail across north and east walls to house recessed lights, and over tub edge to cover shower curtain rod. Creates a unified line around top of bathroom.
3. Build shelving over toilet back, with shelf uprights of same material as soffit holding glass shelves.
4. Exchange sheet vinyl for 12- by 12-inch ceramic tiles, with matte finish.
5. Hang medicine cabinet to left of washbasin. Edge with same material as soffit.
6. Exchange sliding glass mirror for slightly smaller full mirror wall.
7. Repaint vanity and add new hardware.
8. Potted plants cascade over soffits.
9. Window covered with same fabric as shower curtain.
10. New towel bars.
Plan 2
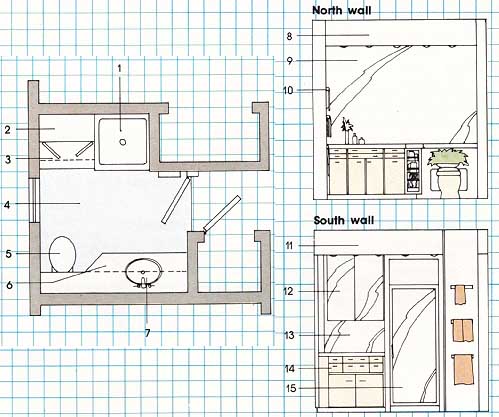
Replacing the tub with a shower creates a second area for putting on
makeup or shaving. Note, however, that the plumbing has not been changed—the
shower wall is the same as it was before, although new lighting is required
on the south wall.
1. Replace tub with shower.
2. Install vanity cabinet with storage above and below.
3. Synthetic marble counter top.
4. Lay carpet over existing floor.
5. Replace standard toilet with new low-line toilet.
6. Replace vanity with custom-built unit, including magazine racks on beveled portion.
7. Replace washbasin.
8. Install soffit full length of north wall.
9. Replace sliding mirror with single piece on full wall.
10. Install new towel bars.
11. Install soffit for lights over shower and new vanity.
12. Mirror facing on cabinet doors. Door opens from bottom. Cabinet stores linens.
13. Mirror on back wall.
14. Lower vanity has drawers for grooming items and lower cabinet with slide-out shelves for additional storage.
15. Glass shower door.
Plan 3
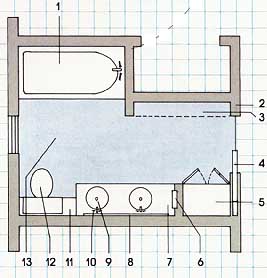
More storage and a second basin are the concerns in this plan. Because
the hall closet is used almost exclusively for towels and linens, there
is no reason why it can’t be incorporated into the bathroom itself. Moving
the bathroom door back to open directly from the hail makes the bathroom
seem much larger. A pocket door eliminates traffic problems. Shifting
the door slightly to the left as you enter the bath extends the wail on the
other side, creating space for shallow, but useful, storage shelves.
Flexible supply lines make the addition of a second basin relatively easy.
Because the entire width of the closet is not used for new storage, it can
be made narrower, which lengthens the vanity and counter top.
1. Current tub with new shower doors and fittings.
2. Extended wall creating space for storage—bath room door moved out to hail and shifted to left.
3. 8-inch shelves—with bi-fold doors for storing bathroom and cleaning supplies.
4. Pocket door.
5. New storage unit—drawers below, doors above— narrower than old closet.
6. Recessed medicine cabinet.
7. Extended vanity to take up space left from closet.
8. Mirrored wail with indirect lighting in soft it above using existing wiring.
9. Two new basins, tapping lines for second basin,
10. New fittings for basin.
11. Cabinet above toilet back for additional storage.
12. Current toilet, with new seat and cover.
13. New vinyl floor.
Plan 4
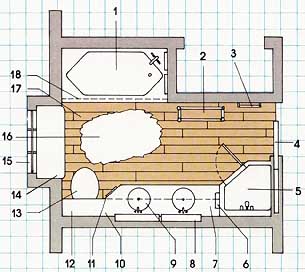
In this variation the goal is to separate the tub and shower, add a
second basin, and upgrade the overall look of the bathroom. Annexing the
entire hall closet and replacing the swing-out door with a pocket door makes
the bathroom seem significantly larger. The major plumbing change is the
addition of the shower, which requires new supply lines and tapping into
the existing drain and vent lines. Crawl space access makes this feasible.
An optional but attractive feature is the window seat. It requires breaking
out the outside wall, but adds an entirely new dimension to the bathroom.
1. New tub.
2. Freestanding storage shelves.
3. Towel bars.
4. Pocket door.
5. Corner shower in old closet space.
6. Towel bar.
7. Soil it with recessed lights over basins.
8. Recessed medicine cabinets.
9. New round basins.
10. New vanity with extension over toilet back, cultured marble counter top.
11. Magazine racks.
12. Shelves over toilet back.
13. New low-line toilet.
14. Window seat with storage below and recessed lighting above.
15. New, larger windows with louvered shutters.
16. Area rug.
17. Wood plank floor with polyurethane finish.
18. Dropped ceiling over tub.
Plan 5
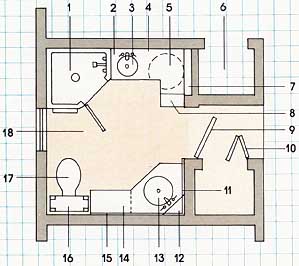
This plan provides two separate washing areas to clear up a traffic
jam at the basin in the morning. By annexing part of the bedroom closet
and replacing the tub with a shower, the design provides more space overall
and two entirely separate basins and vanities. This is the first plan that
requires significant movement in the plumbing, but it is not out of the
question when the supply and drain lines are accessible from the crawl space
under the house. Lighting over the second vanity requires some new wiring.
1. Tub replaced by shower on end wall—plumbing supply and drain lines rerouted from crawl space under house,
2. Custom-built corner vanity with drawers to left, storage beneath.
3. New round basin.
4. Mirror above vanity.
5. Lazy susan in corner of vanity for easy access.
6. Structural change to annex p of bedroom closet.
7. Recessed medicine cabinet in wall.
8. Drawers in vanity.
9. Swing-out bathroom door.
10. Bi-fold linen closet door.
11. Mirror wall extends around corner.
12. Glass corner shelves.
13. New basin set at angle.
14. Custom-built vanity with slide-out shelves for maximum storage.
15. Mirrored wall.
16. Glass shelves above toilet back—in wood frame.
17. New toilet seat and cover.
18. New vinyl floor.
Plan 6
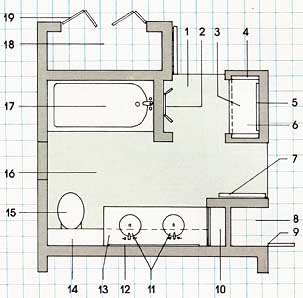
When adults and children share q bathroom, crowding at the mirror can
be a problem. Annexing the bedroom closet and creating an entrance from
the bedroom adds a separate dressing area for adults. In this case, a new
closet is built out into the bedroom, because bathroom space is needed more.
The hall closet is divided and the door changed to open into the hall. Note
that there are virtually no plumbing changes in this plan—the addition of
a second basin is easy and inexpensive.
1. Entire closet annexed for new dressing area.
2. Full-length three-way mirror.
3. Bureau with drawers for storage below.
4. Recessed shelves built in for cosmetics and so on.
5. Mirror back.
6. Overhead lighting in soft it or on track.
7. Bathroom door opening directly from main hall.
8. Hall linen closet divided, with shallower shelves giving easier access.
9. Closet door opening directly onto main hall.
10. Shelves for towel storage, with access directly from bathroom.
11. Two new basins—new vanity and counter top.
12. Large mirror affixed directly to wall.
13. Overhead lighting in soffit or on track.
14. Storage shelves over toilet back.
15. Same toilet with new seat and lid.
16. New sheet vinyl floor.
17. Same tub with new fittings and shower door.
18. New closet built out into bedroom—longer than old closet.
19. Bi-fold doors giving easier access to entire closet space.
Plan 9
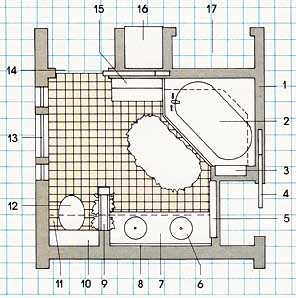
It could be that access to the bathroom from the hail is not necessary.
Perhaps there is another bath for family members or guests. In that case,
you have the option of turning this into a luxury bathroom accessible only
through the master bedroom. By using all of the bed room closet, you can
retain linen storage accessible from the hall and create space for a sumptuous
corner tub. This plan calls for the tub to be built in, but it could just
as easily be a Victorian clawfoot or a sunken tub.
1. Wall enclosing old entry to bathroom.
2. Whirlpool tub at angle, using old plumbing and replacing existing closet.
3. Built-in shelves for storage of tub items.
4. Pocket door for altered linen closet.
5. Recessed medicine cabinet built into back of closet wall.
6. New basins.
7. New vanity with drawers and pull-out shelves.
8. Large mirror on wall.
9. Halt-wall divider between toilet and vanity for some privacy.
10. Cabinet above toilet back with drawers below and enclosed shelves above.
11. Soffit with recessed lights on full length of north wall.
12. New toilet in same location.
13. Single narrow window replaced by three windows extending from just above floor to soffit above— possibly sliding glass doors for access to patio or hot tub.
14. Pocket door between bedroom and bath.
15. Linen cabinet to soffit line—shallow shelves above, deeper ones below.
16. Built-in dresser drawers with mirror above.
17. New closet extending into bedroom space.
Plan 10
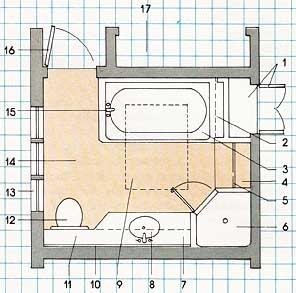
As your children grow up, your needs change. Two basins may no longer
be necessary, and instead of maximum efficiency you may want a room that
is spacious and relaxing. Plan 10 is another variation of a private bath
accessible only from the bedroom. The separate tub and shower allow a relaxing
soak or a quick rinse. Even if you remove the hail closet, you can retain
hall storage just by shifting the enclosures around:
Take out the bedroom closet, using part of it for the bath room and the rest for cleaning supplies accessible from the hall. Plumbing changes are relatively minor in this plan, and you can focus on the materials and products that will give it the look and feel you want.
1. Utility closet with two louvered doors—created by annexing existing bedroom closet.
2. Soft it with recessed light above end and wall side of tub.
3. Whirlpool tub.
4. Built-in cabinet for towel and linen storage.
5. Cushioned seat—soffit with recessed lighting above.
6. Corner shower with pan and tiled walls—recessed light and moisture vent in ceiling.
7. New vanity in same location as old.
8. New basin and fittings in same location as old.
9. Skylight over central space and tub for lots of light.
10. Mirror extending entire length of wall.
11. Overhead lighting hidden behind soft it fascia board.
12. New low-line toilet.
13. Small narrow window replaced by large wall windows or doors leading to patio or hot tub.
14. New flooring—large tiles or carpet.
15. New fittings for tub—outside of tub enclosed with tile or wood.
16. New entrance to bathroom with hinged door.
17. Enlarged closet in bedroom space.
Next: Line, Scale, & Shape
Prev.: Planning Basics