It’s time to start budgeting for a new water heater when yours begins to leak or show rust and corrosion. When you go shopping for a new water heater, you’ll need to consider four factors: capacity, warranty, tank lining, and recovery rate.
Capacity. Gas heaters are usually sized from 30 to 100 gallons; electric heaters hold up to 102 gallons. The graphs below will give you a rough idea of the size water heater tank you need. The capacity should be based on the number of people in the house hold and the number of bathrooms you have.
Warranty. Most water heaters come with a 7 to 15-year warranty. It usually pays to choose the top-of-the-line model, but beware: some models that manufacturers call deluxe energy- savers cost significantly more and carry a longer warranty on their tank, but they don’t necessarily cost less to operate.
Lining. Glass, the most common lining for water heater tanks, lasts longer and provides cleaner water than other liners. Copper-lined tanks, though, are better and longer-lived than glass- lined galvanized tanks, which are usually the least expensive and shortest-lived, because of corrosion caused by chemicals in the water.
Recovery rate. This refers to the number of gallons per hour that a heater can raise to 100°. Generally, gas heaters have the fastest rate, electric heaters the slowest. Manufacturer’s product literature will provide information on recovery rate.
Fuel. If you’re replacing your old water heater, it’s almost always preferable (and easier) to stay with one that uses the same type of fuel. In a new installation, availability and cost of gas versus electricity should be your primary consideration.
CAUTION: If you need to run gas piping to a new water heater, it’s best to call a professional to do the work. If you’re installing an electric water heater, use extreme caution when making the electrical hookup.
Emptying the tank. When you’re ready to replace your water heater, start by shutting off the water and fuel (or power) supply to the old unit (see Ill. 59). If there’s no floor drain beneath the valve, connect a hose to the valve and run it to a nearby drain or outdoors. Then drain all the water out of the heater storage tank by opening the drain valve near the base of the tank.
Disconnecting supply pipes. Next, disconnect the water inlet and outlet pipes from the heater. If they are joined by unions (see Ill. 60A) or flexible pipe connectors the job is simple—just unscrew them. If not, you’ll have to cut through the pipes with a hacksaw (see Ill. 60B).
Detaching the power or fuel line. To disconnect the power supply lines on an electric heater, shut off the power; remove the electrical cable from the heater. For a gas or oil water heater, shut off the gas and use a wrench to disconnect the fuel supply pipe from the inlet valve. You’ll also need to re move the draft diverter from the flue pipe of a gas heater (see Ill. 61).
Most water heaters have temperature and pressure relief valves to prevent explosions in case the heating mechanism fails. The valves are in expensive, and it’s a good idea to get a new one when you get a new heater. You may be able to use the existing overflow pipe (see Ill. 62).
Installing a new heater. Remove the old heater and set the new one in place. Check that the heater is plumb and level (see Ill. 63); shim if necessary.
Plumbing the tank. If the new tank is a different height than the old one, you may have to tinker with the plumbing to make everything come together properly. Use flexible pipe connectors (see Ill. 64) or unions to hook up both the water and gas lines. The connectors (lengths of flexible tubing) simply thread onto the pipe and bend as needed to make the hookup. If the pipes aren’t threaded, replace them with threaded nipples and secure the connectors to them with a wrench.
Activating the heater. For an electric heater, run metal-clad electrical cable from the power source. With all the connections made, open the water inlet valve to the heater. When the tank is filled with water, “bleed” the supply pipes (open the hot water faucets to allow air to flow out of the pipes).
Test the temperature and pres sure relief valve by squeezing its lever. Open the gas inlet valve or energize the electrical circuit to fuel the heater. For gas heaters, light the pilot according to instructions (usually on the control panel plate). Adjust the temperature setting as desired.
Finally, check all connections for leaks, If you’re working on a gas heater, brush soapy water on the connections (see Ill. 65)—bubbles indicate a gas leak.
For solutions to water heater problems, see earlier section.
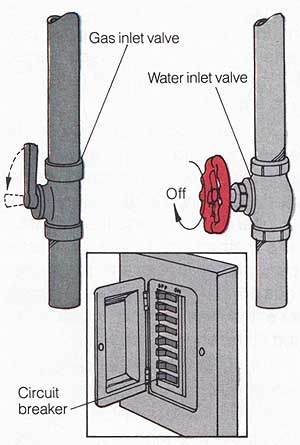
Ill. 59. Shut off the fuel (or power) and water supply to
the water heater before doing any work. Ill. 60. Disconnect the water
supply pipes by unfastening a union (A) or cutting through the pipe (B).
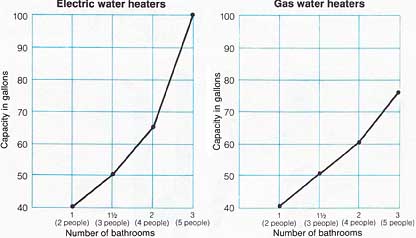
Gas water heaters and Electric water heaters (Number of bathrooms
vs. Gallon capacities). Gallon capacities on the graphs are based on households
with two water-using appliances; a house hold without a dishwasher or a
washing machine will need a slightly smaller tank. Water heater needs will
also vary it there are more or fewer people in the household than shown
in parentheses. Some people need more water: with small children, for example,
more hot water is required for laundry.
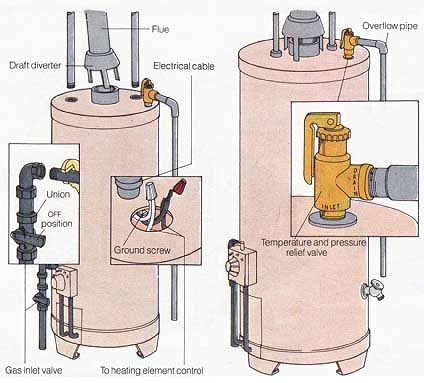
Ill. 61. Detach the fuel supply pipes (or electrical cable);
then, on a gas heater, remove the draft diverter (Gas inlet valve; To heating
element control). Ill. 62. Unscrew the overflow pipe from the relief valve
on the old unit to use on the new water heater.

Ill. 63. Use a level to check that the new heater is plumb;
if necessary, shim with thin scraps of wood. Ill. 64. Use flexible pipe
connectors to simplify water and gas line hookups to the water heater. Ill.
65. Check all gas line connections for leaks, applying soapy water with
a brush; bubbles indicate a leak. Gas line; Soapy water
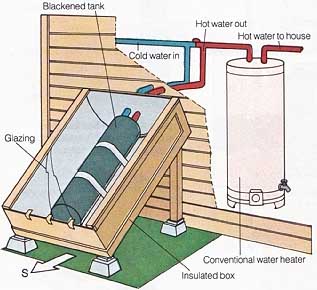
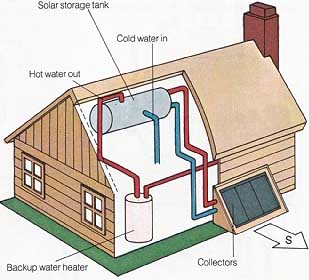
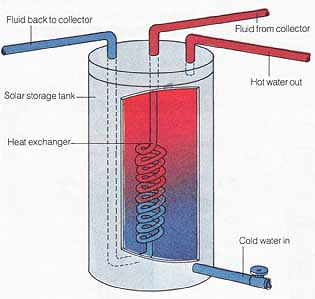
Heating water with the sun Solar energy—the sun’s natural warmth—is an effective source for heating water. Before 1985, solar heating systems flourished, due largely to federal tax credits for their installation. But when the credits were eliminated in 1985, such systems lost their luster, since they were too expensive to realize savings in a reasonable period of time. Today, spiraling energy costs, technological advances, and lower prices are making them a viable alter native once again. Solar water heaters fall into two general categories: passive and active. Along with the sun’s energy, active systems depend on thermostats, fans, pumps, and valves powered by electricity; passive systems don’t need any mechanical components or conventional energy. Passive systems There are two basic passive systems for domestic water heating: batch water heaters and thermo-siphoning water heaters. Both are simple, low-cost ways to introduce solar energy into your home. Batch water heaters. Often called “breadbox” water heaters because of the shape of their characteristic containers, batch water heaters require no energy input or specialized hardware to make them work; they just sit in the sun and get hot. In a batch heater, the collector and storage components are one and the same—often just a glass-lined water heater tank stripped of its outer casing, insulation, and heating mechanism. The tank is painted flat black to absorb solar radiation, and is housed in an insulated box that’s glazed on one side and oriented within 30 degrees of true south in an unshaded location— usually at ground level (see Ill. A). The glazing must also be tilted up at an angle from the horizontal that matches your latitude. Because a full tank is very heavy, roof mounting is inadvisable unless a structural engineer determines that it’s feasible. Most systems employ one or two 30 or 40-gallon tanks to preheat water on its way to a conventional heater. But in some regions, systems with two or more tanks connected in series can displace a conventional heater al together during the sunniest months. Freezing may be a problem in cold climates; in such areas, it’s often necessary to drain the system in winter. Recent developments in batch heaters include the use of special glazings, reflectors, and tank coatings to increase solar efficiency. The performance of such ‘enhanced” batch heaters can approach that of more sophisticated systems, and their cost effectiveness is unrivaled. As with all solar water heaters, batch heaters may require some changes in domestic habits if you are to reap their full benefits. Since peak water temperatures are usually achieved in mid-afternoon, it’s best to schedule your maximum use of hot water for this time. However, special tank coatings and insulated covers can help maintain high water temperatures. For construction help and additional information, consult a solar heating specialist. Thermosiphoning water heaters. In these passive heaters, water circulates from solar collectors to a solar storage tank by natural convection; the water rises in response to the sun’s heat just as air does. To initiate this convective current, the collectors are mounted with their tops below the bottom of a well-insulated tank into which they feed (see Ill. B). The solar-heated water is drawn off for household use indirectly—through the conventional heater, which acts as a backup to the solar water heater. The system just described is called an open-loop system, because plain household water runs directly from the collectors into the storage tank. To prevent wintertime freezing, the collectors must be drained when the temperature drops. To eliminate the problems of water freezing in a solar heating system, you can use a closed-loop system that employs a heat exchanger to heat water. In this system, a mixture of water and antifreeze gathers heat from solar collectors and circulates through a closed loop of tubing to a heat exchanger immersed in a special hot water storage tank. The heat exchanger, usually coiled copper tubing or a finned device similar to a car radiator, is double-walled to prevent leaking. It keeps the antifreeze mixture separate from your water (see Ill. C). The coiled or finned design enhances heat exchange by providing a large area of contact between the two fluids while keeping them safely separated. Active systems With an active solar water heater, the collectors are usually mounted on the roof, and the storage tank is placed at floor or basement level. With this arrangement, you’ll need pumps, valves, and automatic controls to circulate regular household water (in an open loop system) or antifreeze (in a closed-loop system) to the collectors and back again (see Ill. D). Though some active systems are custom-built, most are available as kits for professional installation. These packaged systems include collectors, tanks, thermostats, pumps, and piping. If you have plumbing and wiring skills, you may be able to install one of these yourself on a house with a south-facing roof. Even a shed or garage roof will do: often only 1 to 2 square feet of collector area are needed per gallon of water to be heated. These kits are less expensive than custom-built models, but they’re not exactly simple to install. You’ll need quite a bit of expertise and derring-do—and a good dose of patience. You’ll probably have to pass a building inspection, too. Be sure before buying a kit that the instructions are adequate, or that the seller will help you if they aren’t. Unless you’re an experienced do-it-yourselfer, it’s best to have your system installed by an expert, even if you have to pay more.
|
