A higher-than-normal water bill might give you the first indication of a leaking pipe. Or you might hear the sound of running water even when all fixtures are turned off.
When you suspect a leak, check first at the fixtures to make certain all the faucets are tightly closed. Then go to the water meter, if you have one. If the dial moves, you’re losing water somewhere in the system. If you don’t have a water meter, you can buy a listening device that amplifies sounds when it’s held up to a pipe.
Locating the leak. This isn’t always easy. The sound of running water helps; if you hear it, follow it to its source.
If water stains the ceiling or drips down, the leak will probably be directly above. Occasionally, though, water may travel along a joist and then stain or drip at a point some distance from the leak. If water stains a wall, it means there’s a leak in a vertical section of pipe. Any wall stain is likely to be below the actual location of the leak, and you’ll probably need to remove an entire vertical section of the wall to find it.
Without the sound of running water and without drips or stains as tangible evidence, leaks are more difficult to find. Use a flashlight and start by checking all the pipes under the house in the crawl space or basement. It’s quite likely you’ll find the leak there, since leaks in other places in the house will usually make themselves apparent with water stains or dripping.
Fixing the leak. If the leak is major, turn off the water immediately, either at the fixture shutoff valve or the main shutoff valve.
Patching a leak in a pipe is a simple task if the leak is small. The ultimate solution is to replace the pipe, but here are temporary solutions until you have time for the replacement job (see our instructions on taking pipe apart).
The methods shown here for patching pipe are all effective for small leaks only.
Clamps should stop most leaks for several months if they are used with a solid rubber blanket. It’s a good idea to buy a sheet of rubber, as well as some clamps, at a hardware store and keep them on hand just for this purpose.
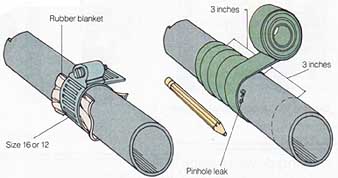
A sleeve clamp (see Ill. 92) that fits the pipe diameter exactly works best. Use a rubber blanket over the leak, then screw the clamp down tight over the blanket. An adjustable hose clamp (see Ill. 93) in size 16 or 12 stops a pinhole leak on an average-size pipe—be sure to use a rubber blanket with the hose clamp. If nothing else is at hand, use a C-clamp (see Ill. 94), a small block of wood, and the rubber blanket.
If you don’t have a clamp, you can still stop a pinhole leak temporarily by plugging it with a pencil point—just put the point in the hole and break it off. Then wrap three layers of plastic electrician’s tape (see Ill. 95) extending 3 inches on either side of the leak. Overlap each turn of tape by half.
Epoxy putty (see Ill. 96) will stop leaks around joints where clamps won’t work. The pipe must be dry for the putty to adhere, though. Turn off the water supply to the leak to let the area dry.

(left) Ill. 93. Hose clam, Rubber blanket, Size 16 or 12; (right) Ill. 95.
Electrician’s tape

Ill. 92. Sleeve clamp: Clamp sized to pipe diameter; Ill.
94. C-clamp: Small block of wood; (right) Ill. 96. Epoxy putty