That constant drip, drip, drip from a spout or persistent oozing from a handle not only means wasted water—money down the drain—but also be comes annoying enough to demand attention.
The first step in fixing the faucet is identifying the type you’re dealing with. There are two basic types of faucets. One is a long-standing design—usually with two handles and one spout—called a compression, stem, or washer faucet (see Ill. 1). The other is a more recent type called a washerless or non-compression faucet—in it, the mix of hot and cold water is controlled by one handle or knob.
The compression faucet closes by a screw pushing and compressing a washer against a valve seat. Ideally, when the faucet is turned off, the stem is screwed all the way down and the washer fits snugly into the valve seat, stopping the flow of water.
Before starting any faucet repair, plug the sink drain so that small parts can’t fall down it, and line the sink with a towel to prevent damage from parts or tools accidentally dropped. Line up disassembled pieces so that you’ll be able to put them back together in the right order.
CAUTION: Before doing any work, turn off the water at the fixture shutoff valves or at the main shutoff valve. Open the faucet.
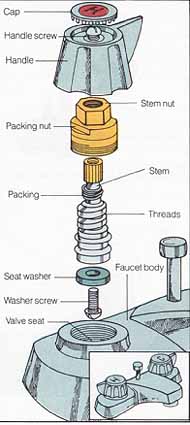
Ill. 1. Compression faucet comes apart easily. Handle-type
faucets may have stems threaded in opposite directions.
Handle leaks
If the leak comes from around the handle stem, try tightening the packing nut slightly. If the leak persists, you’ll have to replace the packing in side the nut.
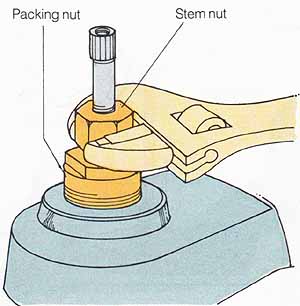
Ill. 2. To take apart a compression faucet, remove the
nuts. Turn the stem beyond fully open and lift out.
To take the faucet apart (see Ill. 2), remove the decorative cap on top of the handle, using a blunt knife or screwdriver. Undo the handle screw and pull the handle straight up off its stem. Remove the stem nut and packing nut with an adjustable-end wrench. Using the handle, turn the stem beyond its fully open position to unscrew it; then lift it out.
The packing on the faucet stem is either a rubber O-ring, a packing washer, or graphite twine (see Ill. 3). If it’s an O-ring (A), pinch the old one off with your fingers and roll on a new one that’s exactly the same size and type. If it’s a packing washer (B), remove the old one and push an exact replacement onto the stem. If its graphite-impregnated twine (C), scrape away all of the old material and wrap new twine clockwise—five or six times—around the faucet stem.
Before replacing the packing nut, lubricate the threads of the stem and nut with petroleum jelly. Tighten the packing nut and replace the handle.
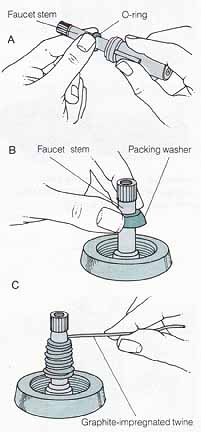
Ill. 3. To replace the packing, take off an O-ring (A),
packing washer (B), or graphite-impregnated twine (C).
Spout leaks
Even though it’s the faucet spout that’s dripping, it’s one of the handles that needs repair. To discover which handle needs work, turn off the shutoff valves under the fixture one at a time. The leak will stop when one or the other of them is turned off, and you will have narrowed down the problem.
A spout leak is usually the result of a deteriorated washer or valve seat in the faucet. Remove the handle and stem. At the bottom of the stem is a brass washer screw or seat screw that goes through the center of a rubber like seat washer (see Ill. 4). If the washer is cracked, grooved, or marred, carefully remove the screw and replace the washer with a new, identical one. Seat washers may be flat or beveled (conical). If the washer is beveled, be sure the beveled edge faces the screw head when you install it on the stem.
During replacement, the shank of the washer screw may break off. If it does, you can replace it with a new swivel-head washer (see Ill. 5) or replace the entire faucet stem.
A swivel-head washer has two prongs that snap into the bottom of the stem to compress against the valve seat. To install, drill a hole in the end of the stem to receive the prongs.
If the washer isn’t the trouble maker, look deeper. A damaged valve seat could be causing the leak. A pitted, corroded, or gouged valve seat prevents the seat washer from fitting properly. Fortunately, most compression faucets have a replaceable valve seat (see Ill. 6).
You’ll need a valve seat wrench to make the exchange. Insert the wrench into the faucet body and turn it counterclockwise to re move the seat. At a plumbing supply store, buy an exact duplicate of the seat. Before installing the new seat, lubricate its threads with pipe joint compound.
If the faulty valve seat can’t be removed (it may be built into the faucet), use a simple, inexpensive tool called a valve seat dresser (see Ill. 7). It grinds down any burrs on the seat, making it level and smooth. Buy the largest dresser that will fit the faucet body.
Insert the valve seat dresser until the cutter sits on the valve seat. Turn the tool handle clockwise until the seat is smooth. Remove the metal filings with a damp cloth.
After the new seat washer or valve seat is in place, be sure to lubricate the threads of the stem with plumber’s grease. Then you can put the handle back.
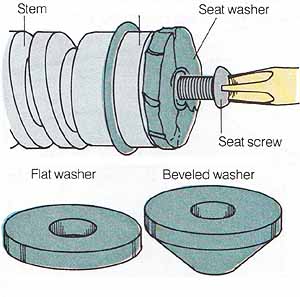
Ill. 4. To replace the seat washer—flat or beveled—remove
the screw and install a new washer.
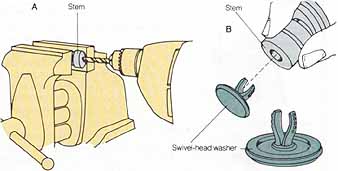
Ill. 5. To install a swivel-head washer, drill a hole
in the bottom of the faucet stem (A) and snap the washer into the hole
(B).
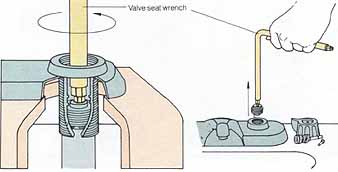
Ill. 6. To remove the valve seat, insert a valve seat
wrench into the faucet body and turn counterclockwise.
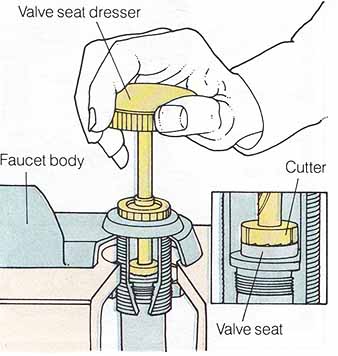
Ill. 7. To use a valve seat dresser, place the tool
in the valve seat and turn until the seat is smooth.