Many medium upgrades can be precipitated by small upgrades; for example, you may want a new countertop after installing a new sink or faucet. Medium upgrades cost between $900 and $4,000 and can be completed in two to six days. Because of their complexity, they may require the services of a professional.
Adding a Cabinet
Most people agree that bath rooms never have enough storage space for towels, linens, toiletries, and assorted paraphernalia. This is especially true if you have a wall-hung or pedestal sink rather than a vanity.
Depending on the location of the new cabinet, this remodeling project may or may not require you to tear out any thing. To install a vanity in place of a wall-hung or pedestal sink, it's necessary to remove the existing sink and start from scratch, incorporating a new countertop into your design. However, it's often possible to install a new cabinet in an out- of-the-way spot in the bath room—behind a door, in an otherwise unusable corner, or over the toilet.
Most home-improvement centers, hardware stores, and lumberyards stock prefabricated cabinets in a variety of sizes designed to fit almost any need. For hard-to-fit spots, a cabinetmaker can offer alternative solutions.
Whether the cabinet is custom-made or prefabricated, there are several things to look for. The first is quality of construction and finish. Some very fine examples of cabinetry are produced by production manufacturers; others are only slightly better than a cardboard box.
Most American-made cabinet bodies (the sides, back, bottom, and shelves) are constructed of raw particleboard, laminated or veneered particle-board, or veneered plywood. All these materials are acceptable, provided they are substantial enough in size. Material for the sides, bottom, and shelves should be at least ¾ inch thick. In fine cabinets the face frames (the surface of the cabinet to which the doors are attached) are made from solid wood and are assembled with screws or dowels and glue.
The second thing to look at in a cabinet is the interior. Al though most prefabricated cabinet bodies are prefinished, the interior is sometimes unfinished. Paint or varnish will not only enhance the interior of the cabinets, but will also eliminate the need to line them with shelf paper.
A popular finish for cabinet interiors is a heat-treated laminate called melamine—a smooth, uniform, permanent surface. Melamine-finished interiors will add slightly to the cost (about 10 percent) but are worth the expense in added convenience and cleanliness.
The final thing to look for in a cabinet is door style. Besides the finish, no other detail will have as much effect on the look of the cabinets. Solid raised- panel doors, due to their substantial construction, tend to be the most impressive in appearance and performance. They also add between 5 and 10 per cent to the cost of the cabinets but are hard to beat in terms of lasting quality.
The cost of bathroom cabinets varies widely, depending on the cabinet size, construction, configuration, type of wood, and finish. Elaborate cabinets can fall outside the range of a small upgrade. Handy homeowners can use a how-to guide on cabinetmaking and save hundreds of dollars. Just be sure that you don’t create one problem in an attempt to solve another. Too many cabinets in too little space will not only be inconvenient to work around, but can make an al ready small bathroom look and feel even smaller.
66 Installing a Vanity: Use a level to check that cabinets are plumb and level in 3 directions: Screws driven into studs behind wall, Shim where wall recedes from cabinet, Cut baseboard to fit against vanity; Set 2 X 4 frame on vanity to raise countertop height: Finish front face to match cabinet; Screw and glue cabinets together to extend vanity length: Drill and countersink pilot holes for screws.

Bathroom Storage: Under-sink storage; Built-in toilet paper and magazine holder

Installing Resilient Flooring: Work each quarter of room
from center; Installing Baseboard
Installing New Flooring
Because of the area it covers, flooring probably has as much to do with the appearance of a bathroom as any other finish. The most popular types of flooring include vinyl, ceramic tile, and carpet. Of the three, tile is probably the longest lasting. It is also the most costly to install, because a mortar bed should be laid down first. This not only adds to the integrity of the installation but makes for a smoother and more uniform finish that will better resist water.
If mortar or cementitious mortarboard is too costly or not available, consider something other than tile. Tile that's glued directly to a wood sub- floor not only can't be considered an upgrade but, due to the lack of thorough water proofing, can actually diminish the value of a house, no matter how good it may look at first. (This is not the case for all ceramic tile installed on the subfloor—only floors where moisture is a factor. For example, ceramic tile installed in an entry hall without mortar would be acceptable, provided that the floor framing was reinforced to minimize the amount of deflection. Deflection could result in cracked grout and loose or broken tile.)
Carpet is a good choice in a bathroom that's subject to minimal traffic and little or no water. Carpet may not be a good idea where there is a lot of traffic or water, especially in a bathroom used by small children, because it's not as easy to keep clean as a smooth, hard surface.
Typically, the installed cost of carpet and pad will be about one fifth the price of ceramic tile. Carpet installed in a bath room that contains a tub or shower should have a water proof membrane, such as vinyl, underneath to protect the wood floor below from leaks. This will add only slightly to the cost but will protect the floor from water damage.
Vinyl is probably the most popular of all bathroom floor coverings because of its moderate price and excellent wear ability. Most of the cost of installing vinyl in a bathroom is labor. The material itself usually amounts to only about 25 percent of the total cost. No-wax vinyl is easy to maintain and comes in a huge selection of colors and patterns.
Although vinyl can be in stalled over an existing layer of vinyl, most flooring experts recommend removing any existing floor covering. New underlayment should be installed over the wood subfloor to en sure a smooth and uniform surface for the new vinyl.
There are two basic ways to install sheet vinyl: laid flat with a baseboard or coved up the wall. Coved vinyl is more popular in a bathroom because it helps prevent water from traveling beyond the floor area under walls and cabinets, where repairs of water damage can be very expensive. You can minimize potential water damage with flat-laid vinyl by caulking the vinyl-to-baseboard joint with latex and silicone caulking. Vinyl tiles don’t hold up as well as sheet vinyl, although they are easier to in stall by the do-it-yourselfer. If you use vinyl tiles, avoid the pre-glued type.
Installing a New Countertop
A new countertop can have a dramatic effect on a bathroom, offering a fresh and interesting surface. A new countertop need not match the existing form, style, or finish, and it can be any shape and size. It can even be extended over the back of the toilet to create a more streamlined look and additional counter space.
If the new countertop is a cultured or solid-surface material, such as cultured onyx, cultured marble, or Corian®, the basin and countertop can be constructed in one piece. This seamless configuration eliminates the need for caulking or grouting. It also greatly simplifies installation.
If you prefer a basin that's separate from the countertop, the choices are ceramic tile, plastic laminate, marble, granite, and cultured or solid- surface material. Ceramic tile, marble, and granite are the most costly finishes. Unless you are skilled, have the installation done by a professional. Ceramic tile should be installed in mortar on a wood substrate. Although it requires occasional re-grouting, it's one of the most durable finishes, resisting scratching and staining significantly better than cultured or other synthetic solid-surface materials.
Installing a Garden Window
A garden window lets you enjoy the outdoors and have privacy at the same time: The outdoors is still clearly visible, but the ability to see in is obscured by the greenery. A garden window can also be a welcome space saver when valuable bathroom counter space is currently occupied by houseplants.
One of the most attractive aspects of this project is the ease with which it can be accomplished. The most cost- effective way to install a garden window is to remove the existing window and replace it with one of a matching size; no framing changes will be required, and the amount of interior and exterior patching will be minimal. To maintain the harmony of both the interior and exterior, the garden window should be finished to match the other windows in the house.
Prices for garden windows vary widely according to size and style. Although this project is considered a medium up grade, it can be completed in a day.

Installing a Countertop: Wear goggles and dust mask while
using saw.
Adding an Exhaust Fan
An exhaust fan is one of the best ways to avoid the buildup of moisture and mildew in a bathroom and hence the damage that often follows. A fan should be used in addition to any ventilation provided by an openable window, because a window will not move the volume of air that a properly sized fan will move, and it's frequently not opened during cold weather.
Exhaust fans are rated ac cording to the cubic feet of air moved per minute (cfm). To determine the minimum cfm required for a bathroom fan, multiply the length of the bathroom by its width, and then multiply that number by 1.1. For example, a 5-foot by 9-foot room has 45 square feet: 45 x 1.1 = 49.5, for a minimum of a 50-cfm exhaust fan.
In addition to the basic exhaust fan, some fans come complete with lights and fan-forced radiant heaters that will make any bathroom more comfort able to use. A heat-fan-light combination can pay for itself in less than a year, based on the amount of energy that's saved in heating the entire home just to get the bathroom warm enough for showering on cold winter mornings.
Because installing an exhaust fan has become such a popular do-it-yourself project, many of these products are packed with nontechnical installation instructions and even have toll-free consumer hotlines and dedicated DIY web pages.
Exhaust fans, fan-light combinations, and heat-fan-light combinations are installed in basically the same way, with the two latter units requiring a little more electrical work.
For the most efficient movement of air, attach the fan housing to the framing at the highest point in the ceiling. All fans should be ducted to the exterior, not into the attic, via a flexible aluminum or plastic tube that originates at the fan housing and terminates at a roof jack or termination cap attached to the roof. Attach this tubing at both ends with two sheet-metal screws. Also, wrap the connections with duct tape to ensure a virtually airtight fit.
Although you do not need to install a basic exhaust fan or a fan-light combination on a separate electrical circuit, building codes require that most heat-fan or heat-fan-light combinations be installed on a separate circuit. Also consider placing the different functions on separate switches for more flexibility and less energy consumption.
Because installing an exhaust fan involves electrical and mechanical work, check with local building officials to see if a permit is required.
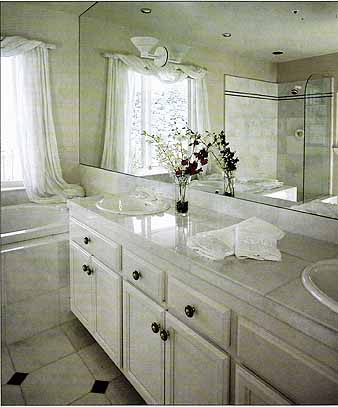
The modest use of marble kept remodeling costs in this bathroom
to a minimum—small marble squares highlight a limestone floor, with marble
cabinet handles and drawer pulls and a thin inlay of green marble on
the shower wall to continue the theme. The curved glass of the shower
cost less than a sliding glass shower door and echoes the curves used
throughout the house.