Simplified Guide to Major Appliance Repair: Clothes Washers
| HOME | Troubleshooting | DIY Tips |
|
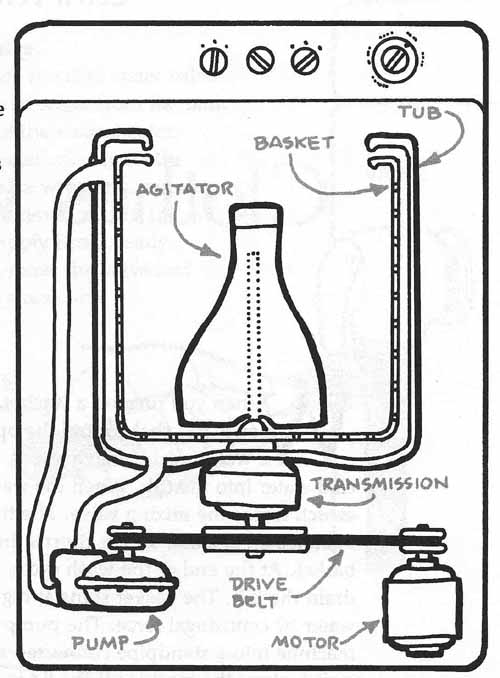
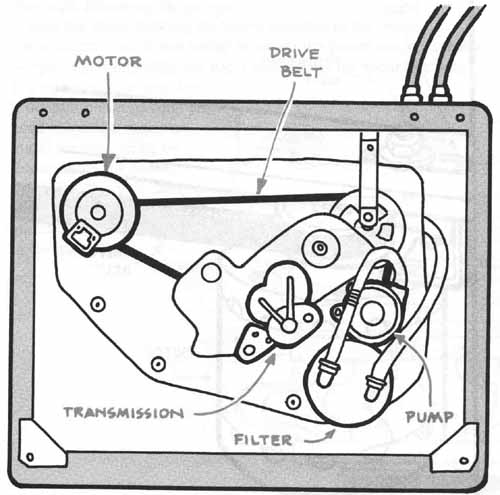
When you turn on a washer, you start a timer connected to switches that control the operation of the machine. First, a water mixing valve opens, letting a mixture of hot and cold water into the tub. When the water reaches the preset level, the switch closes the mixing valve. The timer then turns on a motor that operates an agitator, which churns the clothes back and forth in the basket. At the end of the wash cycle, the timer turns on the pump to drain the tub. The basket spins at high speed, removing any excess water by centrifugal force. The pump pushes the water from the machine into a standpipe connected to a house drain. A safety switch stops the machine if the lid is raised. Three systems operate together in a clothes washer. The electrical system, controlled by the timer and switches, operates the motor and valves; the mechanical system, which includes the transmission and drive belt, operates the agitator and the basket; and the plumbing system moves the water through the pump and hoses. The most common problems with clothes washers are leaks in the hoses and pump (the plumbing system), followed by a slipping or broken drive belt (the mechanical system), then a faulty timer (the electrical system). An important guide to the electrical system is the wiring diagram provided by the manufacturer. You usually can find the diagram inside the control panel, but it might be attached to the inside of the back panel. Most repairs can be made by the homeowner, unless the transmission is involved. Please note that no repairs should be attempted while the machine is running, particularly if water is on the floor.
Tools & Materials:
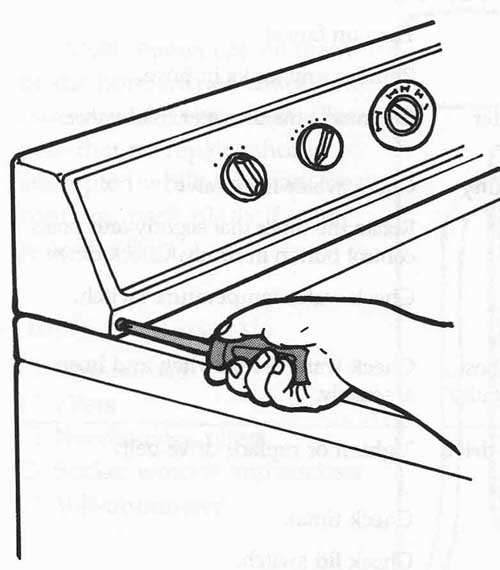
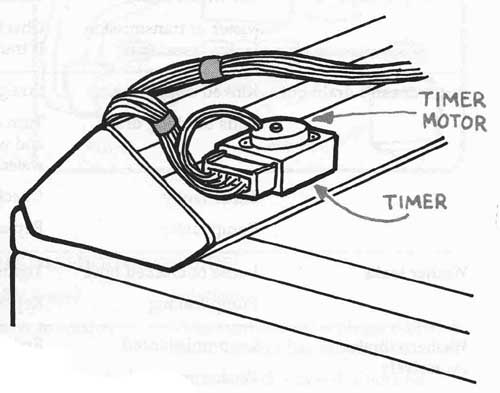
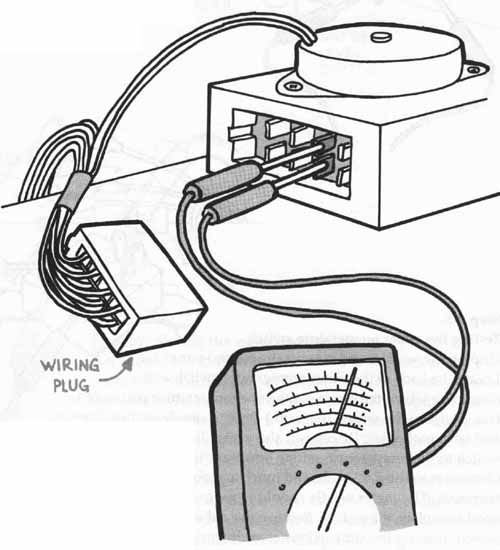
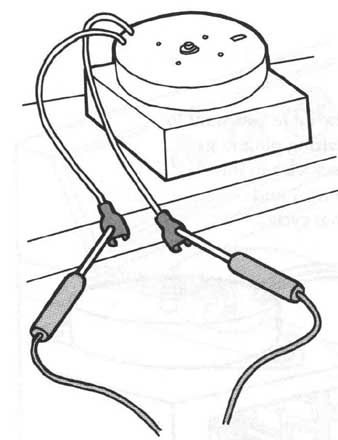
==TROUBLESHOOTING GUIDE== Problem ---Probable causes -- Solutions Washer doesn’t run--No power to washer Lid switch activated Timer faulty Make sure washer is plugged in and circuit breaker has not tripped. Make sure lid is dosed. Check lid switch. Check timer and timer motor. Motor faulty Check motor; replace if necessary. Washer doesn’t spin--Loose or broken drive belt Motor or transmission faulty Check water inlet valve. Rotate the timer dial slightly and press control button in firmly. Check timer. Check water temperature switch. Check water level switch and hose assembly. Washer doesn’t fill Turn on faucet. Remove any kinks in hose. Clean screens or water inlet valve. Water turned off Hoses kinked Screens or water inlet valve clogged Water inlet valve faulty Timer faulty Water temperature switch faulty Water level switch, hose, or pressure dome faulty Washer doesn’t agitate Slipping or broken drive belt Tighten or replace drive belt. Timer faulty Check timer. Lid switch faulty Check lid switch. Motor or transmission faulty Check motor. If transmission faulty call for service. Water doesn’t drain out Kinked drain hose Straighten hose. Suds blocking drain Turn off machine, bail out excess suds and water, and flush tub with cold water. Timer faulty Pump faulty Check timer. Replace pump. Washer leaks Loose or cracked hose Tighten or replace hoses. Pump leaking Replace pump. Washer vibrates excessively Load unbalanced Redistribute clothes. Washer not level Adjust washer s leveling feet. Tighten or replace drive belt. Replace motor or, if transmission faulty, call for service. Step 2-1. Removing the control panel. Unplug the washer and pull it away from the wall slightly. Remove the control panel by removing the two screws from the bottom front corners of the panel. Step 2-2. Gaining access to the controls. Remove any other screws on the top or the back of the panel. Pad the top of the washer with an old towel. Tilt the panel forward and lay it face down on the towel. You now have access to the timer, the timer motor, the water level switch, and the water temperature switches. You also should notice the wiring diagram. Step 2-3. Testing and replacing the timer. Locate the terminals on the timer that operate the cycle you want to test. (Refer to wiring diagram.) Disconnect the wiring plug to get to the terminals. Turn the timer control knob clockwise to the cycle you want to test. Set the volt-ohmmeter to R x 1 and touch a probe to each of the two terminals for that cycle. The meter should go to 0; if it doesn’t, replace the timer with a new one. If it does, test the timer motor. To install the new timer, remove the control knob and the screws holding the timer in place. Install the new timer; reconnect the wires and control knob. Reinstall the control panel and plug in the washer. Step 2-4. Testing the timer motor. Disconnect the two wires coming from the motor. Set the volt-ohmmeter to R x 100; touch a probe to each of the two motor wires. The meter needle should move to about 3000 ohms. If it doesn’t, install a new timer motor. Depending on the model, you might be able to replace the timer motor separately. Otherwise, you will have to replace the complete timer unit (Step 2-3).
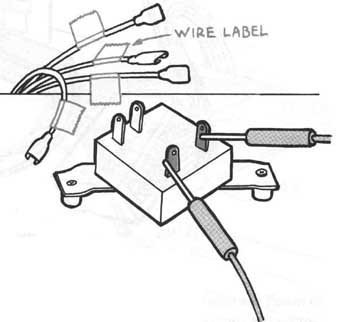
Step 2-5. Testing the water temperature switch. Unplug the washer and remove the control panel. Locate the back of the water temperature switch and determine which terminals control the temperature you want to test. (Refer to the wiring diagram.) Draw a simple wiring diagram and label each wire. Disconnect the wires. Turn the temperature switch to the temperature setting you want to test. Set the volt ohmmeter to the R x 1 scale and touch a probe to each of the two terminals. The meter needle should move to 0. If it doesn’t, you need to replace the switch. Remove the old switch. Install the new switch, making the connections according to your wiring diagram.
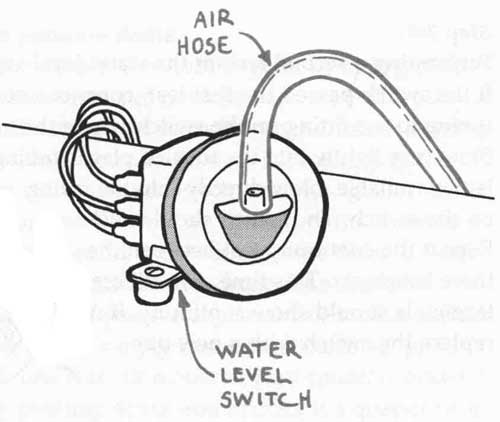
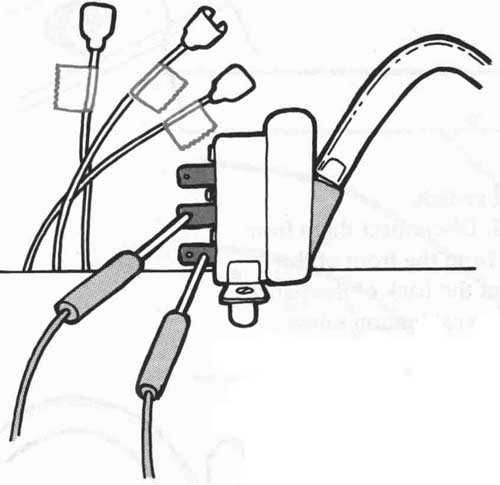
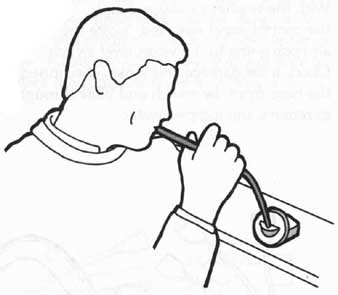
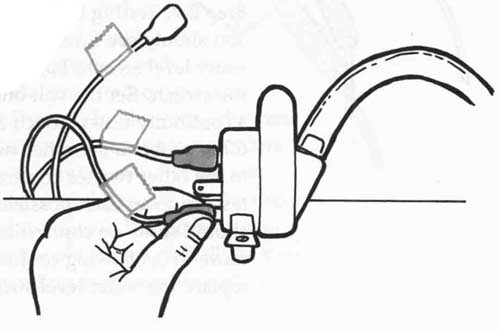
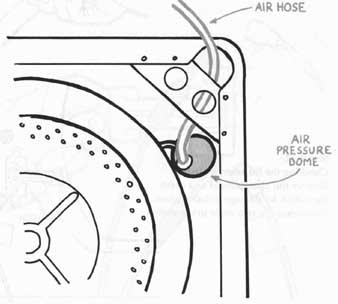
Step 2-6. Checking the air hose to the water level switch. With the washer unplugged and the control panel removed, locate the air hose going to the water level switch. Check it for damage and kinks. Disconnect the hose from the switch and blow through it to remove any trapped water. Step 2-7. Testing the water level switch. You should see three wires connected to the back of the water level switch. Label and disconnect these wires from the switch. Set the volt-ohmmeter to the R x 1 scale or use a continuity tester. Touch a probe to one terminal and the other probe to the other two terminals. Test each terminal to the other two for continuity. You should perform three tests to cover each possible connection. Two of the tests should show no connection; on one test the needle should move to 0, showing continuity. If the needle does not move, replace the water level switch (Step 2-9). Step 2-8. Performing a second test on the water level switch. If the switch passed the first test, connect a small length of plastic tubing to the fitting on the switch where the air hose was connected. Blow very lightly into the tube. If plastic tubing is not available, blow directly into the fitting on the switch. The switch should click. Repeat the continuity test between the three terminals. This time, two different terminals should show continuity. If not, replace the switch with a new one. Step 2-9. Installing a new water level switch. Make sure the three wires are labeled. Disconnect them from the switch. Remove the control knob from the front of the control panel. Remove the switch from the back of the panel. Mount the new switch. You might see a calibration screw on the back of the switch. Don’t turn it. Any adjustment to this screw could cause the tub to overfill. Reconnect the wires and the air hose to the switch. Install the control knob and put the control panel back into position. Step 2-10. Checking the pressure dome. Raise the top panel of the washer. It is held in place by spring clips near each corner. Wrap a few turns of masking tape around a putty knife and slide it under the top panel in each corner. Push the spring clips back and release the top. You should now have access to the pressure dome, the inlet valve, the lid switch, and the agitator. Look on the right side of the tub and find the air hose from the water level switch. The hose will be connected to the air pressure dome. Check for any cracked or broken seals around the dome. The assembly should be completely airtight. If you see any cracks or breaks, replace the dome. To replace the dome, simply disconnect the hose, push down on the dome and turn it about a quarter turn counterclockwise. Install the new dome by pushing down and turning it a quarter turn clockwise. Reconnect the hose.
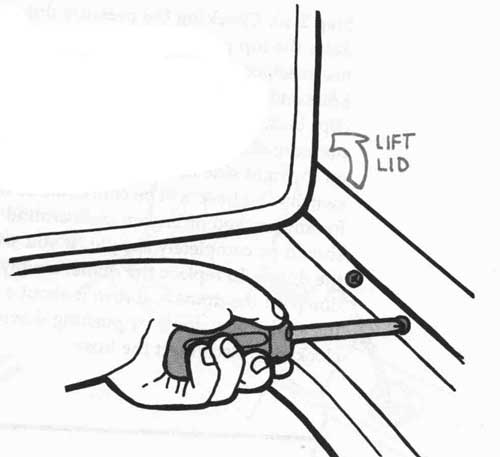
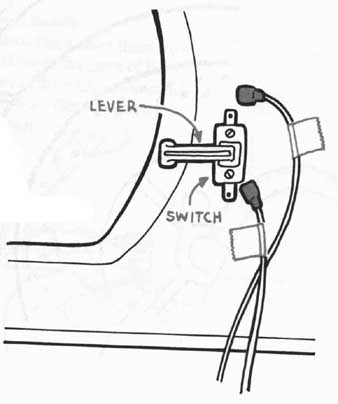
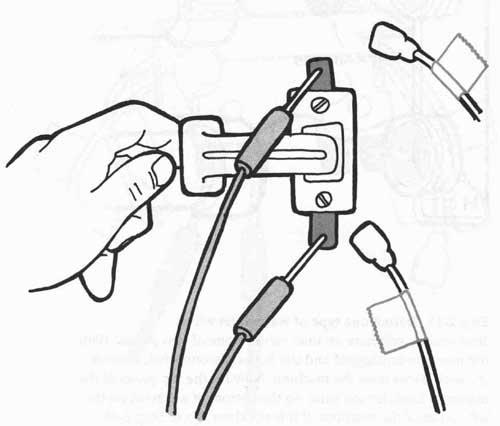
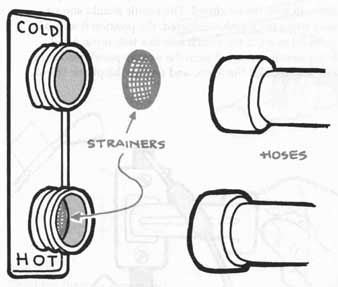
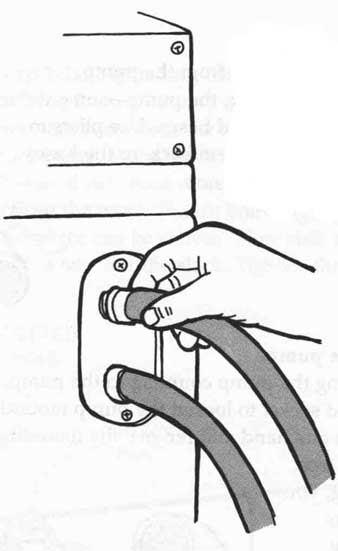
Step 2-11. Finding the lid safety switch. Unplug the washer and open the lid. Depending on the type of washer, you might find two screws on the right side of the lid opening. Loosen these two screws and raise the top panel of the washer. You should see the lid safety switch on the underside of the panel. Step 2-12. Checking the lid safety switch. Remove the plastic shield and check the switch for damage or loose wires. Disconnected the two wires to the switch. Step 2-13. Testing the lid safety switch. Use a volt-ohmmeter set on R x 1 scale or a continuity tester to test the switch. Touch the probes to each of the two terminals of the switch. Operate the lid safety switch by hand and monitor the movement of the meter needle. The needle should show continuity (move to 0) when the switch is depressed, the position it would be in with the lid closed. The needle should show no continuity when the switch is released, the position it would be in with the lid open. If the switch fails this test, replace it. To replace the switch, remove it from the washer panel. Install the new switch, reconnect the wires, and replace the plastic shield. Step 2-14. Checking the water inlet valve. Unplug the washer and move it out from the wall slightly. Turn off both faucets and disconnect the hoses from the water inlet valve on the back of the washer. Pry out the domed strainers with a small screwdriver or knife. Be careful not to damage the screens. Rinse the clogs from the strainers and reinstall them, dome side up, in the valve.
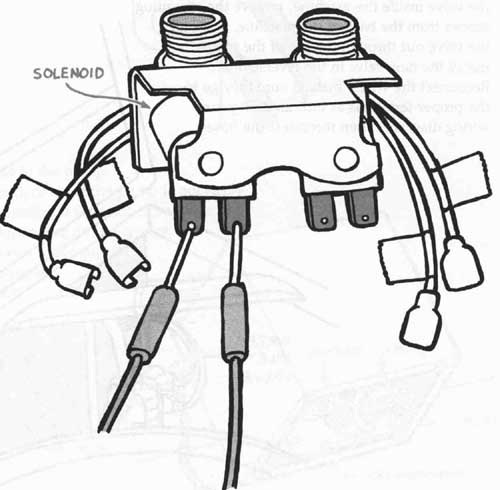
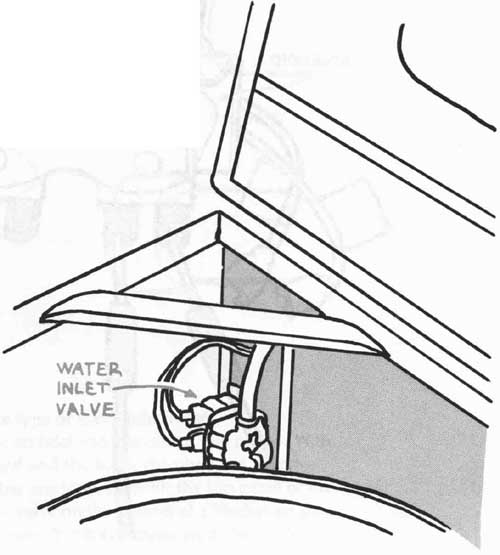
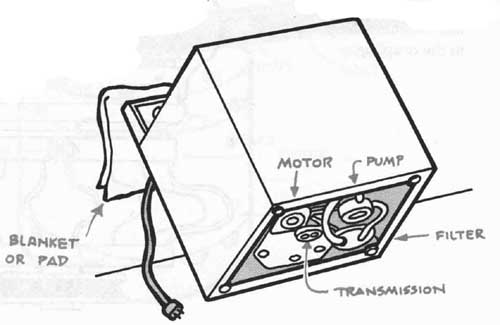
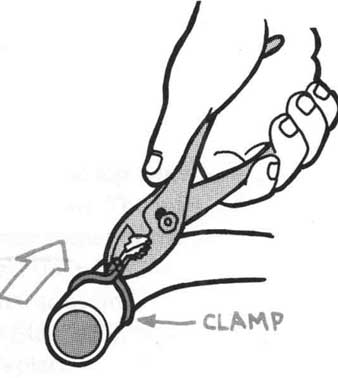
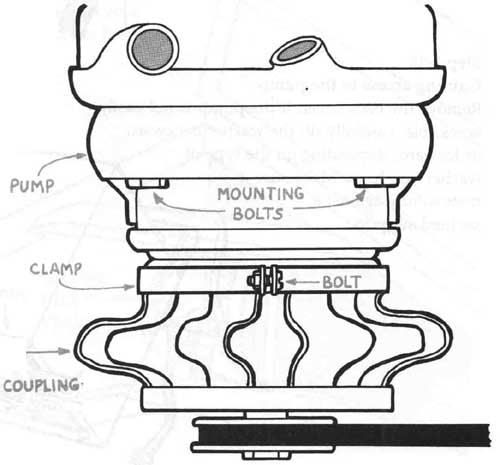
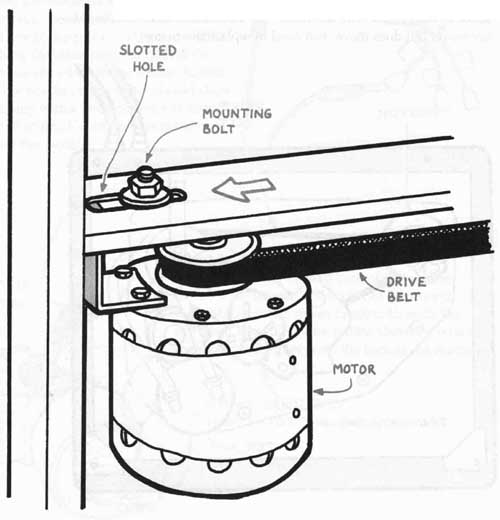
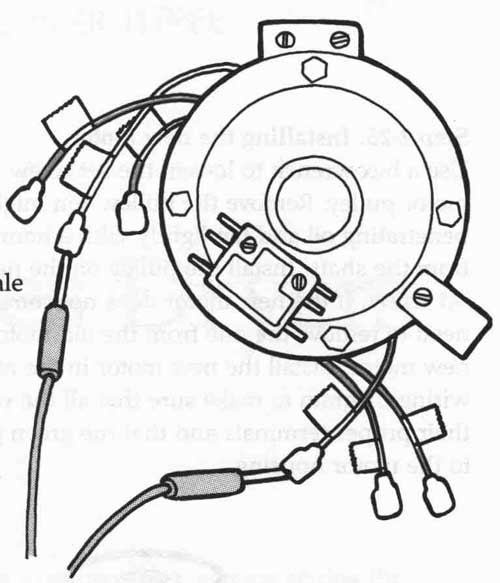
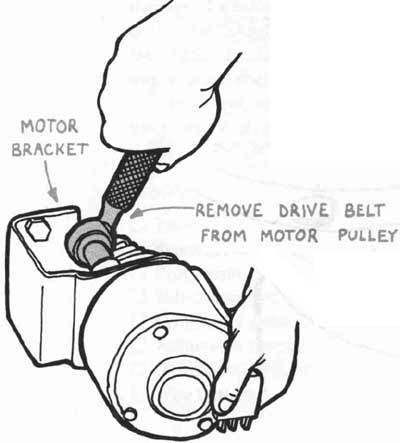
Step 2-15. Testing one type of water inlet valve. Your washer will have an inlet valve in one of two places. With the machine unplugged and the hoses disconnected, remove the back panel from the machine. Now lift the top panel of the machine. Look for the valve on the bottom of a bracket on the left corner of the machine. If it is not there, go to Step 2-16. If it is there, remove the two screws holding the valve to the bracket. Remove the valve and the attached wires through the back of the machine. Draw a wiring diagram; then disconnect the wires from the valve. Set the volt-ohmmeter to the R x 100 scale. The valve should have two solenoids, each with a pair of terminals. Touch the volt-ohmmeter’s probes to the two terminals of one solenoid. Then touch the probes to the two terminals of the second solenoid. The needle on the meter should show continuity with some resistance, approximately 800 ohms for each solenoid. If the meter indicates no continuity for either solenoid, install a new valve. Step 2-16. Testing another type of water inlet valve. If you did not find the water inlet valve in Step 2-15, raise the top panel of the machine and remove the splash guard from the tub rim. The inlet valve should be located inside the cabinet on the left rear corner of the machine. Draw a simple wiring diagram and disconnect the wires from the solenoids. Set the volt-ohmmeter to the R x 100 scale and test the continuity between each pair of terminals (see Step 2-15). If the meter shows no continuity for either solenoid, replace the inlet valve with a new one. Disconnect the hoses from the valve inside the machine, remove the mounting screws from the back of the machine, and pull the valve out through the top of the cabinet. Install the new valve in the reverse order. Reconnect the wires, making sure they go to the proper terminals as indicated on your wiring diagram. Then reconnect the hoses. Step 2-17. Preparing to replace the pump. Empty the water from the tub and unplug the machine. Turn off both faucets and disconnect the water supply hoses and the drain hose. Step 2-18. Gaining access to the pump. Remove the back cover. If the pump is not easily accessible, carefully tilt the washer backward or forward, depending on the type of washer you have. Make sure it rests solidly against a padded support. Step 2-19. Disconnecting the hoses from the pump. Spread a couple of old towels under the pump—some water will still be trapped in the pump and hoses. Use pliers to loosen the hose clamps and slide them back on the hoses. Twist and pull the hoses from the pump. Step 2-20. Removing the pump. Loosen the clamp holding the pump coupling to the pump. Use a socket wrench and socket to loosen the pump mounting bolts. Support the pump with one hand and remove the mounting bolts. The pump should drop free. If the pump was leaking, you need to install a new one. Install the new pump by reconnecting the hoses, tightening the hose clamps, mounting the pump, and fastening the pump to the coupling. Step 2-21. Tightening the drive belt. Unplug the washer and turn off the faucets. Work the machine away from the wall a few feet and remove the back panel. Press firmly on the drive belt with your thumb. It should not move more than about 1/2 inch. If it does, loosen the motor mount bolts slightly, just enough so that the motor can be shifted. Now shift the motor against the belt to take out the slack. Tighten the motor mounting bolts. Step 2-22. Testing the motor for a short. Unplug the washer. Turn off both faucets and disconnect the hoses. Remove the back panel. You might have to tilt the machine forward to get access to the bottom. Locate the motor. Draw a wiring diagram, then label and disconnect the wires from the motor. To see if the motor is shorted to ground, set the volt-ohmmeter to the R x 1K scale. Touch one probe to the metal frame of the motor and touch the other probe to each of the wire terminals. The needle on the meter should not move. If it does move, you need to replace the motor. Step 2-23. Testing the motor for continuity. Now set the volt-ohmmeter to the R x 1 scale Among the wires coming from inside the motor, you should see one white wire. Hold one of the probes to this wire while touching the other probe to each of the other colored wires one at a time. In each test, the needle on the meter should show continuity with a low resistance of about 10 or 15 ohms. If continuity is not shown, replace the motor. Step 2-24. Removing the old motor. Working from the opened back of the washer, use a socket wrench and socket to disconnect the motor from the motor bracket. Unhook the drive belt from the motor pulley. Carefully remove the motor and pulley from the back of the machine.
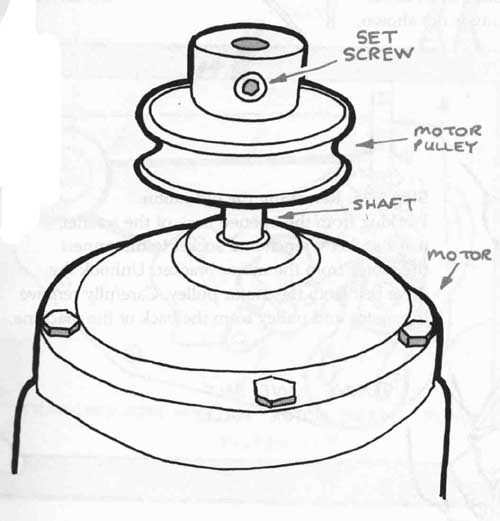
Step 2-25. Installing the new motor. Use a hex wrench to loosen the set screw from the side of the motor pulley. Remove the pulley. You might need to apply some penetrating oil and tap lightly with a hammer to free the pulley from the shaft. Install the pulley on the new motor and tighten the set screw. If the new motor does not come with a start switch, you need to remove the one from the old motor and install it on the new motor. Install the new motor in the reverse order. Follow your wiring diagram to make sure that all the wires are reconnected to their proper terminals and that the green ground wire is connected to the motor housing. Home Guide/index top of page |
