AMAZON multi-meters discounts AMAZON oscilloscope discounts
Audible inspections
Audible, or sound, inspections are done during routine process rounds. Listen to the equipment and notice differences that may have occurred since the last time you were near this piece of equipment.
The listening must be done regularly so changes can be detected. It is necessary to know what good sounds like to be able to tell what is "bad". The following examples of observations may be telling you something:
1. A loud hum on a motor may indicate a soft foot condition. (Soft foot is a condition where a motor foot is out of plane with the others, which leads to a warping of the motor frame.) If it was quiet yesterday and noisy today, you need to seek the reason for the change.
2. Squealing belts can indicate anything from an overload condition to just loose belts. A scraping sound or rhythmic sound can indicate a dragging or rubbing problem.
3. A clicking or regularly recurring sound from inside the gear box may indicate a broken tooth. If there is a sight glass on the oil system, see if metallic particles can be detected floating in the oil or try the paper test. (Described later in this guide.)
4. Tapping heard on a reciprocating compressor usually indicates a loose valve. Use a listening device on the covers one after another to find the loose valve. This will ensure that only the loose valve's cover needs to be opened to replace the valve seat gasket and the valve's securing jack screw tightened before the valve seat is damaged. As a temporary "fix" the hold down device for the valve may be tightened to secure the valve but it could still be leaking.
5. A failing or poorly lubricated rolling element (or frictionless) type bearing can often be detected audibly.
Visual inspections
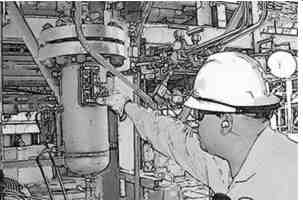
Operator Checking Seal Pot Level
Always be on the lookout for leaks, abnormal fluid levels, burned paint, and vibrating shafts or housings. Here are some specific situations to keep in mind when inspecting:
1. Check for any signs of discolored or burned paint. Paint burns at about 400 to 450 degrees F. If the burned paint is near lubricating oil, it is likely the oil is hot as well. This high temperature indication could mean the condition of the oil is no longer viable as a lubricant.
2. Look at motor fan guards for blockage and check the fins on TEFC motors to ensure cooling can take place.
3. Ensure pressure gauges are installed and working. It is most important to know what the normal pressure is for any piece of operating equipment. Sometimes gauges are marked with the acceptable range. If this is done on the gauge glass, make sure there is another mark to indicate the correct glass position, ensuring that it has not moved and is giving a false reading.
4. Look for signs of over-lubrication, which will cause leaks and shorten equipment life. It is also a potential environmental problem and fire hazard (see FIG. 1).
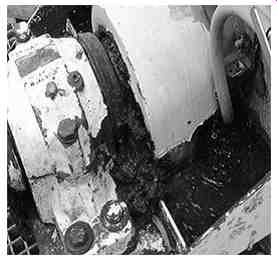
FIG. 1-Over-lubricated Bearing
If equipment is ring oiled, it is generally easy to look at the ring while the equipment is running. This is an excellent check, because if the ring stops turning for any reason, it has the same effect as a loss of oil flow in a forced lubrication system. Improper operation of an oil ring will likely lead to a bearing failure.
Tactile inspections
Tactile inspections are easy to perform and can tell you a lot about how the machine is running. But they are to be carried out only if you are sure you will not be burned by touching the equipment. First, swipe the equipment with a brushing motion of the fingertips. If it is not too hot, gradually slow the motion to determine if it will become uncomfortable to the touch. If you can leave your hand on the equipment the following states of operation may be examined:
1. Lightly touching a piece of equipment with fingertips can provide a subjective evaluation of how smoothly it is running. With practice, manual vibration checks can be a reasonably good method of detecting mechanical changes. A tingling in your fingers when touching the machine indicates a high frequency or fast occurring vibration. It is recommended that vibration checks be done regularly in order to note changes from yesterday's or last week's vibration level.
2. If any of the surfaces are hot, ask yourself the following questions: a) Does it seem hotter than the last time you touched it? b) Is the hot spot localized or is it generally hot? This is excellent data to share with engineering or maintenance.
3. If a seal pot is used, touch the two lines going to the seal gland. If fluid circulation is taking place in these lines the top line should be hotter than the lower. The same can be done for the cooling water lines into the seal pot if it is water cooled. This is a way to know if circulation is taking place. This technique can be used on any type of heat exchanger to get a gauge for heat transfer taking place.
4. If a pump has multiple filters, such as in an oil or hydraulic system, touching the outlet of the pump and then each filter downstream can help to determine which filter is in service. The filter with the same temperature as the pump discharge is the one in service.
5. A leaking pressure relief valve can be detected by touching the discharge side of the relief valve and the inlet to the relief valve. There should be no flow through the valve unless there is an overpressure. If there is leakage or if the valve is relieving there will be no difference in the temperatures of the two lines. If the temperatures are the same, it is likely that the relief valve is relieving or leaking. This condition could divert needed lubricant flow from the equipment and cause the stand by pump to come on.
Smell
Smell is another means of detecting a change in machinery. Here are examples of how your sense of smell can be used as a monitoring tool:
• If belts are loose, it may be possible to detect this situation not only by the sound but by the smell of the hot rubber as it is removed from the side of the belts.
• Burned oil has a distinct scent that can indicate a potential problem.
• Paint that gets hot enough to discolor gives a distinctive odor. Each scent may indicate a particular problem with the equipment.
• A problem can also be detected if the product processed in the plant gives off a "normal" odor and a distinctly different odor when overheated or when a problem exists.
The advantages of the audible, visual, tactile, and smell-based inspections are that they are:
• Easy to use
• Easy to train someone to do
• Always available
• Inexpensive
• Can be done by anyone
The disadvantages are that they are:
• Subjective (Hot? Very hot? Burning up? What does that mean?)
• Difficult to communicate to work request or someone else
• Difficult to repeat (Different people perceive the same thing differently)
• Unable to be used at the earliest stage of a problem Tools available to quantify what you have detected:
Audible Inspection Methods
Ultrasonic Gun
An ultrasonic gun is a relatively inexpensive handheld device for listening to noises in the ultrasonic range. It is used for leak detection, steam trap maintenance, and listening to bearing noises.
Stethoscope
This is an inexpensive tool that can pick up every sound that the equipment is making, though that can also be counterproductive. The good news is that it picks up everything and the bad news is that it picks up everything. It must be used regularly to detect changes from the last inspection, or it is likely to be useless in determining if there is a problem or not.
Metal Rod
A steel or aluminum rod can be used to touch the piece of equipment where the suspected noise is located, with the other end touched to the ear to listen for unusual noises. The end touching the ear should be padded, and the other end should be kept away from rotating shafts. A screwdriver can be used or a tool can be improvised by using a valve wrench or even the edge of a hard hat. The goal is to collect the sound of what is happening inside rotating equipment, listening for potential problems.
Visual Inspection Methods:
Infrared or IR gun
This handheld, noncontact temperature measuring device is an easy tool to use if its limitations are understood. One Important limitation of an IR gun is that the actual sensing area of the device is cone shaped. While the laser pointer indicates only the very center of the cone, the temperature being measured can be quite large depending on how far away from the item being measured the IR gun is.
The reading is an average of what the cone sees. The effect of the ever-widening sensing cone is that the further away you are from the item of interest, the larger the surface area that will be averaged into the reading (see FIG. 1). The laser represents a spot that is the center of the cone that is being measured. FIG. 1 represents how the averaged reading area gets larger as the measure point is further from the measuring device. The closer to the object being measured the readings are taken the better the data will be.
The first surface that the device encounters is the one that will be measured. If you are trying to measure the temperature of something behind a glass or plastic cover, the temperature of that cover is what will be measured. If you wish to obtain accurate surface temperatures, then the device must be used on flat, dark-colored objects. IR guns return very low readings on shiny surfaces. It is always most through to take a reading on a piece of paper that is at the temperature of the surroundings you wish to take readings. This will represent the "ambient" readings.
For the best temperature measurement results, paint a black spot on the point of interest and use your IR gun as close as possible to the black mark. This method is the only sure way to get useful, repeatable readings. Fig 3.2 indicates the measuring area increases the further from the IR gun you are. For best results hold it as close to the object as you can.

FIG. 2-Infrared Temperature Gun
IR Camera
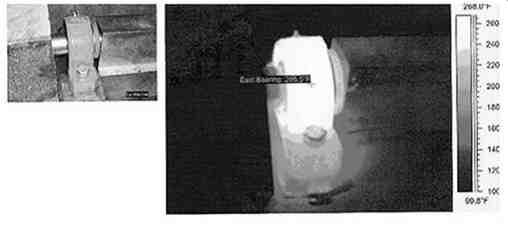
An IR or infrared camera is a device that forms an image using infrared radiation, similar to a common camera that forms an image using visible light (see FIG. 3). The temperature of objects in the output screen may be depicted in a gray or color scale range, depending on the type of IR camera you are using. A scale indicating what the displayed gray or color scales mean is usually in the output screen as an aid to help the user determine the temperatures of the various points being surveyed. What may appear to not be a problem with the naked eye may be seen very differently with the infrared camera.
Strobe light
This device has a high intensity light that can be controlled to a specific flash rate (see FIG. 4).
When an object is turning at a specific speed and the strobe flash rate is tuned to the same flash rate, the moving object appears to be stopped. This capability allows a good visual inspection to be done while a piece of equipment is turning at running speed. Issues like broken shim packs in couplings, missing keys, or broken fans on electric motors can all be inspected without having to stop the piece of equipment. With a small mismatch of flash rate it will make the object viewed appear to rotate slowly so an inspection of the entire circumference can be inspected. If a spinning object has an unknown RPM by adjusting the strobe through a range the speed can be determined.
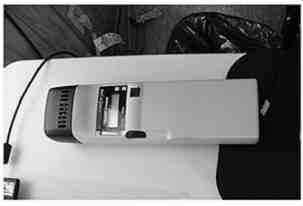
FIG. 4-Pocket Strobe Light Inspection Methods Using Vibration and Temperature
Measurement Equipment:
Vibration Meter with Accelerometer
A hand held vibration meter (see FIG. 5) with a mag-based accelerometer can be used to collect overall casing vibration readings as a means of gauging the mechanical condition of a machine. This additional monitoring tool can augment the five senses by providing information that is objective instead of subjective. Everyone that uses the same type of vibration equipment in the same place should get the same value; if 50 people touch the same piece of equipment with their hands in the same place, there are likely to be 50 different interpretations of how much vibration there is.
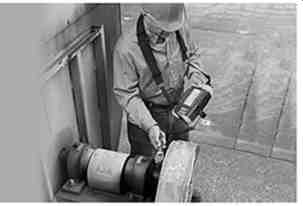
FIG. 5-Technician Using Vibration Meter with an Accelerometer
FIG. 6 illustrates how a vibration trend can be used to identify a problem. In this example, vibration data have been collected and plotted on a weekly basis. The magnitude of vibration is reported in units of velocity (inches per second).) It is easy to see that in week 10, a detectable change in vibration occurred.
Trend plots are useful because they provide visual representations of the measured parameter (e.g. vibration, temperature, pressure, etc.) over time, which can be helpful in troubleshooting and the decision-making processes. Suppose a step change in vibration occurred at the same time as a change in the process; this fact may point to a correlation between the two events that should be investigated.
Always keep in mind that a gradually increasing trend plot may indicate either a deteriorating internal or external component and should be investigated once detected. Most measurements are in velocity and as a general rule under .2 inches per second (IPS) is acceptable. The range of .3 IPS and higher is beginning to get rough. Generally the lower the number the smoother the machine is operating. There must be a trend as below to know what is acceptable and when it is not.
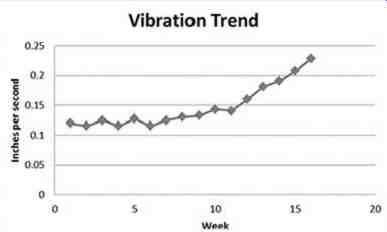
FIG. 6-Vibration Trend Example
Temperature measurement equipment
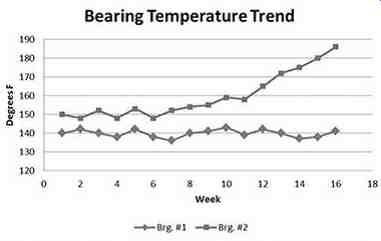
A comparison of subjective versus objective evaluations also holds for temperatures measured by touch versus a calibrated temperature device. If a quantitative analysis is required, a contact thermometer is an inexpensive and accurate tool to measure temperatures. It is simple to use and will give repeatable results no matter the color of the surface being measured as long as it is placed in the same place each measurement.
FIG. 7 shows weekly temperature trends of two different bearing temperature measurements. It is easy to see that the two bearings seem to track together. However, when a bearing problem surfaces in bearing #2, its temperature begins to increase relative to bearing #1 after week 10. This simple visual trending method can help to identify developing machine issues.
These techniques visually explain the need to know what it was yesterday, last week, last month, etc.
Putting all the data needed in one place in general term the following is suggested?
• Oil temperatures should generally be above 100 F before starting equipment.
• Temperatures above 180 degr. F are usually indicative of a problem.
• Vibration levels below 0.2 IPS (inches per second), are generally acceptable. Above 0.3 IPS vibration is starting to get rough and above .5 IPS is very rough.
Remember these are general guidelines. Always compare current operating values with those when the machine was operating normally. If you are unsure involve others to help make a determination on the next course of action.
QUIZ:
1. What senses are available to an operator to monitor machinery?
2. List three ways that smell can be used to detect a machinery problem.
3. List three ways that sound can be used to detect a machinery problem.
4. List three tools that can be used to monitor temperature.
5. List three things to look for during visual inspections of machinery.
Answers:
1. What senses are available to an operator to monitor machinery?
• Hearing
• Smell
• Touch
• Sight
2. List three ways that smell can be used to detect a machinery problem.
• Slipping belts
• Burning paint
• Degrading oil
3. List three ways that sound can be used to detect a machinery problem.
• Electric motor problems
• Broken tooth on a gear box
• Loose valve in a reciprocating compressor
• Failing or poorly lubricated rolling element bearing
4. List three tools that can be used to monitor temperature.
• Contact thermometer
• IR gun
• IR camera
5. List three things to look for during visual inspections of machinery.
• Notice if there is any unusual vibration
• Notice if there are any hot surfaces
• Check for leaking relief valves
• Check temperatures going into and out of seal pots to make sure there is a differential
