Planning Your Flooring Project
Dealing with Professionals There are many types of professionals who can help you in the planning process. Interior designers are trained to help you make design and selection choices, and it may be well worth your while to purchase even a half an hour of their services. When you have an idea of the material you want, you’ll need to decide whether to install the new floor yourself or have it done profession ally—in whole or in part. Before you approach a contractor, dealer, or installer, it’s a good idea to do some homework. The more you know about your budget, your existing situation, and what you want your new floor to look like, the easier it will be to gather the information you need and to ask the appropriate questions. Take along a dimensioned drawing of your room or rooms. A dealer or supplier can help you estimate the amount of material you’ll need and tell you how much extra to allow for mistakes, damaged pieces, and later repairs. He or she can also help you determine what preparation your existing floor may need, so be sure to describe your existing floor covering, subfloor material, and floor structure. Many dealers carry all the tools and supplies necessary for do-it-your self installation. They will rent or lend these to you. Or they can refer you to an installer if you plan to have the floor installed professionally. Doing it Yourself If you’re accustomed to doing home improvement projects yourself, you’ll want to consider installing your own flooring. In some cases it will save you time and money, although in other cases installation may already be included in the price of materials or may require considerable skill. As a general rule, the less expensive the materials and the higher the labor costs, the greater the savings by doing it yourself. The more expensive the materials or the larger the size of sheet flooring, the higher the cost of errors due to improper installation. Do-It-Yourself or Professional Installation: Time, Money, and Skill Comparisons This chart will help you compare the amount of time and money as well as the level of skill required for each type of flooring that’s covered. It helps you see what’s involved in doing a job yourself, or in having it done professionally. Below you’ll find a worksheet to help you itemize the details of your specific project. Use it to help determine the savings and other benefits you gain by doing it yourself.
Cost Comparison Worksheet To work out the details of dealer versus do-it-yourself installation costs for specific flooring materials for a room of a particular size, use the form outlined here. Some of these services, such as removing furniture, can’t be expected from an installer, but they can be negotiated and specially arranged. Contractor or Dealer Charges 1. Sub-floor preparation: Materials: _________ Labor: ________ 2. Installation: _________ Materials _________ Labor: ________ 3. Additional charges: Moving heavy furniture Delivery Finishing door openings, trim, etc. Total $___ Do-It-Yourself Costs 1. Preparation of subfloor: ___square feet of plywood or underlayment at $ 2. Finish flooring materials: ___square feet or yards at $ 3. Tools to buy (list): Tools to rent (list): 4. Supplies:
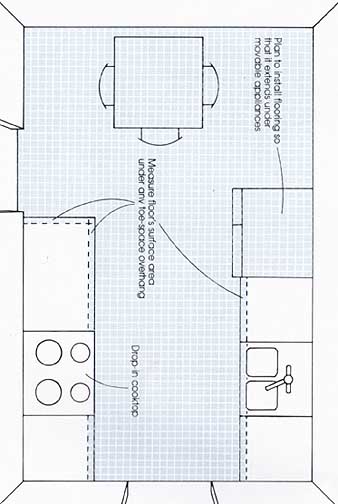
Total $ ___ Questions to ask the dealer: • What are the special characteristics of the material? • Does the manufacturer guarantee the material? • How easy is it to maintain? • How long is the wait for delivery? • Does the material cost include installation? • Are there any hidden costs? • Are there any subfloor conditions that must be met before installing this material? • How long will it take to install? • Is the installation guaranteed? Questions to ask the installer: • Will they remove the furniture? • Will they charge if they have to remove furniture? • Will they measure the space and plan the layout? • Will they inspect and clean the subfloor? • How long will it take to install the flooring? • Will they finish seams, edges, and door openings? • Will they clean up? • Will they dispose of old floor covering? • Will they inspect the completed installation? • Will they guarantee the installation? Measuring Whether you have decided to do some or all of the preparation and installation yourself or with professionals, it’s a good idea to do your own measuring and to roughly estimate the amount of material you will need, Whatever material you plan to install, you’ll find that a dimensioned drawing of the room will be an indispensible tool throughout the planning phase, • Use it as an accurate record of the size and shape of the room, closet and door openings, and the exact placement of fixed elements such as cabinetry, chimneys, pipes, and floor furnace registers. • Use it as an accurate representation of the room; a flooring materials dealer, installer, or other professional can use this drawing to give you whatever guidance you need. • Use it to compute square footages, so that you can make rough estimates of the amount of materials you’ll need, and get an idea of the budget required. • Use it as a planning and layout aid, a template, so that you get the most coverage possible for your dollar investment, and the best-looking finished floor for your time. Rooms come in an infinite variety of sizes and shapes. Some consist of four walls only; others have lots of nooks and jogs, built-in cabinets, closets, and other features which you’ll want to take into account. The illustrations show you two sample rooms and the measuring principles you would apply in making your drawings. The following pointers show you one method of measuring the area of a room that has built-in fixtures. • Take the overall measurements first. Measure the longest dimension of the room, then the widest dimension, and multiply them together. For example, this room is 20 feet long and 14 feet wide (14 feet x 20 feet = 280 square feet). • Measure the length of each permanent feature at its base and multiply it by its width. This is the amount of floor area it displaces. • Measure the length of each nook, bay, or closet, and multiply it by its width if you plan to continue the flooring material into those areas. This is the amount of additional square footage of flooring material you’ll need.
Make a Rough Estimate To make a rough estimate of the amount of material you’ll have to purchase, plan to add a certain percent age to the total square footage of the room. This will insure that you have enough material for details (such as extending the flooring into door openings), and will give you an allowance for error and waste. Use the following list to determine how much extra you will need: Wood strip and plank. This is sold by the square foot; the lumber is available in a variety of lengths, widths, and thicknesses. Add 1-1/2 square feet for each door opening; 3 percent if the room is fairly regular and rectilinear, and 5 percent if it contains many jogs or nooks. Wood block and parquet. This is sold by the square foot in boxes. Add 1-½ square feet for each door opening, plus 5 percent for error and wastage. Resilient and ceramic tile. This is sold by the square foot in boxes. Add 1-½ square feet for each door opening and 5 percent for extra tiles (in case some need to be replaced in the future). Different lots of the same tile may have different tone or color characteristics, so check through the box for consistency. Resilient sheet and carpet. This is sold by the square yard. You buy it off the roll and have it cut to length. Widths are limited: 6 or 12 feet for resilient sheet, and usually 12 feet for carpet. Add 2 to 4 extra inches to each dimension for a safe cutting margin. If you have to plan for seams (and their placement is crucial), add 8 to 10 percent to your total. If your room has many jogs, nooks or bays, and if you have to take pile direction, seam placements, or pattern matching into consideration, you may have to add as much as 20 percent to your original square footage estimate. Use your dimensioned drawing to consult with your dealer about these allowances. A Measuring Checklist • Use a steel tape—preferably one longer than the greatest length of the room. Over long distances, you’ll find it easier if you have a helper hold the end tightly against the surface you’re measuring. • Measure into doorways to the centerline of the closed door, plus 1 or 2 inches extra. • Measure from wall surface to wall surface; either remove baseboards before measuring, or take their thickness into account. • Measure every wall in the room—including bays, nooks, jogs, and closets. • To keep your sketch accurate in scale and pro portion, draw it on a sheet of ¼-inch graph paper and let ¼ inch equal 6 inches or 1 foot. Record the dimensions on your sketch.
Next: |

Saturday, 2023-06-10 14:14