|
Do you spit into your sewing machine to clean it out? Although many of us will quickly answer “Not me!” most of us do blow into the machine to clear out the fuzz. Saliva contains enzymes that can actually erode the metal parts over time. Instead, I find that a hair dryer works best. The warmth dissolves the oil already inside, making it easier to lift out, and there is enough air pres sure to blow away looser bits hiding in the back. The care of your machine, cleaning and oiling in particular, is the primary preventive measure you can take to ensure smooth machine function. Although major repairs and problems still need the attention of a trained technician, there is much you can do at home. Most of it will not only save on repairs but will bring you closer to your machine and give you a greater feeling of control over “machine problems.” Note: The air propellant used in spray cans is cold, which coagulates the oil even more and only aggravates the problem. Also, the cold temperature can be so intense that it can actually damage parts. Cleaning Your Machine For thorough internal cleaning, your best option is to use the brush that came with your machine. If you have lost it or never had one, buy or order another from your dealer. The best cleaning solvent is regular rubbing alcohol. Because it evaporates quickly, it doesn’t promote rust. Dip your brush into it and remove the lint, old oil, and other buildup. Rip an old soft cotton cloth into pieces and dip the torn edge of one piece into the alcohol. Run it gently between the separating disks of the upper tension mechanism (Fig. 2.1). Do this about every six months to remove any excess sizing, coating, dye, or other buildup that thread might have shed there. Be sure the presser-bar lifter is up so the disks are apart. If you have double disks (for two threads), be sure to clean on both sides. Try to clean as much of the metal portions of your ma chine as possible with this cloth. Fig. 2-1 Clean separating disks with a soft cotton cloth dipped in rubbing alcohol. Be sure to remove the throat plate, even if you must unscrew it. The fuzz that builds up there from shedding fabrics can actually act like a sponge, soaking up oil and becoming like concrete. When it's hard enough, it can actually stop the feed dogs from moving at all. Note: Learn this important technique for removing these and other screws. When you put the screw driver in the slot, put your other hand on top and press firmly while turning. This prevents marring the slot, strip ping if, or making burrs (Fig. 2.2).
Never poke around the bobbin area or elsewhere with your seam ripper or other metal objects to “clean” it. You can create burrs or scratches, which will adversely affect the tension. Remember: When two pieces of metal come together, one of them is going to lose. The best items to use if you need to dig inside are bamboo skewers or orange sticks. Toothpicks are too weak. Don’t be afraid to unscrew the top and bottom of your machine to get in side for maintenance. Caution: In an oscillator machine, the bobbin case will lift m easily, so you can clean and oil inside the shuttle. A rotary casing doesn't come apart. Be sure you know which kind of machine you have before taking it apart. If your bobbin case is re movable, take it out and clean it with rubbing alcohol. The readily accessible areas should be cleaned before you start a project. The more difficult-to-reach areas should be cleaned about every six months, ac cording to usage. The outside of your machine should also be cleaned with rubbing alcohol. Normal household cleaners can leave a sticky residue if they seep in side. Dampen a soft cloth and wipe the surface. Note: If you have an antique ma chine and wish to clean it, using alcohol on the black lacquer will remove the artwork. Instead, use Grumbacher’s oil-paint cleaner, which you can find at any art supply or craft store. Cleaning the Motor Brushes If you think your machine has slowed down over the years and is running sluggishly, you may need to clean the carbon brushes in the motor, which may be dirty or seated improperly. To accomplish this, disengage the clutch inside the hand-wheel as if to wind a bobbin, depress the foot pedal for about 10 minutes, and run the motor until you hear a change in its whirr. (Note: If you have trouble loosening the clutch, see Gremmie No. 6 in Section 5.) Remember: Always oil your machine after cleaning before you use it. Oiling and Lubing The most frequently asked question about care of the sewing machine is, “How often should I oil it?” Depending on how often you sew and the fabrics you use, you will need to oil your machine approximately every six hours of running time: that's , the time you are actually sewing, not pinning or ironing. Use only sewing machine oil in your machine. Do not use any all-purpose household oil such as 3-in-1. I once saw a machine that had been oiled with olive oil for ten years and finally had stopped working. The best oil doesn’t have to be the one that came with your machine, but it must be specifically for sewing purposes. The detergents in household oils leave tacky residues that one day will cause your machine to stop running. Even if you don’t use your machine often, this kind of oil will coagulate. Sewing machine oil, on the other hand, evaporates, even when the ma chine is idle. That’s why you especially need to oil a machine that has not seen action for some time. If the manufacturer of your ma chine doesn’t recommend oiling, but it begins to make noise after a while, you can use a non-oil lubricant such as Tri-Flow. It is available in some sewing-ma chine stores, bicycle shops, and hard ware stores. Please refer to your manual to find the exact spots to oil. The part that needs to be oiled the most often, however, is the race. Because it takes two revolutions of the shuttle to make one stitch, the shuttle moves twice as fast as any other part. So this area needs to be oiled twice as often, or about every six to eight hours of running time. You will know when it needs to be oiled because it will sound clattery. A good way to find out what places need to be oiled is to put the machine on its widest zigzag and longest stitch and hand-turn the wheel forward. Any part that moves needs to be oiled. Oil wherever two pieces of metal come together. The machine should be oiled when the uptake is at its highest point. Machines are set up so that the internal workings line up for proper oiling at that point. Repeat this process about once a month. Even though you don’t need to use a lot of oil, it’s a good idea to run a piece of scrap cloth through before starting your project to absorb any excess oil that might stain your good fabric. Unless your manual specifies oiling the motor, never oil or drip oil into it. The sewing machine works via closed circuit. The power flows alternately to the top and bottom of the motor. If you oil it, you can complete the circuit and blow it up. Some older machines have special caps near the motor that lead directly to the bearing that needs oil, but they have nothing to do with oiling the motor itself. Your manual will specify what parts need to be oiled. If your manual recommends lubing the gears, use the special sewing machine lube sold at most fabric stores. It is similar in consistency to Vaseline. Check your manual to see which areas to lube (Fig. 2.3). Lube them every six months to a year.  Fig. 2-3: Lubricating the gears: Apply lubricant between gears. Do not use oil on the gears. Oiling can cause them to slip, and your ma chine will not work. You should have your machine professionally cleaned and lubed about every five to ten years whether you use it often or rarely. Over time, the sol vents coagulate. A good repair shop will thoroughly strip your machine and clean places you are unable to reach. Removing Burrs A burr is a snag caused by a nick or hit from another piece of metal, such as a needle or seam ripper. It can cause jerky seams, snags in the fabric, or seams that don’t feed straight or smoothly. Now that you understand how important it's that the thread slide smoothly through the machine, you see how burrs can inhibit the progress of the thread as it travels through the ma chine and affect the quality of the stitches. That extra drag will affect the total gram weight of pull and throw off the tension. It is important to check occasion ally for burrs. Even tiny burrs can cause major problems with both sewing quality and sewing ease. You can find them in many places and for many reasons. The primary cause is the fabric puller— the sewer who reaches behind the bed of the machine and tugs on the fabric to “help” feed it through. If the fabric is pulled after the needle has entered it, the needle will bend back and strike the throat plate, often breaking. In the process, that action gradually chips away at the throat plate, causing burrs, especially at the back of the hole (Fig. 2.4). 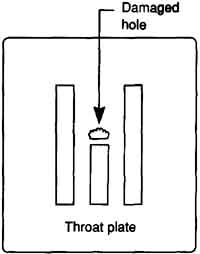 Fig 2-4: Fabric pull damage to throat plate Burrs can also be caused by broken needles that fall into the shuttle area. Check bobbins, bobbin cases, and presser feet for rough spots; they can occur here, too. Burrs are best removed with a piece of crocus cloth, which is very fine sand paper made of jeweler’s rouge impregnated in fabric. It will smooth over the burrs without creating new rough spots. Beware of other sandpapers; none is as fine as crocus. You can buy crocus cloth at most hardware stores or lumber-yards. Run your fingers over all the metal parts of your machine. When you find a rough spot, remove it. Don’t forget the shuttle area, even if burrs here are harder to find and remove. You may want to consider replacing the throat plate if it has too many burrs. Do not put a plastic cover over your machine to keep off the dust. Plastic actually makes the machine sweat, which encourages rusting of metal parts. Cover the machine with a towel or cloth instead. Never leave or store your needles and metal attachments in front of a window, where they might rust from frequent condensation. Mechanical Repairs After you’ve tried everything you know, including reading your manual and rethreading the machine, you may need to take it into the shop if it in fact isn’t working. Do not strip the machine before taking it in. Don’t remove the needle and don’t remove the thread. Leave all the knobs in the positions they were in when the problem occurred. Do not remove the bobbin or its casing, and don't clean anything. Some people are embarrassed by taking in a dirty machine, but if you remove all the evidence, chances are the mechanic can’t solve the mystery. Take a scrap of the fabric you were working on when you had a problem to the shop. If the mechanic can get your machine to sew but you can’t, you are probably doing something wrong. Feel free to ask about what repairs were made, but give the mechanic all the help you can by letting him see how you were sewing. If you are in fact having operator problems, the rest of this guide will help you improve your mind-set. |
| PREV: How a Sewing Machine Really Works | NEXT: Don't be too Cheap | Home |
Wednesday, 2020-03-04 8:48
