Zippers, buttonholes, ties, and loops and all fastenings you will want to use in your sewing projects. There are tips and tricks for inserting and making them that’ll make the tasks easier and the end results look better. Centered zipper This style of zipper is typically used to fasten a skirt or pants. Zippers can seem daunting, but if you follow these instructions carefully you’ll find it easy to insert one. The technique is exactly the same for the different types of zipper—concealed zipper dress zipper or metal-toothed zipper See our related Guides on:
Best used for: Zipper that opens at the top of a seam. 1. Mark with a pin the position in the seam where the end of the zipper will be. Sew the seam up to the pin, take the pin out and reverse a few stitches to secure the end of the seam. 
2. Using a fabric marker mark the seamline on the open section of the seam, where the zipper will be. Baste along the marked seam line, using short, tight basting stitches to close the open section of the seam. 3. Press the whole seam—the machine-sewn section and the basted section—open. At this stage you should finish the edges of the seam allowances by either zigzagging or overcasting them. 4. With the fabric right side down, position the end stop of the zipper on the machine-sewn section of the seam, just below the start of the basting. Align the teeth with the seamline and pin the zipper in place through the tape. Lay the zipper along the basted section of the seam, keeping the teeth aligned with the seamline and pinning it in place. 5. Baste the zipper in position, basting through the zipper tape on both sides of the teeth. Baste in the middle of the tape to avoid getting entangled in the machine sewing. 
6. When you are machine-sewing the zipper you’ll need to move the pull and on some zippers this is easier to do by pulling up than by pushing down. Test yours to see how easily the pull moves in each direction and if it's trickier to push down, then wriggle ft down to the halfway point now, before you start sewing. 7. Set the sewing machine to a medium straight stitch and fit the zipper foot. Position the top of the zipper under the foot with the side of the foot against the zipper teeth, so that the needle will start sewing as close to the teeth as possible. Sewing quite slowly, sew the zipper in place—keeping the edge of the zipper foot running along the teeth of the zipper—until just before you reach the pull. 8. Stop sewing with the needle down in the fabric. Lift the presser foot and wriggle the pull up past the needle. This can be a bit tricky and you may need to pivot the fabric around the needle, which is fine as long as the needle remains firmly in place in the fabric. Don’t move the pull up to the top, just enough to get it past the needle. Straighten the fabric, lower the presser foot, and continue sewing to the bottom of the zipper; just below the end stop. 
9. Sew across the zipper tape below the end stop. Cut and knot the threads to secure the stitching. 10. Move the zipper foot to the other side. Starting at the top of the zipper; repeat Steps 7 - 8 to sew the other side of the zipper tape in place, knotting the threads at the bottom to secure the stitching. Sewing from the top down on both sides of the zipper prevents the fabric twisting. 11. Using sharp embroidery scissors and the tip of a darning needle, cut and pull the basting stitches out of the seam. Press the fabric at over the zipper. Zipper trick: If you are making a skirt or pants with a waistband and a centered or lapped zipper, then buy a zipper that's about 2” (5cm) longer than you need. Prepare the seam and position the zipper end stop as usual. Pin the zipper in place so that the top, and the pull, protrude above the edge of the fabric. Sew the zipper in place quickly and easily, without having to wriggle the pull past the needle. Unpick the basting, open the zipper cut the protruding top section off and sew the waistband over the teeth at the top of the zipper. Simple and clever.  
Inset zipper You’ll use this zipper in the middle of a seam, perhaps in the side seam of a dress or across the back of a large pillow. The principle is very similar to a centered zipper. Related topics: Stitches - How to run a sewing machine - Pinning - Basting - Pressing - Sewing straight lines - Starting and finishing sewing - Finishing edges - Open seam - Shortening a zipper - Centered zipper Ideal for: Zipper that opens in the middle of a seam. 1. Follow Steps 1—2 of Centered Zipper putting in a pin to mark both ends of the zipper and sewing both ends of the seam. Baste the open center section. 
2. Press the whole seam—the machine-sewn section and the basted section—open. At this stage you should finish the edges of the seam allowances by either zigzagging or overcasting them. 3. Follow Steps 4—6 of Centered Zipper to pin then baste the zipper in position. 4. At the top of the zipper baste the toothless section of the tape together above the zipper pull. 5. Follow Steps 7—11 of Centered Zipper to machine-sew the zipper in place and finish it Machine-sew across the basted tape at the top, down one side, and across the end. Then sew down the other side, starting from the top. Fig. an inset zipper 
Separating zipper This is the type of zipper typically used on a jacket; the two halves separate completely at the bottom. Nylon zippers of this style are usually available in just a narrow range of colors, with the metal-toothed ones being more easily found. See our related Guides on: Stitches, How to run a sewing machine, Pinning, Basting, Pressing, Starting and finishing sewing, Finishing edges, Centered zipper Ideal for: Zipper that needs to open completely. 1. Finish the edges of the fabric before you insert the zipper Separate the zipper and lay the side with the pull right side down on the right side of one piece of fabric. Match the edge of the zipper tape with the raw edge of the fabric. Pin then baste this side of the zipper in position. 2. Follow Steps 7—8 of Centered Zipper to machine-sew the zipper in place. Knot the threads at the back at each end. 
3. Fold the zipper tape to the wrong side of the fabric, so that only the teeth show on the right side. Press the fold. 4. Zip the free side of the zipper onto the sewn-on side. 5. With the zipper flat and right side up, lay the other piece of fabric right side down on top of it Match the raw edge of the fabric with the edge of the zipper tape and pin then baste them together. 6. Separate the zipper again. Machine-sew, then fold and press the second side of the zipper in place in the same way as for the first side. Remove all basting stitches. 
A separating zipper. You can topstitch the fabric close to the zipper teeth to help hold the zipper tape flat, the left-hand side of this sample has been topstitched. Lapped zipper As with a centered zipper this style is used for skirts and pants, but it’s more professional-looking as a flap of fabric completely covers the zipper There are some complicated ways of inserting this style of zipper but this method is straightforward. You may find that you prefer it—as I do—to a centered zipper for looks and ease of insertion. In this example the overlap is on the right-hand side, so the zipper would be on the left-hand side of the body See our related Guides on: Stitches, How to run a sewing machine, Pinning, Basting, Pressing, Sewing straight lines, Starting and finishing sewing, Finishing edges, Open seam, Centered zipper, Ideal for: Zipper that opens at the top of a seam. 1. Follow Step I of Centered Zipper to sew the seam below where the zipper will be. Using a seam gauge to measure accurately, press the 5/8” (1.5cm) allowances on the open section of the seam to the wrong side. Finish the seam allowances by zigzagging or overcasting them. 
2. Lay the fabric right side up with the open end of the seam toward you. Open the left-hand seam allowance out and then re-press 3/8” (1cm) to the wrong side. On the right side you will see the original pressed line then a further ¼” (5mm) of fabric. 3. Lay one side of the zipper under the edge of the left-hand piece of fabric, positioning it so that the folded edge is against the zipper teeth. Pin then baste it in place, basting along the line pressed in Step 1, the edge of the original seam allowance. 4. Set the sewing machine to a medium straight stitch and fit the zipper foot Right side up, position the top of the zipper under the foot with the side of the foot against the zipper teeth, so that the needle will start sewing as close to the teeth as possible. Have the right-hand piece of fabric folded right side down across the side you are sewing. Machine-sew the basted side of the zipper in place. 
5. As you get toward the bottom of the zipper make sure the right-hand piece of fabric is completely out of the way so that you can sew past the start of the seam to sew the tape to the seam allowance right down to the bottom of the zipper Right a lapped zipper. 6. With the fabric right side up, lay the right-hand piece over the zipper matching the folded edge with the line on the left-hand side that was pressed in Step 1. Pin the flap in place. 7. Turn the fabric over. On the wrong side, baste the free side of the zipper tape to the fabric. Keep the stitches in a straight line, as they will be your guide when it comes to machine-sewing this side of the zipper 8. Right side up, position the fabric under the foot so that the needle will start sewing along the line of basting stitches worked in Step 7.This is one occasion where you will be sewing over basting stitches and you’ll need to pick them out afterward. Machine-sew from the top to the bottom of the zipper. 9. With the needle down in the fabric, lift the presser foot and pivot the fabric 9O around the needle. Sew across the bottom of the flap. Knot the threads on the back to secure the stitching. Remove all basting stitches. Shortening a zipper Sometimes you won’t be able to get a zipper that’s the right length, but for centered, inset, and lapped zippers it’s very easy to shorten a longer one as needed. This technique works on all nylon-toothed zippers; for metal-toothed ones, follow Step 1 ,then use craft pliers to pull off a couple of the zipper teeth 3/8” (1 cm) below the stitches so that you can cut the tape without damaging your shears. See our related Guides on: Centered zipper; Inset zipper; Lapped zipper. Ideal for: Centered, inset, and lapped zippers. 1. Thread a needle with doubled sewing thread in a color that matches the zipper (a contrast color is used here for clarity). At the required length, make five or six firm, straight stitches over the zipper teeth. Secure the thread with a couple of backstitches in the zipper tape. 2. Using pinking shears, cut off the zipper about 3/8” (1cm) below the stitches, 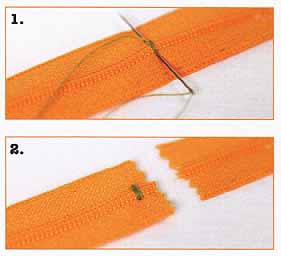
Automatic buttonhole This function isn't found on all machines, but is one that I recommend. It makes professional-looking buttonholes quickly and easily. Different sewing machines may have slightly different ways of making automatic buttonholes, so read your manual before trying one. See our related Guides on: Buying your first sewing machine; Stitches; How to operate a sewing machine; and , Pressing. Idea for: Buttonholes in fabric 1. Fit the button you want to use into the buttonhole foot. The machine will automatically make a buttonhole the right size. 2. Mark the position of the buttonhole on the fabric. 3. Position the fabric under the foot so that the needle will start sewing at the end of the buttonhole nearest to you. Set the machine to the buttonhole function. Gently press the power pedal and the machine will sew the button hole. You need to be prepared to do some gentle steering, particularly when making buttonholes near seams, as lumps or ridges in the fabric can throw the buttonhole off course. When the buttonhole is complete, pull the threads through to the back and trim them off. 4. Press the stitching. Put a pin in at each end of the buttonhole, just inside the end bars. These will make sure that you don’t cut the threads by accident. 5. Using small, sharp-pointed scissors, very carefully cut the buttonhole open. Push one point of the scissors into the fabric in the middle of the buttonhole to start cutting to one end, then turn around and cut to the other end. 
Manual buttonhole If you don’t have an automatic buttonhole function on your machine, then you can make them manually, but do practice first as they are tricky to get right. On some machines the zigzag isn't as tight stitched in reverse as it's stitched forward, so the two sides of the buttonhole won’t match perfectly. See our related Guides on: Stitches, How to run a sewing machine, Pressing, Automatic buttonhole. Best for: Buttonholes in fabric 1. Mark the position of the buttonhole on the fabric. Set the sewing machine to a wide zigzag with zero stitch length. Position the fabric under the foot so that the needle will start sewing at the end of the buttonhole nearest to you. Make four or five stitches, ending with the needle on the left-hand side, but not down in the fabric. 2. Set the machine to a very narrow, tight zigzag. Press the reverse lever and slowly sew backward along the length of the marked line. The right-hand edge of the stitching should just cover the line. End with the needle on the left-hand side, but not down in the fabric. 3. Reset the sewing machine to a wide zigzag with zero stitch length. Make four or five stitches, ending with the needle on the right-hand side, but not down in the fabric. 4. Reset the sewing machine to a very narrow, tight zigzag. Sew forward until you reach the bar stitched in Step 1.The left-hand edge of the stitching should be very close to the stitches made in Step 2. 5. Pull all the threads through to the back them into a hand-sewing needle and weave them in and out of a few of the buttonhole stitches to secure them. Follow Steps 4—5 of Automatic Buttonhole to cut open the buttonhole. 
Two automatic buttonholes (above), one with a button, and two manual buttonholes (below), one with a button. 
In-seam buttonhole This is essentially a gap in a seam through which you put a button and it's ridiculously simple to make. The pieces of thin fabric for the stays need to have the same laundering requirements as the main fabric. See our related Guides on: Stitches, How to run a sewing machine, Pinning, Pressing, Sewing straight lines, Starting and finishing sewing, Finishing edges, Open seam. Best for: Buttonholes in seams 1. Using pinking shears, cut two pieces of very thin fabric (we have used organza; organdie or cotton lawn would also work), each 1 1/4” (3cm) wide by the required length of the buttonhole plus 3/4” (2cm): these are the stays. Mark the length of the buttonhole centrally on one stay. On the main fabric, mark the seamline along the section where the buttonhole will be. 2. Lay the marked stay on the seam line where the buttonhole will be. Lay the other stay on the other side of the seam, matching the edges of them as best you can (they don’t need to be perfectly aligned). Pin the stays in place, putting the pins in as you would if you were going to sew over them (which you aren’t). 3. Set the sewing machine to a medium straight stitch and sew the seam up to the rst pin. Reverse a few stitches to secure the seam. Tum the fabric around and sew the rest of the seam from the other end up to the other pin, reversing as before. 4. Press the seam open, then finish the edges of the seam allowances. 
Two in-seam buttonholes, one with a button. 
Ties This technique can be used to make straps of any width and length to serve as bag handles, belts, dress straps, and curtain tab tops, as well as ties. See our related Guides on: Stitches, How to run a sewing machine, Pinning, Pressing, Sewing straight lines, Starting and finishing sewing, Outward square corners. Ideal for: Straps of any width and length 1. Cut on the straight grain a strip of fabric measuring four times the required width of the tie by the length plus 3/4” (2cm).At each short end, press under 3/8” (1cm). Using small, sharp scissors, cut off the corners of the pressed-under section, as shown. 2. Wrong sides together fold the tie in half along its length and press the fold. 
3. Open the tie out flat Fold one raw edge to the middle and press the fold along the length of the tie. 4. Fold in and press the other raw edge. Fold the whole tie in half along the line pressed in Step 2 and press it thoroughly. 
5. Set the sewing machine to a medium straight stitch and fit the zipper foot. At one end of the tie, position the fabric with the edge of the foot against the open edge of the tie, so that the needle will start sewing close to the edge. You can check that it's positioned correctly by turning the handwheel to lower the needle until it just touches the fabric. Topstitch along the edge, reversing at each end to secure the stitching. If the ends of the tie are going to be hidden in a seam, then there is no need to sew across them. If they are going to be on display, then start at the fold edge on one short end, sew across to very close to the open edge, put the needle down into the fabric and pivot the tie around it before topstitching the open edge. Repeat to topstitch the other short end of the tie. A tie. 
Rouleaux loops These pretty fastenings are often used on wedding dresses and evening gowns, though they work well on any project requiring a feminine touch. Each loop must be long enough for the button to pass through plus 1.25” (3cm), so experiment before cutting the loop lengths. The loops are sewn into a seam between the main fabric and a facing and it’s usually best to use iron-on interlacing to stiffen the facing. See our related Guides on: Stitches, How to run a sewing machine, Pinning, Basting, Pressing, Sewing straight lines, Starting and finishing sewing, Finishing edges, Open seam, Making bias strip and binding. Ideal for: Delicate fastenings; Lightweight and medium-weight fabrics. 1 Cut a 0.75”- (2cm-) wide piece of bias fabric long enough to make the required number of loops. Right sides together fold ft in half along its length. Set the sewing machine to a medium straight stitch and fit a 0.25” (5mm) patchwork foot At one end of the strip, position the fabric with the edge of the foot against the open edge of the strip and sew the seam. Cut the threads leaving 6” (15cm) tails. 2. Thread a blunt-tipped darning needle with one of the tails of thread. Slide the needle up the tube of fabric, working it along until it appears at the other end. 3. Pull the thread through, coaxing the end of the fabric it’s attached to turn in and emerge at the other end of the tube. Keep pulling gently (you really don’t want the thread to snap) to turn the whole tube right side out. 4. Cut off pieces of tube the required length. Fold them in half and press them flat so that the folded ends look like this. 
5. Pin each loop in position on the right side of the fabric, matching the ends of the loop with the raw edge of the fabric. Baste the loops in place. 6. Fit a straight presser foot Position the fabric under the needle with the edge of the presser foot against the raw edge of the fabric and machine-sew over the ends of each loop. Make sure that the loops remain at right angles to the raw edge of the fabric. 
7. Right sides together lay the facing on the main fabric, matching the raw edges. Pin the layers together and baste them if necessary. 8. Taking a 5/8” (1.5cm) seam allowance, machine-sew the facing to the main fabric. Remove all basting stitches. 9. Press both the seam allowances toward the facing. 10. Position the fabric under the needle with the presser foot on the seam allowances and the edge of it against the seamline of stitching. Understitch the facing by sewing the seam allowances to it. 11. Wrong sides together fold the fabric and facing along the seam so that the loops protrude. Press the folded seam. 
Sewing the bias strip: If you don’t have a 0.25” (5mm) patchwork foot, out the strip just a little wider and seam it using an ordinary straight presser foot. The principle is that the stitching should run more or less up the middle of the folded strip.
|
| PREV: All about hems | NEXT: | Home |
Monday, 2011-08-22 15:27
