Big home-repair and improvement jobs often call for heavy-duty or specialized equipment. Choosing the right construction tools and equipment can mean the difference between doing a job quickly and completely, or working at a disadvantage and struggling just to finish it.
Some things, such as a stepladder, are worthwhile to buy or, like sawhorses, to make. But renting is the best choice for larger and more specialized equipment. This section deals with some of the most useful equipment for large home projects: ladders, sawhorses, scaffolding, concrete mixers, some special-purpose power equipment, hoists, and various kinds of jacks.
LADDERS
When you need elevation to do a job, don't climb up on a household step-stool or a stack of boxes. Use a proper ladder, or for large-area work a scaffold. There are four types of ladders to choose from, the familiar stepladder, a fixed-length straight ladder or an extension ladder, and versatile folding ladders.
Whichever type you need for a job, choose a ladder that is rated Type I Industrial / Commercial or Type II Commercial and that complies with the Occupational Safety and Health Act. The rating and compliance notice must be given on one of the rails, along with warnings and basic use information. Type I ladders meet standards for the most rugged continuous use. Type II ladders are quite adequate for home use and are less expensive.
Ladders are made of wood, metal— aluminum, steel, or magnesium alloy— or a combination of fiberglass rails and metal steps or rungs. Metal and fiber glass ladders are essentially maintenance-free, and especially in large sizes are much lighter in weight than wood ladders. All are equally useful for almost all kinds of work, but wood or fiberglass are safest for electrical work, to minimize shock hazards. Valuable features are nonskid pads or pivoted shoes on the ladder feet, and non-marring bumpers or rollers at the top. A stabilizer that bolts to the top of a straight or extension ladder makes the ladder much safer to use.
STEPLADDERS
Stepladders range from 3 to 12 feet or more in height when closed; the open work height is a bit less. A 6- or 8-foot ladder is a good household choice. It should have rugged hinges and folding spreader braces, and both horizontal and X bracing in the rear legs. The ladder should be firm when open, and the steps should flex little or not at all as you stand on them. A wooden ladder should have metal braces or tie rods under the steps. A pail shelf is extremely useful; don’t consider a stepladder with out one.
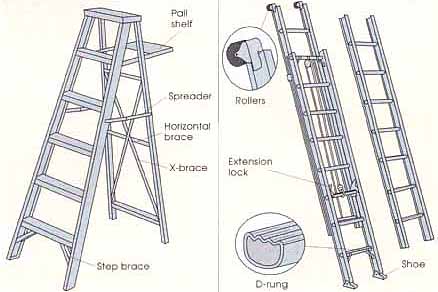
A STEPLADDER (left) can be used for most in door work as
well as low-height outdoor jobs. Look for these features. A STRAIGHT OR EXTENSION
LADDER (right) is what you need for working 10 feet or higher outdoors.
STRAIGHT LADDERS
A straight, fixed-length ladder is specifically meant for working on vertical surfaces and climbing to high spots. Both the rails and the rungs must be sturdy. Rungs may be round (the least comfort able and sate shape), D-shaped, or flat a in a stepladder. Flat and D rungs should have ridges or some other non- slip surface.
EXTENSION LADDERS
An extension ladder is actually two straight ladders of equal length. One des in brackets or tracks on the other and can be extended by pulling on a plastic rope that runs over control pulleys. Locks on the extension section fit over the rungs of the lower section to provide secure support. The nominal sizes of extension ladders are from 16 to 40 feet, the total length of both sections. The actual maximum working length is 3 to 5 feet less, because the sections must overlap at least that much when extended.
FOLDING LADDERS
There are two types of highly versatile folding ladders. One, a folding straight ladder, consists of three or four hinged sections that can be folded into “A”, inverted-U, or M shapes for various situations. The other is a kind of stepladder iii which the rear legs are two extension ladder sections. It can be used normally, straight, or on stairs, as illustrated at the right. These ladders must have strong rails and rungs and , above all, rugged hinges that work freely and lock securely in each position.
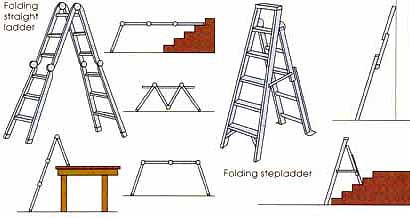
FOLDING LADDERS can be used on stairs and uneven ground
or as scaffolds, as well as conventionally. The prime requirement is strong
hinges that lock positively but are easy to release when desired.
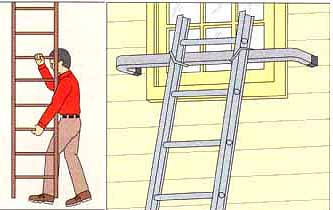
CARRY A TALL LADDER this way. Bend your knees to lift or
lower the ladder. Be sure the route is clear overhead. A STABILIZER (right)
bolts to the top of a ladder. It prevents side tilting and can span window
openings.
Working With Ladders—Safety Points:
• Never move an unfolded or extended ladder more than a very short distance.
• Before moving a ladder, inspect the route for hazards on the ground and above. Overhead tree branches or wires could tip a tall ladder out of control, or give you a serious electrical shock.
• To carry a tall ladder in a vertical position, brace it with one rail against your shoulder and thigh as illustrated above. Crouch slightly and grasp a lower rung with one hand. Grasp an upper rung at forehead height with the other hand. Keep the ladder tight against your body as you straighten your knees to raise it slightly. Walk steadily to your destination and bend your knees to lower the feet of the ladder to the ground.
• Pull the base of a straight or extension ladder out from a wall a distance equal to one- fourth the length of the ladder—for example, 4 feet for a ladder extended to a 16-foot working length. That will give a safe lean angle of about 75 degrees. and make sure the ladder does not lean left or right.
• The ladder feet or shoes must be on firm, level support. Put down boards on soft earth; clear away gravel, if any, to reach firm ground below.
• Use a stabilizer, illustrated above, across the top of a ladder both on flat wall surfaces and to bridge window openings.
• Whenever possible, tie off the top of a ladder to a chimney, to a 2 x 4 across the inside of a window opening, or to any other secure point. Have a helper steady the foot of the ladder as you climb, or stake a cleat across the feet to prevent their slipping.
• Let a ladder top extend at least two feet above a roof edge, and three feet or more above a tree branch. A branch may deflect a bit as you climb the ladder. Use only a tree branch that is strong and that angles up, not down, from the trunk. That way, if the ladder should happen to slide, the top will move to ward the trunk, which will stop it.
• don't climb a ladder with tools or other equipment in your hands. Wear a tool belt with tools hanging at the sides or behind you, never in front, or use a rope and large S-hook to pull up what you need in a bucket after you have gotten to working height.
• Before starting to climb a ladder, be sure your hands and shoes are clean and dry so you will not slip.
• Keep your hips within the width of the ladder rails. Work out to either side to the extent your arms can reach, but don't stretch or lean farther sideways. Move the ladder instead.
• On a straight or extension ladder, keep your waistline below the level of the top rung. On a stepladder never stand on the very top step (the seat) or the step just below that.
• Never have two people on one ladder.
SAWHORSES and SCAFFOLDS
Sawhorses are basic equipment. They support pieces to be worked on or, with planks or a plywood panel, can form a temporary platform. Scaffolds are specialized equipment for use where a ladder does not give access to enough area for safe, easy working.
SAWHORSES
Commercial sawhorses are made of lightweight metal. Most have legs that fold up into or alongside the crossbar; there are several different designs. To make your own sawhorses, buy either folding steel legs or brackets and insert pieces of wood cut to length.
Sawhorse brackets are about half the price of full-length metal legs. You need two brackets for each sawhorse. Cut pieces of 2 x 4 for legs; a length of 40 inches will put the top of the crossbar at about that height. For the crossbar, cut a piece of 2 x 4 or 2 x 6 that is 36 inches long. Insert the legs into each bracket, position the crossbar in the brackets with about 3 inches extending at each end, and spread the legs so the jaws grip the crossbar. Then nail or screw through the bracket holes into the legs. For permanent sawhorses, also screw into the crossbar, and fasten a stretcher between the legs at each end. For fold- up sawhorses, cut legs no longer than 30 inches. don't fasten the brackets to the crossbar, but tack on temporary stretchers when you use the horses.
SCAFFOLDS
On many large-scale projects, such as roofing or putting up siding, it's very helpful to have a variable-height plat form, a scaffold, to work from and to hold tools and materials. For safety, there are regulations regarding scaffold construction and use. Be sure to check your local building code on these points.
A scaffold consists of a support structure and a work platform. Lumber for a platform should be 8- or 10-inch-wide scaffold-grade planks of at least nominal 2-inch thickness; 9/4 (2¼ inches thick) is even better. You can rent scaffold planks or a telescoping platform.
INTERIOR SCAFFOLDS
For indoor work, you can improvise a low-level scaffold by placing planks between the steps of two stepladders or between a ladder and a stair step. Or put them across sawhorses that have stretchers nailed to the legs at each end and each side, about midway above the floor. Clamp or nail planks to their sup ports to stabilize them, or fasten cleats across the bottom of the planks at each end so they can't shift. If you have much work to do, rent a roll-around scaffold that makes working on ceilings and tall walls very easy. Wheel locks or screw-down jacks keep the scaffold from moving while you work.
CAUTION: Always attach a waist-high guard rail across the rear of a scaffold platform, to keep you from going over the edge if you step back to look at your work. OSHA regulations require toe boards as well as guard rails on scaffolds over 3 feet high.
EXTERIOR SCAFFOLDS
For some outdoor projects a scaffold can be built using ladders or 4 x 4 posts with jacks that will hold a platform of planks. For large-scale projects or working with heavy materials, rent a bolt- together scaffold frame of metal tubing and cross braces.
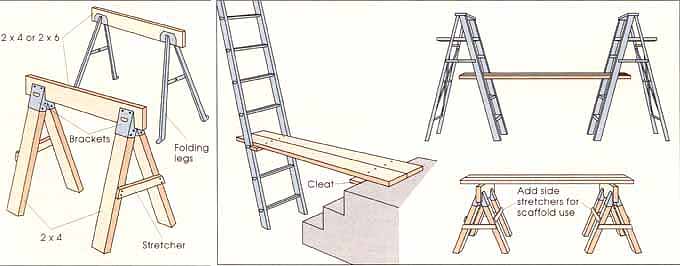
SAWHORSES are basic equipment. They are easy to make with
brackets or folding legs and 2x lumber. INTERIOR SCAFFOLDS primarily suitable
for low-level work can be improvised. Sawhorses must have stretchers across
both ends and both sides to keep the legs from spreading. Use cleats to keep
planks from shifting sideways on stairs or ladders.
SCAFFOLD JACKS
There are three types of jacks to support a scaffold platform: window jacks, ladder jacks, and pump jacks. Window jacks hook onto a bar placed across a window opening that bears against the interior walls. The jacks extend out through the window and a triangular brace bears against the outside wall be low the platform-supporting arm.
Ladder jacks hook over ladder rungs on the inside, toward the house, or the outer side of the ladder, depending on their design. To use them, two straight or extension ladders must be placed exactly parallel to one another. The ladder feet must be on firm ground or boards, and should be held against slipping by a 2 x 4 cleat and stakes. Tie off the tops of both ladders as well.
Pump jacks ride on 4 x 4 posts, which you can make by nailing 2 x 4s together with staggered joints. The posts must be set absolutely vertical in holes 9 to 12 inches deep, equally spaced from the work wall and fastened to the wall with braces. The jacks can be moved up the posts with scaffold planks across them by foot-operated levers and lowered by hand cranks. Ask for a demonstration when you buy or rent the jacks, and insist on having printed instructions de scribing their installation and use.
TUBING SCAFFOLDS
Tubing scaffolds are assembled from end frames that stack on one another, secured with connecting and lock pins.
Cross braces between each pair of end frames slip over threaded studs and are secured with nuts.
The first (bottom) section must be properly set, because everything else stacks on top of it. After attaching the cross braces, position the first section with both ends the same distance from the work wall. Put a short 2 x 6 board under each corner so the pipe foot will not sink into the earth or an asphalt drive, or slip on concrete. Use a level to ensure that each corner post is vertical and that the ends are level front to back. Add support boards under one or more feet as necessary, or use a threaded leveling foot. Then lay a platform plank across the end pieces and check that it's horizontal; if not, make further adjustments. The alignment of this first section is critically important for safety.
Extend the scaffold frame upward by inserting connector pins in the corner posts, stacking the next end frame on them, and inserting lock pins. Then attach the cross braces. Fasten the scaffold to the building near the top at both ends. Lay platform planks at the desired working height. Lay separate planks to support a load of heavy materials at a convenient working height.
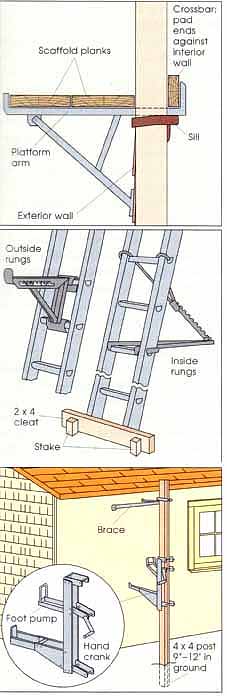
WINDOW JACKS (top) fasten to interior cross-bars, which
must be padded to protect the interior wall surface. LADDER JACKS (middle),
inside or outside type, are used in pairs on two ladders set parallel with
one another. Ladder feet must be braced. PUMP JACKS (bottom) move up and down 4 x 4 posts, which must be set into holes and fastened to the house.

METAL TUBE SCAFFOLDING is best for large, heavy jobs. Assembly
is simple, but the first section must be set absolutely plumb and level in
all directions. A solid footing and braces fastened to the building (not
shown) are also essential.
OTHER EQUIPMENT
Almost any tools or equipment can be rented. In addition to ladders and scaffolds, the items on below are among those most often needed by homeowners for large repair or remodeling jobs.
CEMENT MIXER
A power mixer to prepare concrete takes over some of the heaviest work in building a sidewalk, pouring a patio or garage slab, or similar projects. A mixer consists of a revolving drum driven by an electric or gasoline motor. To use it, tilt the drum mouth-upward and load in the proper amounts of gravel, sand, and cement for the mix you want (mix pro portions for various projects are given in the sections describing them). Turn on the motor to dry-mix the ingredients for a few minutes, then slowly add about half the required amount of water as the drum turns. Mix for two minutes, then slowly add the remainder of the water and mix about three minutes, until the concrete has a uniform color and consistency.
To dump the batch, turn off the mo tor, tilt the drum mouth downward, and let the mix pour into a wheelbarrow or into place. If you empty only part of the batch, tilt the drum up and turn the motor on to revolve it slowly, to keep the remainder from setting up. When you dump the last of the batch, use the motor to help empty the drum. Immediately put a small amount of gravel in the drum and hose in some water to clean the inside. Leave the mixer running while you place the last batch. Then dump the gravel and rinse out the drum with plenty of water.
POWER NAILER
Nailing large-area materials in place, such as roof decking or plywood underlayment for floors, can be slow, tiring work. For any job with a significant amount of nailing, use a power nailer. The time and effort it saves will be well worth the modest rental cost.
Most nailers are powered by com pressed air or by electricity. These tools use nails made in either coil or stick form for convenience in loading a large quantity at a time. Fasteners include al most all kinds of nails to heavy-duty fence and construction staples. For an air-driven nailer you will need to rent a compressor along with the tool. Rental suppliers generally stock fasteners to fit the various magazines. Wear safety goggles and hearing protection when using a power nailer.
POSTHOLE DIGGER, POWER AUGER
Digging narrow holes with straight sides for deck or fence posts is virtually impossible with a conventional shovel. With a posthole digger, or clamshell shovel, it's much easier. Hold the long handles together at the top, so the jaws are wide open, and drive the digger straight down into the ground. Twist it right and left to cut a circle, spread the handles apart to close the jaws, and pull up to lift out a bite of dirt. Repeat a few times and the hole is dug.
If you have a lot of holes to dig, for a line of fence posts, for instance, or if you need holes up to 4 feet deep, rent a power auger. An earth auger is a large, long drill bit powered by an electric or gasoline motor. As the bit turns, its corkscrew spiral feeds earth up out of the hole. Large-diameter augers are in tended for two-person operation. Large or small, an auger will save hours of backbreaking work.
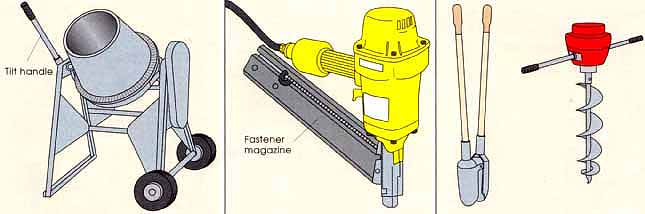
A CEMENT MIXER saves a great deal of work and gives uniformly mixed batches
of concrete. Dry the ingredients briefly before starting to add water. A POWER
NAILER speeds installation of sheathing, roof decking, flooring underlayment, and many other materials. A wide range of fasteners can be used. HOLE-DIGGING
TOOLS include a clam shell-type posthole digger (left) for small jobs, and a power auger (right) when you need to dig many or deep holes.
WINCH HOIST
When you need to move a lot of material to an elevated working level, a winch- operated pedestal hoist can be invaluable. The load rests on the forked arm of a telescoping mast that moves up or down as you turn a winch crank. The base has retractable wheels to move the hoist easily and outriggers to stabilize it before lifting a load. Hoist capacities and maximum heights differ. Fork arms of various lengths and widths are avail able to handle small compact loads or sheet materials such as plywood and gypsum panels. it's best to divide a big job into several lifts of moderate weight.
PULLEYS
For many high lifting jobs, such as get ting materials to the top level of a scaffold, a half-inch-diameter rope and a 6- inch-diameter pulley (a sheave) is all you need. For heavier loads, use a pair of pulleys—actually sheaves mounted in housings called blocks. A rope (the tackle in the term “block and tackle”) tied to an eye on the upper, fixed, block runs down under the sheave of the second, traveling block. It then passes up over the sheave in the fixed block. In double-sheave pulleys the rope again passes down under the second traveling sheave and up over the second sheave in the fixed block.
The amount of lifting force or pull, P, you need to raise a load, L, is equal to the weight of the load divided by the number of ropes that support it, not counting the rope you pull on, With a single pulley only one rope supports the load, so you need a 100-pound pull to lift a 100-pound load. But as illustrated above, with two single-sheave blocks there are two load-supporting ropes, so a 50-pound pull will lift the same load. (If you use double-sheave blocks, there would be four ropes to the load and a 25-pound pull would lift 100 pounds.) The actual pull must be a bit more, to overcome friction, and the rope must have a test rating greater than the actual full weight of the load.
The upper pulley must be securely attached to a strong beam or other sup port. When raising a heavy load, work with the pull rope wrapped once around a post or tree, so friction will help hold the load. Attach a guide rope to a bulky load so a helper can keep it from swaying and twisting as it's lifted.
JACKS and JACK POSTS
A house or construction jack is an efficient and simple workhorse, useful for supporting extremely heavy loads and raising them a short distance—for example, to permit putting in a support pier. The jack has a wide base and short body that houses a piston topped by a support plate. The piston is raised and lowered either by screw action—turning a threaded collar, or a crank to drive internal gears—or by hydraulic action when a lever is pumped up and down. The maximum extension is only about 8 to 12 inches, so it may be necessary to support the jack on concrete blocks or on cribbing, a crisscrossed stack of short 4 x 4 or thicker beams.
For taller jobs, such as supporting a porch roof while the posts are replaced, or holding a beam or header while it's fastened in position, the answer is one or more jack posts. These are pairs of nesting steel tubes that can be extended to various fixed lengths by inserting a steel pin through matching sets of holes in their bodies. The bottom tube fits on a steel base plate that should rest on a 2x board or other weight-distributing support. The upper tube has a collar with a screw piston inserted in the top. Turning the piston with a crossbar raises or lowers it a maximum of about 6 inches. The load rests on a plate and washer at the top of the piston. If more convenient, the post can be inverted so the piston is at the bottom. Use a level to make sure the post is truly vertical before starting to lift a load.
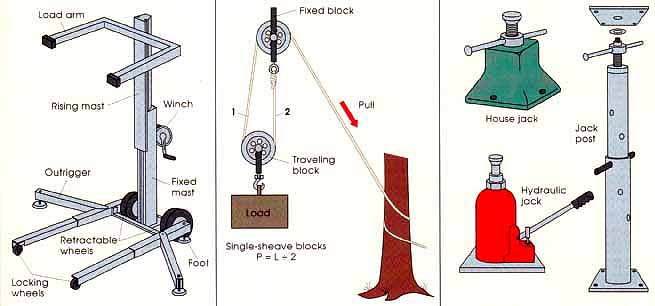
A WINCH HOIST (left) will save many trips up and down ladders or stairs.
Use it to lift materials too heavy or bulky to hand-carry easily or safely.
LIFTING WITH PULLEYS (middle) in a block-and- tackle setup like this can cut
your effort in half. With a heavy load, snub the rope around a tree or post.
JACKS and JACK POSTS (right) can support very heavy loads and raise them short
distances. The lifting is done by screw-thread or hydraulic pistons.
Previous:
Next: