First Master the Basics And the Rest Is Easy
Nothing smells quite so good as the aroma of bread baking in the oven. And the incomparable taste and texture of a loaf of wholesome, homemade, preservative-free bread is well worth the effort, especially since breadmaking is not nearly as time-consuming as many people believe.
Measuring, mixing, kneading, and shaping can be accomplished in 30 minutes or less. Rising takes longer; but this is a process that occurs by itself, leaving you free to handle other chores or simply to sit back, relax, and contemplate the warm, fresh bread you will soon be enjoying.
Ingredients and Supplies: What Goes Into a Loaf of Bread and Why
Bread is a simple food. Few ingredients and little equipment are required to make it. The basic components of bread are yeast and flour: yeast to make the dough rise, flour to provide substance and structure.
Yeast. When yeast, a plant with millions of living cells, is placed in warm water and is fed sugar and flour, it grows and multiplies, giving off the carbon dioxide gas that makes dough rise. Yeast adds vitamins, gives bread its airy texture, and contributes to aroma and flavor.
You can buy yeast in two forms: active dry and compressed. Active dry yeast is granulated and will remain fresh for months without refrigeration. Before it is used, it is generally dissolved in warm (110°F) water or milk. However, it is sometimes added directly to the other dry ingredients and then mixed with the water or milk at a somewhat higher temperature -120°F to 130°F.
Compressed yeast in cake form is more perishable: it should be refrigerated or frozen immediately. Refrigerated, it will keep about 10 to 14 days. Frozen, it can be stored for much longer periods. When you are ready to make bread, thaw the yeast at room temperature and use it immediately by dissolving it in water or milk that has been warmed to no more than 95°F You can also make your own yeast as old-time homesteaders did. Mix together 1 cup of cooked mashed potatoes, 1/4 cup sugar, 2 teaspoons salt, and 1 cup of warm water (105°F to 115°F). Pour the mixture into a 1 quart glass jar, cover with a cloth, and leave in a warm place (80°F to 85°F) for two days or until it ferments and bubbles up. One cup of this mixture is equivalent to one package of active dry yeast or one cake of compressed yeast. Every time you use a cupful, replenish the starter by stirring in 3/4 cup of flour and 3/4 cup of potato water, water, or milk. Allow to ferment for a day or so and return, covered, to the refrigerator. It is best to use the starter once a week. If you do not, stir it down after three or four weeks, discard half of it, and replenish the balance with flour and one of the liquids.
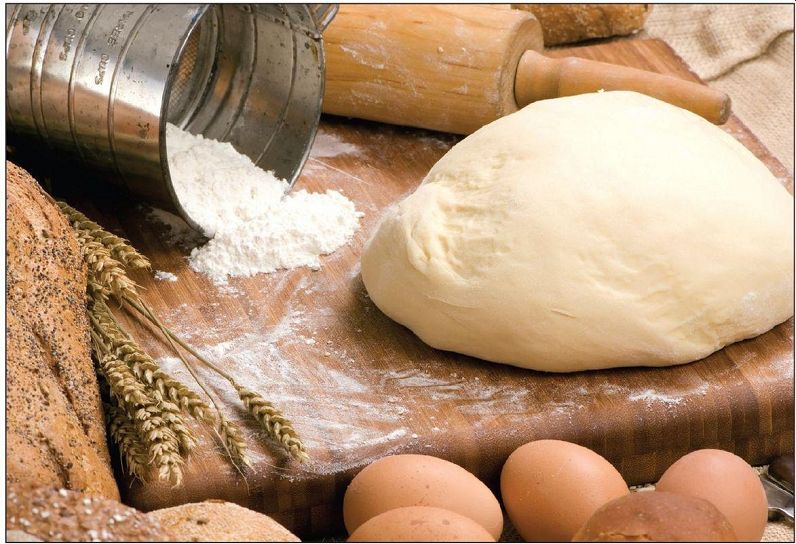
Tools and ingredients for making bread are simple. Start with a basic bread recipe and then experiment by using different grains, nut, seeds, fruit, etc.
------------
Flour. The gas emitted by the growing yeast must have a framework that will hold it. This structure is provided by the flour, more strictly by gluten, a sticky combination of proteins that is developed by stirring and kneading moistened flour. The gluten traps the minute pockets of gas given off by the yeast, causing the bread to rise. Hard wheat flour, also known as bread flour, is the richest in gluten and produces loaves of greater volume than other flours. Neighborhood bakeries sometimes sell hard-wheat flour, or you may be able to purchase it from a health food store. So-called all-purpose flour is widely available and is satisfactory for both yeast and quick breads. Buy it unbleached-it it gives the bread a better texture. Rye, whole wheat, and buckwheat flour are low in gluten and must be combined with all-purpose flour. Used alone, they produce heavy, compact breads.
Other ingredients. In addition to yeast and flour, salt, sweetener, shortening, and eggs are often used in bread recipes. Salt adds flavor and controls the yeast action.
Sweeteners add flavor, help in browning, and provide food for the yeast. White cane sugar is the type most often used, but brown sugar, honey, and molasses can be substituted in many recipes. Shortening, generally butter or lard, provides additional flavor, makes bread more tender, improves keeping quality, and helps form a brown crust.
Eggs give yeast breads color, texture, and flavor. However, dough that has been enriched with shortening or eggs takes longer to rise.
Special equipment. Several bread pans and, perhaps, a heavy-duty mixer are the only special implements you will need. The size of the pan is important, so be sure to use the one specified in the recipe. If the pan is too large, the dough will rise properly but will not expand over the top of the pan to make a dramatic-looking loaf. If the pan is too small, the dough will rise too high and slide over the sides of the pan. As a rule of thumb, the dough should fill two thirds of the pan.
Some experienced bakers prefer dark-colored bread pans to help absorb heat and give a browner crust. Special black steel pans are best, but aluminum pans are satisfactory. Darken aluminum pans before using them by heating them in a 350°F oven for five hours. Pans of heat resistant glass are also popular.
Basic White: Template for Bread-making
The instructions for making basic white bread can be used as a guide for almost all other yeast breads. Master it and you will be on the way to mastering the entire art of breadmaking from the simplest recipes to the most complex. You will need two 9- by 5- by 3-inch bread pans plus the following ingredients:
2 cups milk
1 tbsp. salt
2 tbsp. butter
1 package active dry yeast flour
½ cup warm water (105°F-115°F)
2 tbsp. sugar
6-7 cups un-sifted hard-wheat or all-purpose flour
Making the dough. Heat the milk, salt, and butter in a saucepan until bubbles appear around the edges of the pan. Remove from the heat and let cool to about 110°F.
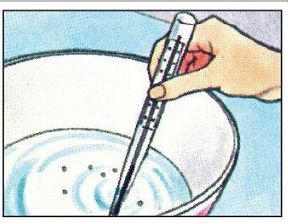
Sprinkle the yeast over the warm water in a large mixing bowl. Make sure the water is not more than 115°F: higher temperatures will kill the yeast. To test the temperature touch a drop of water to your wrist; it should feel only slightly warm. now add the sugar , stir well, and set aside for 5 to 10 minutes to "proof" the yeast; that is, to test it to see if it is alive (if it is, small bubbles will appear on the surface). Once the yeast is proofed, stir in the mixture of milk, salt, and butter.
-------------
Add 3 cups of flour. Stir to mix, then beat with a wooden spoon until smooth-about two minutes. Gradually add more flour , mixing it in with your hands until the dough tends to leave the sides of the bowl. The secret of making bread is to use as little flour as possible and still be able to handle the dough; any flour beyond this amount will tend to make the bread heavy and tough. Remember that the amount of flour given in a bread recipe can only be an approximation, since flours vary greatly in their ability to absorb moisture, differing from one locale to another and from batch to batch. Experience will help you judge the correct amount.
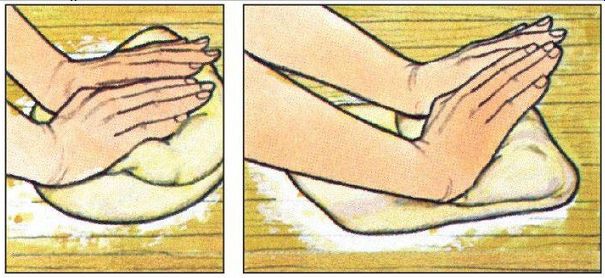
Kneading the dough. The purpose of kneading is to distribute the yeast cells throughout the dough and to develop the gluten in the flour , which traps the gas produced by the yeast, causing the bread to rise. Turn out the dough onto a lightly floured board, marble slab, or countertop. Sprinkle the dough lightly with flour. As shown in the illustration at bottom left, knead by folding the dough toward you, then push down with the heels of your hands. Fold the dough over again, give it a quarter turn, and repeat the kneading; try to develop a rhythmic motion. Continue kneading and turning for 10 minutes or until the dough is smooth and elastic. To test the dough to see if it has been kneaded sufficiently, press two fingers into it about 1/2 in. deep; the dough should spring back.
Form the dough into a ball.
-------------
First rising. Grease a large mixing bowl with about 1 tbsp. of softened butter. Place the ball of dough into the bowl and roll the dough around to cover it with butter. This will keep the surface from drying out and cracking as the dough rises. Cover with a kitchen tow el or plastic wrap, and let rise in a warm, draft-free place (80°F to 85°F) for 1 to 1 1/2 hours or until doubled in bulk. If the room is cold, put the dough in a bowl, cover, and place the bowl in a pilot-lighted oven, or on a rack over a pan of hot water, or near (not on) a radiator. If you have a wood stove, the warming oven over the range is ideal for rising.
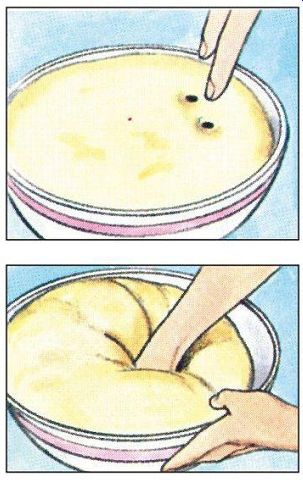
------------ To test if the dough has risen sufficiently, make an indentation
by pressing two fingers into the dough about 1/2 in. deep. If dough does
not spring back, it is ready. If the dough has risen a little too much, it
will not be seriously affected; how ever , excessive rising can change the
texture and flavor of the finished product.
Punch the dough down with your fist to deflate it. Turn it out on a lightly floured board, then knead well about two minutes. Cut the dough in half with a sharp knife and shape each half into a smooth ball. Cover with a tow el and let rest about five minutes.
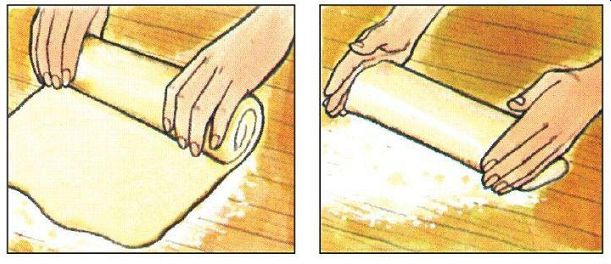
Shaping the dough. Use a rolling pin to shape each ball of dough into a 9- by 12-in. rectangle, then roll the dough up tightly from the short sides (above left). next, press the ends together to seal them, and fold the ends so that they are underneath the rolls (above right). Lift the loaves carefully and place them in the greased pans with their seam sides down.
------------- Second rising. Brush the top of each loaf with
1/2 tbsp.
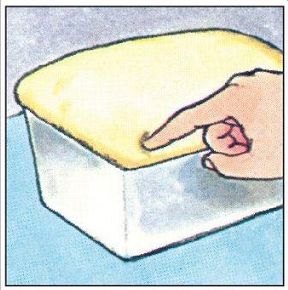
melted butter . Cover pans with a tow el. Let rise as before in a warm, draft-free place until the dough has doubled in volume or when a finger pressed lightly near the edge leaves a dent. The purpose of the second rising is to give the dough a finer grain. This rising will take less time than the first rising; 3/4 to 1 1/4 hours is typical.
In case of an interruption. If at any time during the first or second rising you cannot complete the breadmaking, punch the dough down as you did after the first rising, and place it in a buttered bowl. Set a clean plate on top of the dough, weight it down with a brick or other heavy object, and place the bowl in a refrigerator . The cold plus the weight will bring the action of the yeast almost to a halt.
Baking the bread. For glazed loaves, gently beat one egg yolk with 1 tbsp. of milk. Lightly brush the top of each loaf with this mixture just before putting the bread in the oven.
------------------ Bake the loaves 40 to 50 minutes on the lower rack of
an oven that has been preheated to 400°F. Place the bread pans so that their
tops are as close to the center of the oven as possible. In order to permit
adequate circulation of hot air , how ever , the pans should not touch each
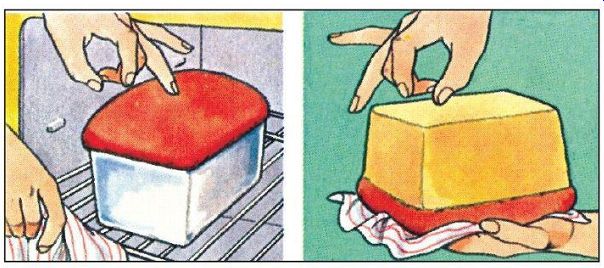
other or the sides of the oven. To check if the bread is ready, tap the top
of a loaf with your middle finger (left).
If it is done, the bread will sound hollow. To test further , take a potholder in each hand, turn the loaf out of the pan, and tap the bottom of the bread with your finger (right); it should sound hollow . If it is soft on the bottom, return the loaf to the pan, bake an additional 5 to 10 minutes, and test again.
------------ Remove the pans from the oven, turn the loaves on their sides
on a rack, and place in a draft-free location.
For easy slicing, the bread should cool completely--about two to three hours. To store the bread, put it in plastic bags and tie securely or keep it in a bread box or freezer . Bread will keep at least a month in the freezer . If you use only a small amount of bread at a time, slice the loaf before freezing and remove slices from the freezer as needed. For quick thawing of a whole loaf, wrap it in aluminum foil and heat in a 300°F oven about 25 to 40 minutes.
===