The Welcoming Hearth: Rumford Rediscovered
The theory of fireplace design is almost entirely the work of a single man-Benjamin Thompson, better known as Count Rumford, an American Tory of the colonial period who eventually fled to England. Rumford's findings, particularly his discovery that a wide, shallow firebox radiated the maximum amount of heat into a room, revolutionized fireplace design in the early 1800's. The introduction of cast-iron stoves, however, followed later by an almost universal conversion to oil, gas, or coal central heating, changed the role of the fireplace from that of a vital home-heating device to a mere status symbol; along the way many of Rumford's precepts were forgotten or ignored: in an age of limitless energy fireplace efficiency no longer seemed important.
Nowadays, Rumford's ideas are enjoying a renaissance. Although the Uniform Building Code restricts total adherence to Rumford's principles, it is still possible to construct a fireplace that comes close to the energy-efficient ideal. With a Rumford-style fireplace the fellowship and security that a blazing open hearth inspires can be enjoyed at a minimum cost and with a maximum of home-heating warmth.
---------------- Traditional-style fireplace has
the shallow heat-radiating firebox characteristic of the Rumford design. This
feature is the main reason for its excellent heating utility. The firebox and
other elements of the Rumford design, including a wide smoke chamber, can he
incorporated into almost any style of fireplace from modern to traditional.
In general, the width of the front opening should he restricted to no more
than 42 in.; anything wider will result in lower efficiency for most rooms.
How a Fireplace Works
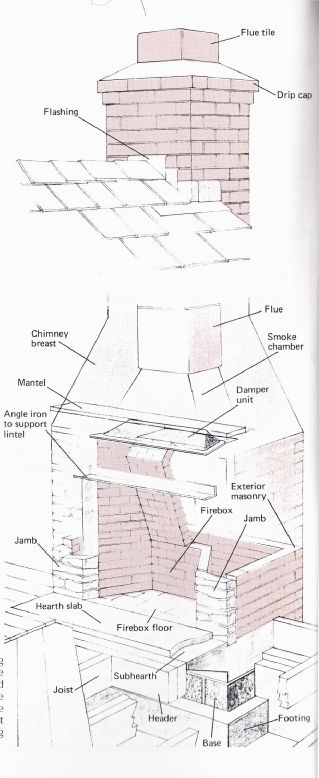
Fireplaces are basically hollow towers constructed out of strong, long-lasting, heat-resistant materials, such as stone, brick, adobe, or metal. They can be designed in a myriad of shapes and sizes; but no matter what they look like on the outside, all fireplaces are virtually alike inside, consisting of four basic units. These are the base, firebox, smoke chamber, and chimney. The hollow core of the chimney is called the flue.
The base is simply the platform upon which the upper sections of the fireplace rest. It should be solid and massive in order to support the weight of the heavy masonry above it. The firebox, built atop the base, is where the fire is set. Most fireboxes are lined with a special type of brick, called firebrick, which will with stand high temperatures. The design of the firebox should allow heat generated by the fire to be radiated outward into the room, while at the same time preventing heat from escaping up the chimney in the form of hot gases. The funnel-shaped smoke chamber is erected directly above the firebox. It serves as a transition unit, channeling the smoke from the fire below into the flue above. The final unit, the chimney, carries the smoke and hot gases away and passes them into the atmosphere.
In order to work efficiently, the firebox, smoke chamber, and chimney should be built in correct proportion to each other. The smoke chamber should have a smooth interior surface and should slope inward from its base toward the chimney opening at an angle no greater than 30 degrees from vertical. The area of the chimney opening itself should be about 10 percent of the area of the firebox opening. In addition, the size of the fireplace must fit the proportions of the room. Air drawn by the fire has to be replaced. In a small room the strong draft of a large fireplace will suck warm air out of the room and send it up the chimney. To replace this warm air, additional air will be drawn into the room, most likely from outdoors through cracks around the windows and doors. Not only is this wasteful but the room may actually be cooler than it would have been with a smaller fireplace that drew less air.
Planning a Rumford Fireplace
Determine the size and overall shape of your fireplace by i;ikirig drawings and scale models of various design I tosihilities, then taking the time to analyze each. The cation of a fireplace should not interfere with house ld traffic, and its exterior should harmonize with the iiroiindings. It is also important to realize that many tlIil)Iace components-bricks, flue tiles, dampers--are manufactured in standard sizes and that your designs iiisl take these fixed dimensions into consideration. For amp1e, the Rumford-style fireplace whose construe iii is shown here uses a standard 10-inch-wide cast-iron ltiiiiper and standard-sized terra-cotta flue tiles; neither i'u is available in Rumford's day.
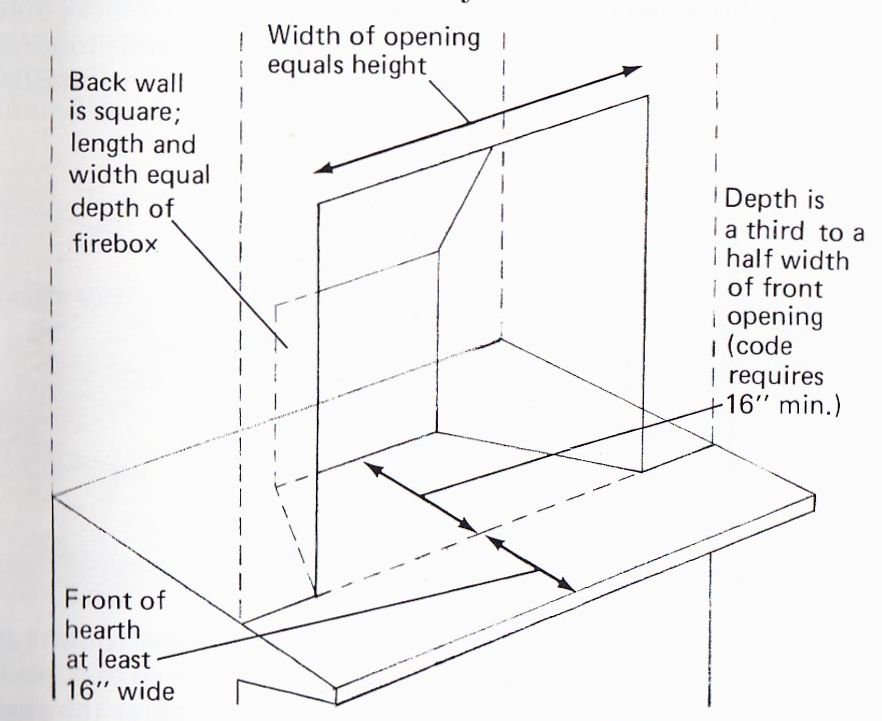
--------- Rumford firebox (above) is designed for maximum
radiation. Front opening is square. Ideal firebox depth is 1/3rd the width
of the front opening but at least to 16 in. deep in order to satify Building
Code requirements.
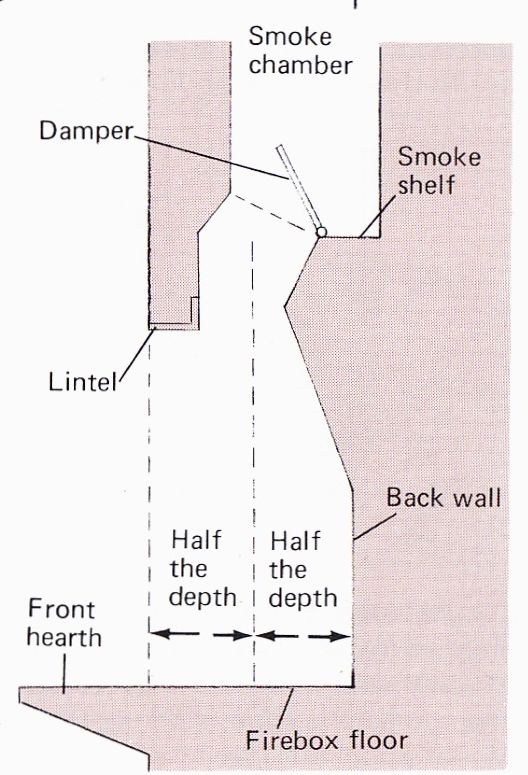
------ Smoke chamber (right) should begin at least 8 in. above
lower edge of lintel.
Tools and materials
Tools for fireplace building are the same as those used i other stone and concrete work. Some of the more specialized tools are shown below. Among materials you will need are cement, sand, and concrete block for the footing, base, and hearth; firebrick for the firebox; ordinary red brick for the smoke chamber, exterior, and chimney; and terra-cotta flue tile for the chimney interior. Some special mortar and concrete mixes are also necessary (see chart at right).
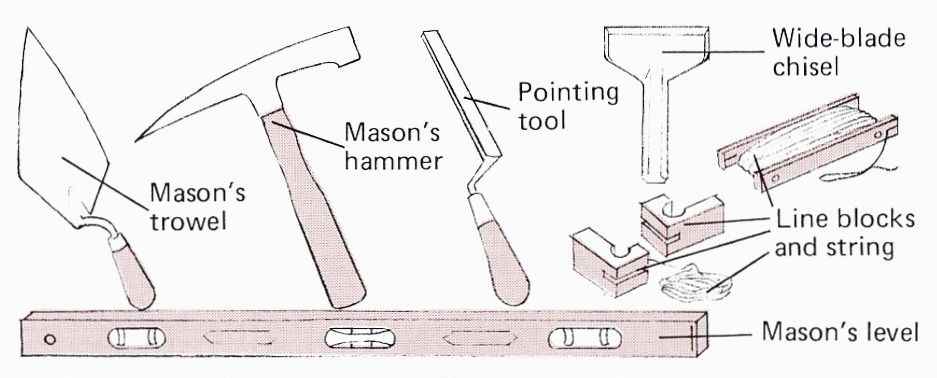
------ Building a fireplace requires only a few basic masonry
tools.
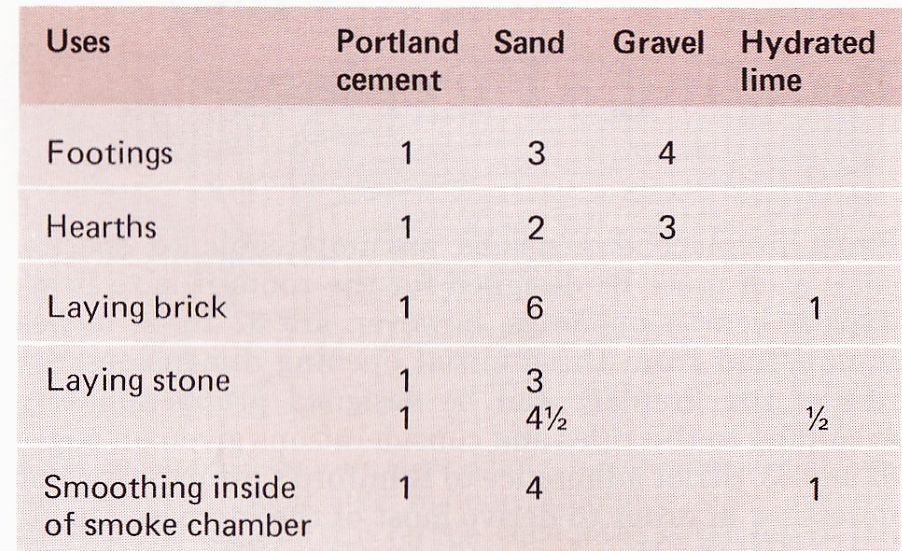
------ Mixing guide for concrete and mortar-----Chart
shows correct proportions br mixing both concrete and mortar to
suit different applications. Two blends are shown for laying stone; the second
one is a stiffer mix than the first, hut both are of equal strength For all
formulas mix the dry ingredients first then add water until smooth.
The bricklayer's art
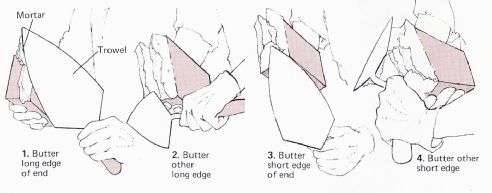
Practice applying mortar and raising walls
before actually starting to build. Sequence shows proper way to "bolter" the
end of a brick with mortar for firm bond. Dip bricks in water before buttering
them. Remember that mortar is caustic and abrasive. It should not be worked
by hand or come in contact with bare skin.
Raising a Brick Structure

1. Lay corner bricks first. Set each one atop mortar base so that outside corner touches plumb line. Hold brick in place with one hand; level it by tapping the edges with trowel hand e.
2. Set second brick in place on mortar base 1/2 in. from corner brick. Align by tapping with trowel handle. Carefully fill gap between bricks with mortar, taking care not to disturb corner bricks.
3. Lay succeeding bricks in a similar fashion, but butter one end of each before installing it. Work from corners toward the center; keep bricks in line with guide string held by line blocks.
From Footing to Flue: Building a Fireplace
Exact fireplace dimensions are impossible to specify, since each must be designed for the room it is to heat. Typical hearth openings, however, are 32 to 38 inches square, and from these initial opening dimensions the rest of the fireplace can be designed proportionately according to the rules and considerations given on pages 62 and 63. Strict adherence to Rumford's principles is not necessary in order to derive most of the increased heating ability of a Rumford-style fireplace. Wherever possible, choose dimensions that will allow you to use bricks and concrete blocks without extra shaping.
Use high-temperature mortar for the firebox sides and back. Make the mortar by mixing 1 pound of fireclay per 6 ounces of water, or buy premixed air-setting refractory cement at a boiler or kiln repair shop.
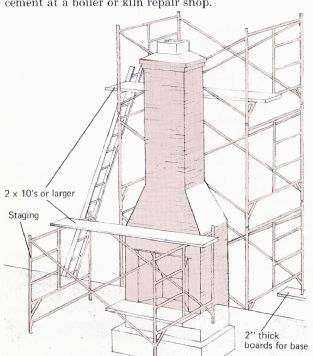
Rent modular staging from a ( oust ruci ion supply center.
When putting it up, make sure it is level and plumb. Support the legs on wide
hoards 2 in. thick. Check often to lute I sagging.

1. Install rebar (steel reinforcing bar) grid and if code requires, vertical rebar as well. Make grid by wiring lengths of 3/4-in. rebar together to form 8" squares. The concrete footing should be 12 in thick and extend 8 in. beyond dimensions of chimney breast on all sides. Footing must be below the frost Iine.
2. Distance between top of footing and bottom of sub-hearth (Step 3) should he divisible by thickness of concrete blocks used for base plus their mortar joints. Construct base atop footing Drop plumb Iines; use line blocks to keep courses level. Install 1/4" hortzontal steel ties every 18 in. between courses.

3. Sub-hearth must extend at least lb in. in front of firebox. Prepare for its pouring by laying two courses of red brick around exterior of base. Joists and headers serve as remainder of lorm with 3 plywood as bottom. Concrete blocks that enclose rebars should be packed with concrete; fill others with rubble.
4. Allow 24 hours for mortar on double layer of bricks to set. Lay down a grid of Va-in. iebar, of 1/2" rebar elevated with brick scraps so that mesh will be in center of slab. Pour concrete 4 in thick at thinnest (interior) edge then level and smooth. Upper surface of sub-hearth should come no higher than level of subfloor.

5. Form firebox floor by laying dampened firebri ks tightly to gether on bed of mortar spread on rear of sub-hearth. Do not mortar joints between bricks. Ideally, top surface of firebnick should be flush with finished house Poor. Front hearth slab, installed after all work is done, can rise 1 in. higher to trap ashes
6. Mark fire-box dimensions on firebox four and begin las iii firebrick for firebox sides and back. Cut bricks to size vs iii mason's hammer or use a power saw wth a masonry blade I one course at a time, working Ii orn the back toward eac 1 sue Mortar joints must be c'ss than 4 in. hick.

7. Use plywood template cut to angle of firebox back in order to l.i l brk ks. I told template in place against each brick as it nd: mortar must harden somewhat before template can be iiiicivtd. Continue to build up exterior brickwork, filling in i and behind firebox with rubble.
8. To accommodate standard 10-in-wide damper, flare top of firebox backward, beginning above lintel height, so that basic Rumford design is not affected. Next, build up jambs on each side (stone can be used instead of brick). There must be at least 8 in. between the firebox sides and the house walls.
9. Lay up jambs so they ire level at lintel height, then install 3-in. angle iron to support lintel masonry. Continue to lay material above the lintel until it is on the same level as the top of the firebox. Smooth the interior surface of the lintel masonry with a coating of mortar.

10. Install a damper unit on top of the firebox and lintel masonry. lion it so that smoke can rise vertically into chimney when is open. Build up the exterior masonry and rubble until Ili Ire even with top of firebox, then smooth the area behind Ito 'loot with mortar to form smoke shelf.
11. Build smoke chamber of ordinary brick. Set the courses stepwise so that each extends about 1 in. beyond the course below and tapers to the size and shape of the chimney flue. Be sure to allow clearance for damper to function without binding. Smoke chamber should slope inward at no more than 10° angle.
12. Smooth the interior of smoke chamber with mortar as you proceed. When front slope provides enough space, install mantel atop lintel masonry, and construct chimney breast behind mantel. Breast masonry should be same material as jambs and lintel if exposed or ordinary brick if hidden behind wall.

13. Spread mortar on top course of smoke chamber and install fluetile. Check that tile sides are plumb, shimming them with brick scraps if necessary. Scrape away any mortar inside flue. Lay up courses of exterior brick, setting in the sides until 6-in, gap surrounds flue. Fill gap with rubble.
14. Continue building chimney by adding additional flue tiles and bringing up exterior masonry and rubble fill. Where chimney penetrates roof, install metal flashing between courses, overlap ping each piece 4 in. Copper is the best material for flashing, although galvanized steel or aluminum may be used.
15. Finish chimney with drip cap made by overlapping two courses of brick so that each overhangs the one below by 1 in. Spread mortar on top smooth and bevel surfaces so they shed water. For protection from cross drafts chimney height should be 3 ft higher than any other point within a 10 it. radius.
=============