A Home Made of Rock: Beauty Plus Strength
People have a natural love for stones. Children climb on them, collect them, and skim them over ponds. Our most magnificent structures are made of rock, as well as some of our most ancient. To this day, a house made of stone provides a special feeling of security, comfort, and coziness.
For years stone houses were made by expert masons using the time-tested technique of laying each rock individually in place. More recently, however, the slip form method has become popular, especially among do-it-yourselfers. A slipformed house can be built for less than two-thirds the cost of a similar home made of wood and will compare favorably with mason-built stone houses in terms of durability and attractiveness.
Choosing Your Stone
There are many variables to keep in mind when selecting building stones. Perhaps the most important consideration is availability: stone is heavy and if good stone cannot be found locally, shipping costs can be prohibitive. Stone for building should be durable and water proof, qualities that depend not only on the type of rock but also on climate. Limestone, for example, is among the most durable of construction materials in arid areas but will weather rapidly in a wet climate. Attractiveness is also important. Ideally, stone buildings should fit in with the prevailing architecture and blend with the local topographical features as well.
The chart at right gives some of the common rock types and their suitability as building stone. However you can tell a lot about a stone without knowing what type it is. Start by examining it carefully to determine its features. Compare its weight, texture, and appearance with other stones. Good building stone is heavy and therefore less likely to absorb moisture. Break open a sample with a sledgehammer. The rock should be difficult to fracture and should break into rough-textured, irregular chunks. Stone that crumbles or splits easily along flat planes is probably weak and porous. Though the stone may still be suitable for building under many conditions, water may seep in, hastening erosion and causing cracking in freezing weather.
Streambeds, mines and quarries, rocky pasturelands, lakeshores, and abandoned stonework are all likely sources for building stone. Maps published by the U.S. Geological Service show locations of abandoned mines and quarries. In suburban areas talk to contractors who may be involved in demolition work. In the country ask local farmers; you may find all the rock you need free for the hauling. If the stone is not on your property, be sure to talk to the owner before you take any, and always put the emphasis on working safely.

--- Scott and Helen Nearing built this lovely Maine home with their own
hands using the slipform method described.
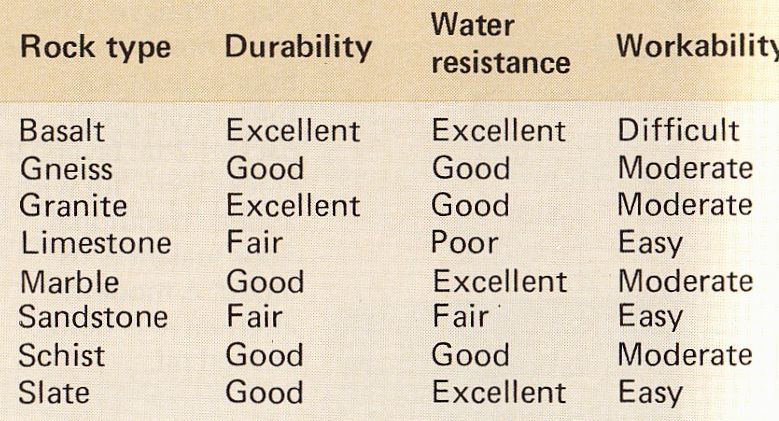
-------- Suitability of rock types for building

----- Fieldstone is loose surface rock. It is rough textured
and worn from exposure to nature and the passage of time.
Creek stone is polished smooth by running water. Its unusual character lends it to decorative uses, such as fireplace facings.
Quarried stone is cut from massive crops. Its surfaces are freshly expo sharp, clean, and regular.
-------------
Principles of Traditional Stonemasonry
For centuries the only way to erect a stone house was to lay the stones individually like bricks. The skill of the stonemason involved selecting the proper stone to lay in time and then adjusting the stone to fit securely, either by shaping it to fit or by filling in around the stone with specially chosen smaller rock fragments called shims.
The first stone structures were dry, that is, built without mortar. Later, clay, lime, or cement was used to set the rocks in place. In either type of masonry, structural integrity depends on the same two forces—gravity and friction—and the key to building enduring stone work has always been to make full use of both forces. For gravity to do its job, keep the stones’ bedding surfaces horizontal or canted slightly inward toward the center of the wall. Maximize friction by creating as much contact between stones as possible. Follow the old rule “one over two and two over one” so that each stone rests across at least two stones beneath; gravity then locks the stones together and unifies the structure. Maintain solid bedding surfaces by shaping or shimming any stones that fit poorly. Shaping is done with a hammer and chisel. Shimming is done by inserting small pieces of filler rock in spaces between stones, thereby providing support and increasing surface contact. However do not use shims as wedges to hold stones in place. If you do, the wedged stones may eventually work free. The best use of shims is for leveling and stabilizing the bedding surfaces, always with the goal of keeping them as horizontal as possible in order to make the fullest possible use of the force of gravity, which pulls straight down.
Mortar eliminates much of the shaping and shimming needed in dry-wall construction. It does not, however, glue the stones together. Portland cement, the active ingredient in mortar, cures as hard as stone and automatically provides a perfect seat for the rocks as they are laid, filling the smallest gaps.
Shaping the stones to fit

Large rocks should be broken into random chunks with a sledge or stonemason’s hammer, Use the wedge shaped end of the mason’s hammer to split the stone along the grain.
Wide-bladed chisels are used when scoring, smoothing, and splitting soft stone. A point chisel is employed when working with hard stones where impact must be concentrated.

When hewing stone, chip rock away gradually to avoid breaking
entire block. Place stone on bed of sand and score with chisel. Chip off small
pieces using flat face of hammer. Work from edge toward line with steady blows.
On hard rock you may have to hammer quite a while before cracking begins. Wear
safety goggles to prevent injury from rock chips.
Mortaring the stones in place

1. Mortar proportions are one part portland cement to three parts sand. Add only enough water for a firm mix.
2. Stones should be clean and surfaces wet. Shape stone and test for fit before laying down bed of mortar.
3. Lay mortar on bedding face with a trowel. Do not smooth. Use only enough to provide firm support.

4. For effective seating drop stone in place from a few inches above. Once
stone is set, do not move it farther.
5. Scrape off excess mortar and pack it into vertical joints. Use a trowel; mortar will irritate skin.
6. Use tuck-pointing trowel to trim mortar. Clean stones with cleaning compound from building supply dealer.
-----------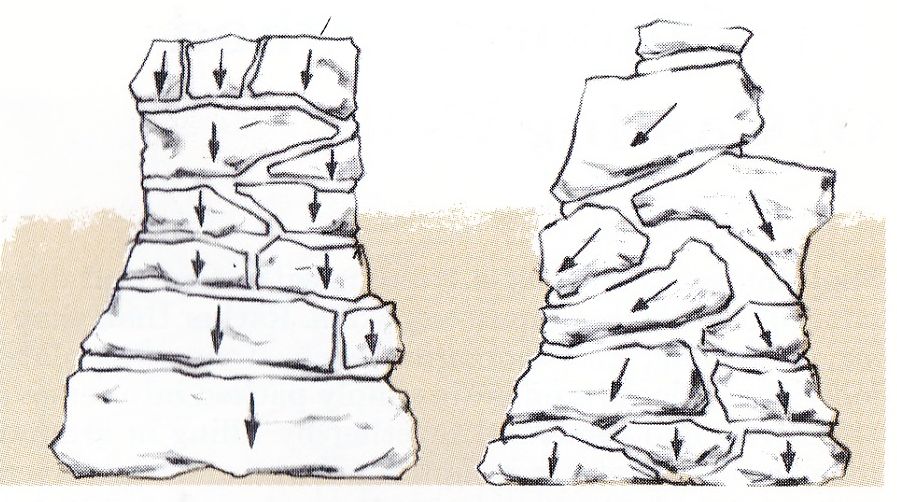
--- For maximum structural integrity each stone should
weigh straight down on the ones beneath it (left). Stones in a mislaid wall
(right) tend to slide out; the higher the stones are stacked, the greater the
tendency to crumble. Shape the stones with hammer and chisel or use small fragments
as shims to keep bedding planes horizontal or tilted slightly inward.
------------------
The Slipform Method Of Casting Walls
Slipforming is a method of building with stone that does not require advanced masonry skills. Rather than shaping, shimming, and mortaring each stone into place individually, loose stones are simply packed into removable forms and cemented together by filling in around them with concrete. In a slipformed wall an entire layer, or course, is built as a unit. A number of forms are connected end-to-end and filled. While the mix hardens, a second chain of forms is placed on top of the first and also filled. When the bottom layer has set, those forms are removed and reattached above the second to form a third layer. In this way wall building proceeds vertically like a game of leapfrog. Properly done, the results are excellent. A slipformed wall is sturdy, weatherproof, and almost indistinguishable from old-style mortared masonry—and can be put up in half the time it would take to lay it stone by stone.
For ease of handling, forms are usually 18 inches deep and about 8 feet long. Stones to fill them should also be of manageable size—no more than 50 pounds each—and have at least one fairly flat face. Stockpile a wide variety so that you will have plenty to choose from. Cast the walls at least 14 inches thick. Place stones in the form with their fiat faces against the side that will become the exterior wall. Try to follow the “one over two, two over one” rule that holds for mortared masonry so that gravity will help bind the stones together.
Stone is a poor insulator and, in addition, joints between stones tend to develop small leaks. As a result, most slipformed walls are built so that the stones extend no more than two-thirds of the way through the wall from the exterior to the interior. The inside face is smooth concrete. Furring strips are usually embedded in the concrete, and the wall is finished with insulation and paneling. If you want your interior wall to be of stone, place a 2-inch layer of solid insulation in the middle of the form and fill in on either side with stones and concrete. This type of wall will be thermally sound as well as leakproof.
Apply a coat of oil to the slipforms before using them so they can be removed more easily later on. As you pour the concrete, tamp it down, striking the forms occasion ally with a hammer to dispel air bubbles. Your aim should be to surround each stone with 1 to 2 inches of concrete. It is vital that the bonding between successive layers be strong and weathertight. Try to complete an entire course on a single pour to avoid vertical through-seams, which will weaken the walls. Horizontal seams tend to form on the top of a course. To keep them from allowing moisture into the house, slope the top of each pour downward to the outside. Do not cap the courses with concrete; instead, finish each course with stones that protrude vertically, so they will mesh with those in the next layer. Surfaces that have cured for more than 48 hours may require application of a commercial bonding agent or a paste of portland cement and water before the next layer is poured on top.
Good Concrete Is the Secret of Slipforming
When building slipformed stonework, the quality of the concrete is most important. Concrete is made up of portland cement, sand, and gravel. For slipforming, ½- inch-diameter gravel is best. Recommended proportions are one part cement, three parts sand, and four parts gravel. Proper water content is the secret of strong concrete. There must be enough water so that the mixture can be worked and the chemical reaction that hardens the cement can go to completion. Too much water results in weak concrete. Generally, for a batch of concrete mixed from one sack of cement (94 pounds), 5 gallons of water are needed. Adjust this figure to accommodate the moisture content of the sand and gravel. To obtain good results when you are mixing by hand, use the method shown below. With a power mixer, blend the dry ingredients first, then add water gradually until a workable mix is obtained. It helps to have an experienced person on hand when you make your first batch.
Concrete must not dry too fast. Water evaporating from the mix while it cures has the same effect as adding too little water at the start. Nor must ordinary concrete be exposed to freezing temperatures for at least a week after it has been poured. The chart describes different types of portland cement, each suited to a particular building condition. Type I is suitable for all but severe conditions. Type III is excellent for slipforming because its rapid setting time allows forms to be removed sooner. So-called air-entrained cement will trap microscopic air bubbles as it hardens, causing it to resist frost damage. Use Type l in all areas where heavy freezing occurs.
Types of cement and where to use them
Type I General purpose: Moderate-weather building conditions in areas where light to moderate freezing will occur
Type IA General purpose, air-entrained: Moderate-weather building conditions in areas where heavy freezing occurs
Type III High strength, early set: Early or late season building conditions in light to moderate freeze areas where conditions re quire rapid concrete setting and early form removal
Type IIIA High-early, air-entrained: Early or late season building conditions in heavy freeze areas where conditions require rapid concrete setting and early form removal.
The measuring box
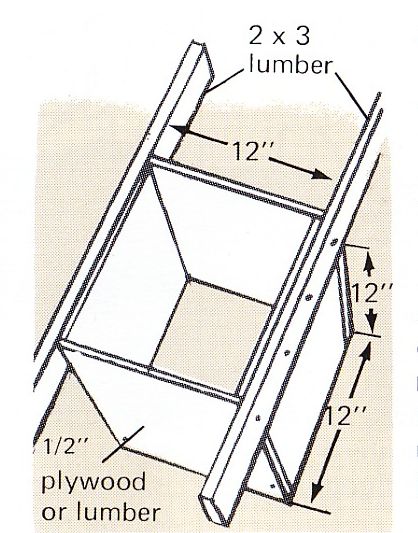
Measuring box for dry ingredients has a 1-cu.-ft. capacity. Box has no bottom. Sides are ½-in. plywood or ¾-in, lumber with 2 x 3 boards for handles. Join parts with screws, not nails, for extra strength. When mixing concrete, place box in mixing trough, fill, and lift up. Each filling equals one unit of a particular ingredient.
Mixing the components
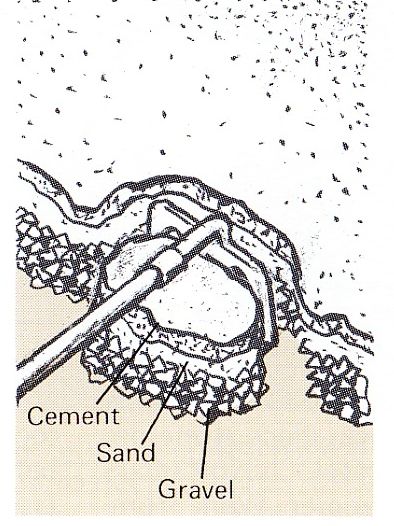
To mix concrete by hand, first wet the mixing trough. Spread correct proportions of ingredients in layers over three-quarters of the bottom; then pour water into remaining area. To mix, pull sections of dry material forward into water with mason’s hoe and blend until proper consistency is reached.
------------------
Assembling the Forms:
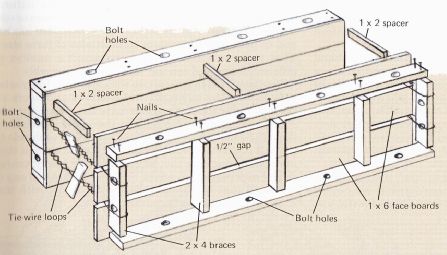
Build your own slipforms using 1 x 6 boards or sheets of 1/2 in. plywood for the laces. Nail them to 2x 4 braces as shown. Leave 1/2-in. gaps between face boards or drill holes in plywood hat tie-wire loops can be threaded through to hold the sides together. Bore holes in end, and bottom braces to bolt forms together end-to- end and in vertical layers. You will need enough forms to assemble two end-to-end chains the length of the wall section being poured. The forms will be stacked one on top of the other leapfrog fashion as the wall is raised. For efficiency and economy use standard commercial lumber sizes for forms, and make them interchangeable by planning walls to be even multiples of form dimensions.
Getting Ready to Build:
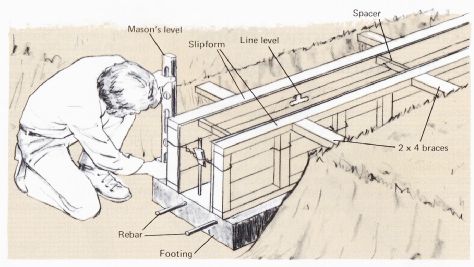
Reinforced concrete footing poured below frost line ensures firm base for heavy masonry walls. Footing should be 4 in. wider on each side than width of wall and at least It) in. thick. Set forms in place along footing marked with a chalk line. Make tie wire loops by inserting light wire through holes or between boards and tying around vertical braces. Twist loops tight with nails while inserting 1 x 2 wood spacers cut to width of wall to maintain correct dimensions. Use mason’s level, and line level to make sure forms are plumb. Adjust by tapping forms with hammer. In additional support is needed, nail extra braces across the tops of the forms or prop the sides with 2 x 4’s set in the ground as shown in the illustration.
Filling the Forms:
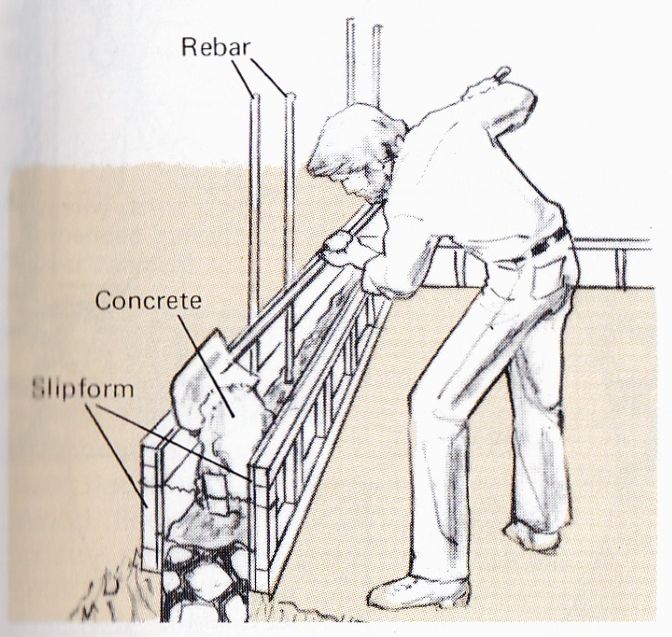
Place stones 2 in. apart with hat faces against form. If rebar (steel reinforcing bar) and furring strips are being used, install them now. Pack remaining area with concrete and tamp well, allowing the concrete to flow beneath stones.
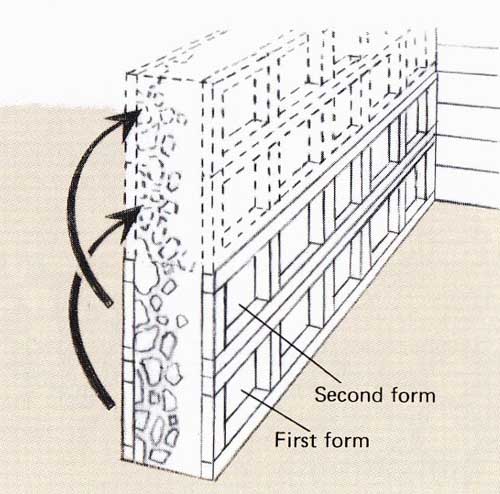
While masonry cures in first form, second form is placed
on top and filled. After 48 hours first form is removed and placed atop second
form as its contents continue to cure. Clip tie wires flush; they will remain
embedded in the wall.
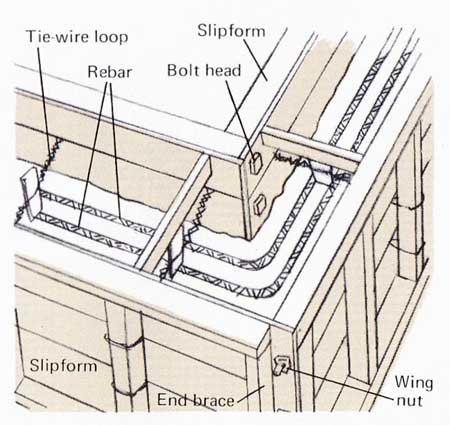
Corners are built as a unit with special forms that can be
bolted together at right angles. Lay a 6 ft. length of 8-in. rebar, bent at
a right angle, into corners every 10 in. vertically. Use corner stones that
have two faces at right angles.
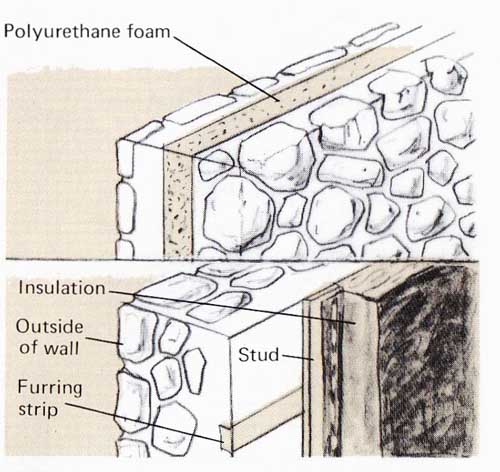
Stone is cold unless insulated. Sandwich type wall (top)
with core of 2 in. polyurethane foam provides exposed stone inside house. Or
embed treated furring in wall as it is built then attach studs, insulation,
and paneling.
-----------------------
Movable Slipforms: An Old-fashioned Home Using Modern Methods
Stone houses have the quality of blending into the landscape, especially if they make use of stone gathered from the building site itself. Plan a house that will harmonize with the environment. Choose an area of well-drained solid ground upon which to build, since masonry will crack if settling occurs. Stone walls are not easily modified, so plan your house large enough to accommodate any anticipated needs for more space in the future, and take into account plumbing, heating, and electrical arrangements. Wall openings for these systems are far easier to incorporate during the construction process than to drill afterward.
Begin by collecting stone. The more you have on hand the better. Unless you plan to pour a concrete floor along with the foundation, it is a good idea to stack the piles of rock in the center of the site. That way you will have less distance to carry the stone and will be able to keep all possible choices in view. Store bags of cement where they will stay absolutely dry, stacked on wooden platforms with an airspace beneath and covered with plastic. Cover sand also if rain is frequent.
Build enough forms to be able to “slip” them properly. This means having on hand as many forms as are needed to construct a wall section two courses high. Ideally, you should build enough forms to reach between natural openings in the wall plus special forms for corners or odd shapes. Remember to make forms from standard lumber and to plan wall dimensions in multiples of form sizes. That way you will not have to construct a number of different forms and can use them interchangeably.
You might design your house with low walls for greater ease in handling stone. Extend windows and doors all the way to the top plate to eliminate the need for lintels. Frames are studded with nails on the outside and laid up directly in the forms, with spacer blocks on each side to prevent concrete from being pushed behind them if they are not as thick as the wall itself. Use heavy timber joined with pegged lap joints. Soak the frames and any of the wood that will make permanent contact with masonry in preservative to prevent dry rot.
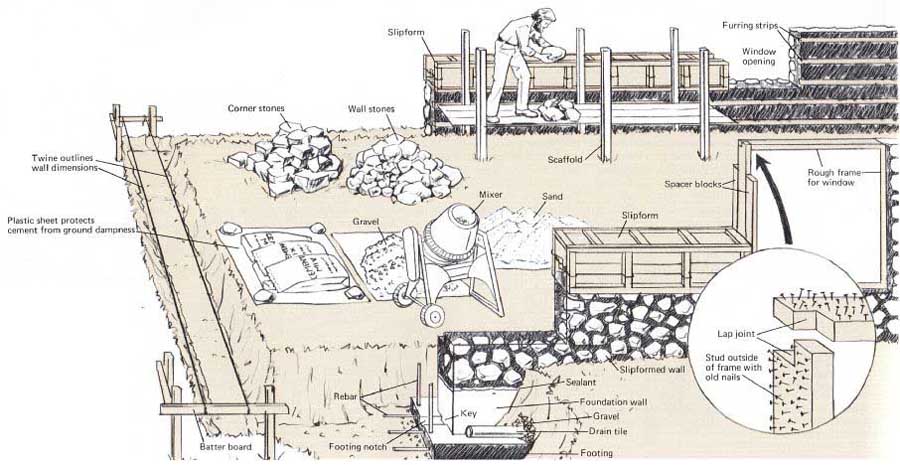
----- Stretch string between batter boards to guide excavation
and wall building. A perimeter footing of poured concrete with horizontal rebar
(steel reinforcing bar) ensures rigid foundation. Below-grade walls can be
poured, slipformed, or made of laid stone and mortar. Vertical rebar is optional
if the base of the foundation wall is keyed into footing notch. Drainpipe next
to footing carries water away from foundation, pre venting water damage and
settling. Use sealant to weatherproof joint between foundation and stonework.
--------
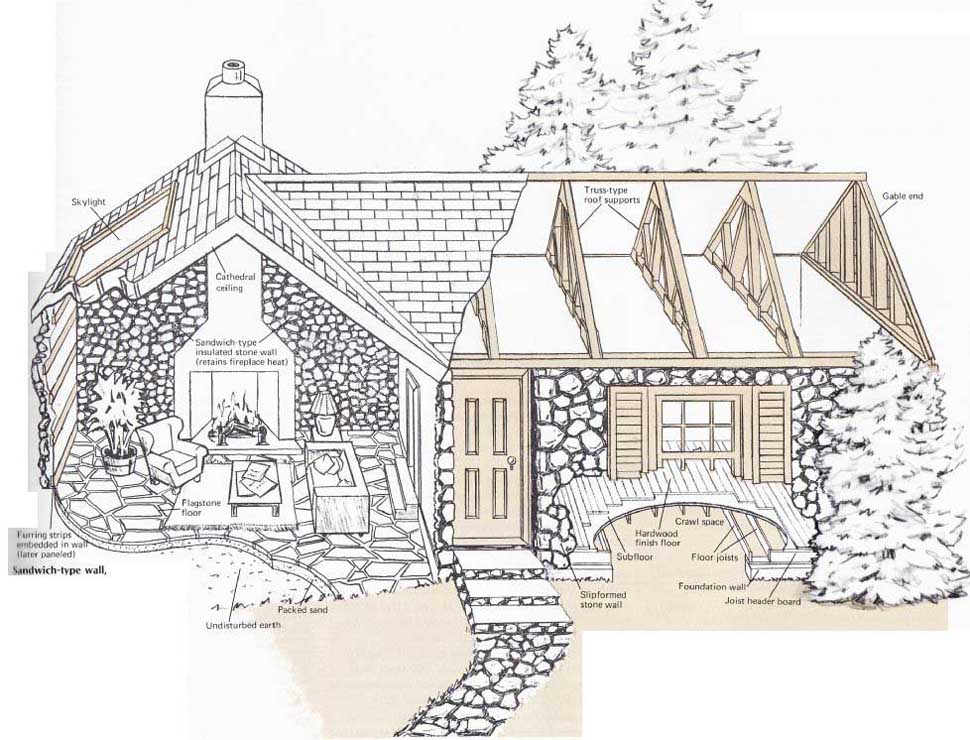
Sandwich-type wall, with stone face inside, stores heat from fireplace or sunlit windows. Paneled stud walls permit easy installation of shelves, plumbing, and wiring. Flagstone or slate floors are laid at ground level. Wood floor is raised, since crawl space is needed to prevent rot. Gable ends are wood. Roof may be simple truss type. Since slipformed walls can withstand the outward thrust of the rafters, few tie beams are needed. This allows architectural freedom to include such features as the skylight cathedral ceiling.