Masonry walls make the most permanent of all fences, capable of taking nature’s punishment for generations. Yet for all their sturdiness, they need not be forbid ding ramparts. Softened by greenery or enlivened by patterns, even a massive 6-ft. wall of brick or blocks can be a graceful garden ornament as well as a property boundary, a windbreak or a guardian of privacy.
Because of its solidity and weight, a masonry wall calls for more careful planing than other fences. It must sit on soil firm enough to support it, and not block natural drainage. If you have any doubts about the site of your wall, consult your local building authority. Check with utility companies about pipe and wire locations before digging the wall’s foundation, and take special care not to violate property lines or local codes governing setback distances.
In addition to careful initial planning, a high masonry wall requires care and some skill in its construction if it's to be safely sturdy; an amateur attempting one should first gain experience with the basic masonry techniques. In many areas, codes prescribe strict standards for masonry structures more than a few ft. high, specifying materials, dimensions, and depths of footings—the under ground masses of solid concrete that support the structures.
Footings must be at least 18” below grade and must rest on earth not affected by frost. In much of North America, digging beyond the frost line to the level specified by the codes requires moving large amounts of soil. If you live in an area with severe winters and plan to build a high wall more than a dozen ft. long, have the digging for the footing done by a professional with a backhoe. If a backhoe can't be maneuvered into position, or if the amount of earth to be moved is comparatively small, consider renting a gasoline-powered trencher, which you can operate yourself.
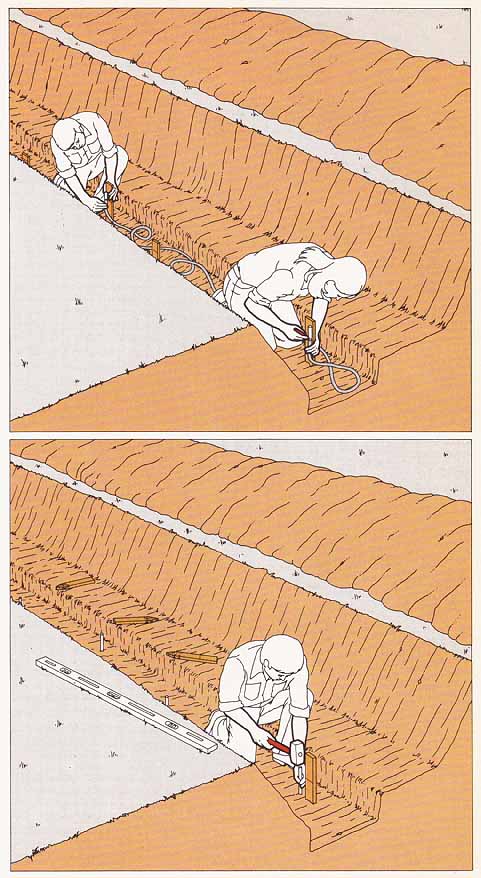
Before you begin digging, mark the borders of the footing trench and the center line of the fence on the ground with a trickle of sand; drive stakes clear of the digging area to fix the marks. Allow space for dumping the moved earth—next to the trench and on your own property. Remember that in loose soil, you may have to bank the walls of the trench back from the bed by as much as 45 degree to keep them from caving in. Keep the bed as level and flat as you can, but do not smooth it off by filling loose earth back in: the footing must rest on undisturbed earth. If the virgin soil at the proper depth is loose, tamp it.
A footing’s width and height depend on the thickness of the structure it sup ports. For a building foundation, normally 8” thick, the footing should be at least 16” wide and 8” high. For the brick wall, which requires sections 16” thick, the footing should be heavier: about 24” wide and 10” deep.
In any but the loosest soil, you will not need wooden forms to pour concrete for a footing. In most soils, you should widen the trench on one side for room to smooth the concrete and lay blocks and mortar from the footing up to the surface. But if the soil is firm enough to keep the trench walls vertical for their full height, you have a convenient but expensive alternative: you can dig the whole trench no wider than the footing and fill it with concrete to a level just below the ground (below, right).
Either kind of footing requires horizontal reinforcement—two lines of No. 4 steel bars laid along the trench—and either will probably need enough concrete for an order from a ready-mix firm. Explain what you need the concrete for and ask for an appropriate mix.
When the truck arrives, have plenty of helpers on hand. Pouring and leveling concrete is heavy work that must be done quickly. A fully loaded cement mixer weighs as much as 30 tons and may crack a driveway or rut a lawn. If you can't bring the truck close enough to the trench to pour the concrete directly into it, use wheelbarrows equipped with pneumatic tires to ferry the concrete from the truck. When the concrete is poured and leveled, cover it with plastic sheeting and let it cure for 24 hours be fore starting to build on it.
Readying a Solid Footing

Two types of deep footing. The trenches at right contain
two types of poured-concrete footing. The trench at near right, suitable
for aver age soils, has one wall as nearly vertical as the firmness of
the soil allows; the bottom is squared off to the width and height of the
footing, and above that the trench gets a ft. or two wider to create a
shelf for working space. Rein forcing bars are laid, concrete is poured and leveled, then a block foundation is built up to within a few in. of
ground level. The trench at far right, dug in very firm soil, has vertical
walls separated by the width of the footing. R is laid and the trench is
filled with concrete almost to the surface; it needs no block foundation.
Placing the Concrete
1. Leveling the bed. At 3- to 4-ft. intervals, drive parallel rows of 12” stakes a few inches into the ground along each side of the bed of the footing trench. Choose one stake at a high spot in the bed, mark it at a point 8 to 10” above the bed; then, using clear plastic tubing by the method shown, mark all the stakes at the same level.
2. Driving the grade pegs. Next to each stake, drive a grade peg—an 18” length of reinforcing bar—so that its top is exactly level with the mark on the stake. Be careful not to drive the pegs too deep. Remove the stakes and tamp the earth around each peg. Check the levels of the pegs with a 4-ft. mason’s level or a carpenter’s level taped to a straight length of 2-by-4. If a peg is high, tap it lightly to drive it deeper.

3. Laying reinforcing bars. Set lengths of No. 4 reinforcing
bar alongside each row of grade pegs, supporting the bars 2 to 3” above
the trench bed on bricks or stones. Where two bars meet, overlap them 12
to 15”, and use tie wire to lash the overlapping bars to each other and to the grade pegs.
4. Completing the footing. Working with helpers, pour concrete into the trench and spread it with square-tipped shovels, digging into it to break up air pockets. When the grade pegs are covered by at least ½” of concrete, level the footing with floats made from 2-by-4s nailed together to form a handle and a working surface. Covering a small area at a time, use a patting motion to compact the concrete until the tops of the grade pegs appear. Next, zigzag the floats horizontally until the surface of the concrete is fairly smooth, and finally sweep the surface with the trailing edge of the float, pulling it toward you in wide arcs. When you finish, the tops of the grade pegs should be barely visible at the surface of the concrete.
- - -
Extra-deep Footings: The Professional Approach
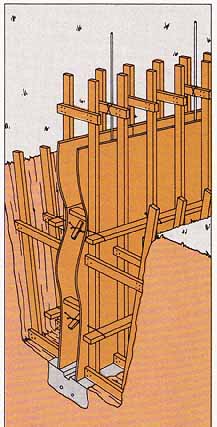
If you must provide a footing deeper than 3 ft., it's best to have
a professional do the job. Just moving the earth for such a deep trench
is a formidable project, and once it's dug, its sides must be shored up
for the safety of the people who will work in it. .For a wall 8” thick,
a footing 8” high and 16” wide is poured in the bottom of a trench with
a notch or key running its length—to stabilize the foundation on top of
it—and vertical reinforcing bars projecting up from it, to strengthen the
aboveground part of the wall. Then a wooden form is generally built above
the footing in order to cast a foundation 8” thick up to ground level.
Once both sections of concrete have been poured and cured, forms are removed and the construction of the wall can begin.
- - -
Laying Blocks and Bricks
In addition to deep footings, high masonry walls need lateral support. A free standing garden wall 8” thick and more than 4 ft. high should be braced a winds and climbing children, It can be supported with pilasters—thick columns built into the wall—to give it a broader base, or with vertical steel bars embedded in the footing. The 8” walls shown are reinforced with square pilasters that are 16” on a side. Their footings are 24” wide and 10” deep.
Regardless of the type of wall you are planning above-ground, it's most economical to build from the top of the footing up to ground level with inexpensive masonry block. You will need standard “stretcher” blocks measuring 8 by 8 by 16”, together with a few half blocks measuring 8 by 8 by 8”, to avoid having to cut the large stretchers; flat-ended “double-corner” blocks, and “partition” blocks measuring 4 by 8 by 16” for the pilasters. Have all the blocks delivered on pallets if possible, and keep them covered with plastic sheeting—blocks must be laid dry.
A few inches below ground level, be gin laying the masonry units for the wall itself. For a brick wall like the one on below, the number of standard- sized bricks you will need equals 14 times the area of one face of the wall in square ft., with an extra 90 for each 6-ft. pilaster. You will also need enough half blocks to fill the cores of the pilasters (9 or 10 for each in a 6-ft. wall), and four solid bricks for each pilaster cap.
Pilasters should be spaced 8 to 12 ft. apart; try to make the total length of the wall and the distance between pilasters divisible by 8” to facilitate brick- and -block construction. The cores of the blocks in the pilasters should be grouted with concrete—not mortar—from the footing up. For added strength, run two 6-ft. lengths of No. 4 reinforcing bar down to the footing through the cores of the foundation blocks in each pilaster before grouting them full. Keep in mind that a pilaster is useful as a wall support only if it's perfectly plumb, which re quires scrupulous checking with a level.

1. Aligning the blocks. Snap two chalk lines along
the footing, one 4” from its center to mark the edge of the bottom course
of blocks for the wall, and another 4” outside the first to mark the edge
of the pilasters. Lay a dry run of the first course to the chalk lines,
with a pair of blocks at each pilaster. Leave a 3/8” space between the
ends of the blocks to allow for the mortar joints. Adjust the thickness
of the joints to bring the course to the correct length. Mark the location
of each pilaster with chalk on the footing.
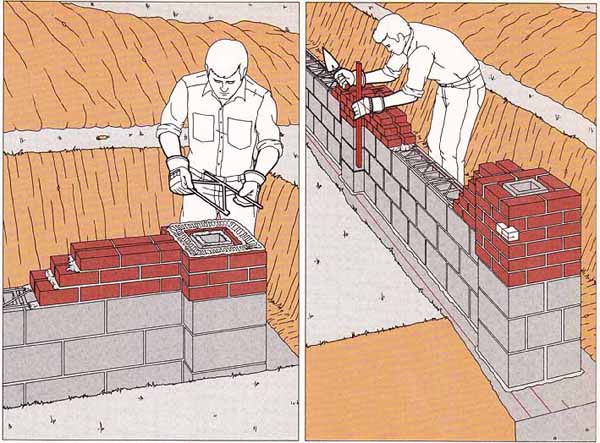
2. First course. At the marks for one of the end pilasters, lay two double-corner blocks side by side in a full mortar bed. Gauge how much space to leave between the blocks by placing two bricks end to end across the footing, with the end of one brick at the outside chalk line, and %” between the bricks. Lay the blocks so that their outside edges are even with the ends of the bricks. This will leave about an inch between the blocks; the space should be empty. Check both blocks for plumb and level with a mason’s level; check the height of their mortar bed with a story pole—a homemade measuring stick marked where the top of each course should be when its mortar joint is the right thickness.
Lay two more double-corner blocks for the other end pilaster, run a mason’s line between the two ends and lay pairs of similar blocks for the other pilasters to the line. Fill their cores with concrete.
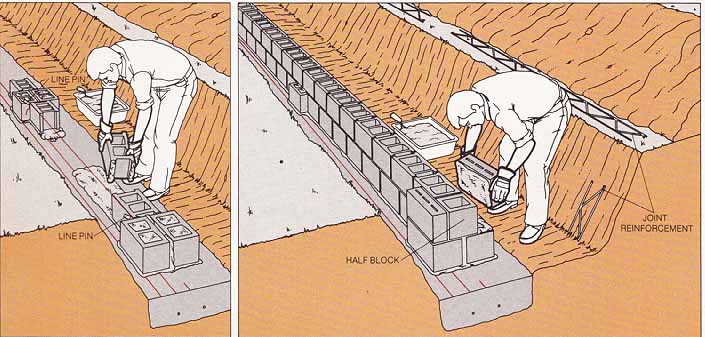
3. Completing the first course. Lay a stretcher hoc in crar inside each end pilaster and on s-ces o the other pilasters, centering : 0 ocks on the joint between the as:er blocks—use the inside chalk line a g ce. After the mortar has begun to set, two line pins stuck in the vertical joints between the pilasters and the stretcher blocks to run a mason’s line to establish a guideline for the rest of the stretchers to be laid between each pair of pilasters. Fill in the blocks for each section and point up the holes in the mortar left by the line pins.
4. Completing the foundation. Begin the second course of blocks with a half block at each end, centered over the joint between the pilaster blocks. Lay a corner block inside each half block, run a mason’s line from one end to the other and fill in between them with ordinary stretcher blocks. Next, lay partition blocks at the end pi asters, sandwiching the newly laid second-course blocks as shown below. Three sides of the stretcher blocks must be plumb with the paired double-corner blocks beneath them. Make similar sandwiches at the other pilasters with the aid of a mason’s line run from the ends. For the third course, repeat the first, but at each pilaster set a 15” length of truss-type joint reinforcement across the wall embedded in the mortar before laying the blocks.
When the mortar has set, fill the openings in the blocks at each pilaster with concrete so that there is a continuous column of concrete from the footing up to a few inches from the top of the third course. If you plan to use vertical rein forcing bars, thread them down through the blocks to the footing before grouting and tie them in place until the concrete sets.
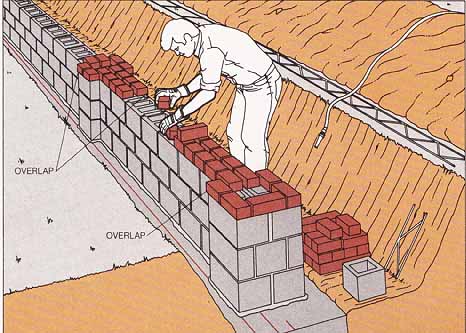
5. A dry run. With the foundation built up almost to ground level, lay a dry run of the first course of bricks to adjust the fit from pilaster to pilaster. Lay the bricks in the pattern shown at right and set a half block at the core of each pilaster. The bricks in the pilasters should be plumb with the blocks beneath them on three sides; keep any overlap on one side as shown. Between pilasters, separate two rows of bricks so that a brick laid across them fits plumb. Separated in this way, the two rows of bricks should overlap the single row of blocks they rest on. Keep all the overlap on one side of the wall so that the other side can be plumbed from a foundation.
6. Laying the first bricks. Start by building a lead—the
end structure—six courses high at one end of the wall. Spread mortar on
the tops of the blocks of the end pilaster and on 2½ ft. of the adjoining
wall. Set a 10-ft. length of joint reinforcement in the mortar, starting
an inch from the wall’s end. Using the dry-run pattern, lay well-moistened
bricks around the pilaster rim and three and a half brick lengths out onto
the wall. Set a half block in the middle of the pilaster; double-check
each brick for level and plumb.
Mortar the tops of the first-course bricks and lay the second course one half brick shorter than the first, varying the pattern as shown to avoid lining up vertical joints. The third course repeats the pattern of the first, stepped back one half brick from the second. The top of the third course should be level with the top of the block in the center of the pilaster; set a 15” length of joint reinforcement across the pilaster in the mortar on top of the third course and proceed with the next three courses, checking repeatedly for level and plumb. Alternate the pattern and short en the lead one half brick in each course. Build a similar lead at the other end pilaster.
7. Building up the pilasters. At the pilasters between ends, build six-course double leads—ones that step up from the wall on both sides. Start with 10-ft. lengths of joint reinforcement in the mortar on top of the block foundation; overlap their ends 12 to 15”. Lay bricks in a pattern similar to that used for the end pilasters, but with leads extending out onto the wall from both sides. Use a mason’s line strung from the end pilasters to maintain alignment. Fill the cores of the blocks in the centers of the pilasters with concrete as in Step 4. Complete the courses between the pilasters, running a ma son’s line from line pins stuck in the vertical mortar joints next to the pilasters as in Step 3.
You should now have a solid wall six courses high; on both sides of the foundation, fill in the dirt dug out for the footing trench and tamp it well.
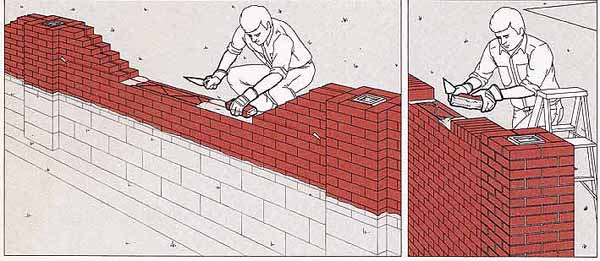

8. Extending the wall upward. Lay joint reinforcement along the wall on top of the sixth course and build new six-course leads at each pilaster as before. Grout the cores, fill in between the pilasters and repeat. If you lay one or two courses of brick below grade, four six-course leads will take the wall to 5 ft.; three more courses plus a cap will take it to 6 ft.
9. Capping the wall. When the wall is 4” short of the height you want, lay joint reinforcement along the top, build the pilasters up three more courses and fill their cores. Lay a cap of rowlocks (bricks laid on edge) along the wall between the pilasters. Start with a dry run to see whether you will have to adjust the thick nesses of the joints for a proper fit.
10. Capping the pilasters. For each pilaster, cut eight 1”-thick pieces of brick (that is, pieces measuring 1 by 2 1/4 by 4”), called closures, to use in widening the cap courses. Following the basic pilaster pattern, lay the first course of the cap with full-sized bricks around the rim of the pilaster so that they project an inch over the edge on all sides. Fit four of the closer pieces between the whole bricks, one on each side, to fill out the course. Set two bricks in the middle of the pilaster and fill all the space around them with mortar.
Alternating the pattern, lay the second cap course plumb with the first. Put two more bricks in the center and grout solid with mortar. For the final course, lay a double row lock cap across the pilaster, set in from the course beneath in the original dimensions, 16 by 16”.
Decorative Masonry Patterns
Masonry walls need not always present a solid, unvarying face. Brick and block can be laid in patterns to enliven a wall’s appearance and in open designs to admit light and air while screening a view.
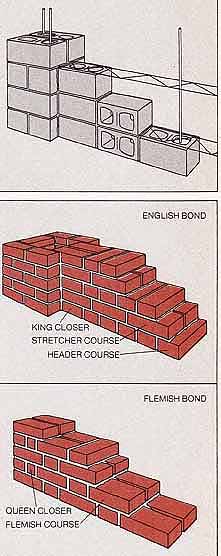
Decorative patterns for walls made of blocks, particularly those with openings, most often use a form of stacked bond: the units do not overlap but have their vertical joints lined up. The lack of over lapping joints weakens the wall, which therefore requires strengthening with joint reinforcement and steel bars (top right). Horizontal joint reinforcement should be embedded in the mortar along the full length of the wall after every second or third course of blocks—after each course with 12” screen blocks. Where hollow cores of blocks align vertically, reinforcing bars at 4-ft. intervals can be run from the footing up through the blocks halfway up the wall.
The block patterns shown use stacked bond and blocks of widely available, standard sizes. Odd sizes give you more complex patterns, but what ever the pattern, arrange blocks so that continuous reinforcement can be laid between courses and so that very few blocks stand on end, the position in which they weaken the wall most.
Bricks can also be used to make open work, but such walls require a skilled ma son to make them structurally sound. An amateur bricklayer, however, can build a solid brick wall with a decorative pattern based on the interplay of headers (bricks laid crosswise on the wall) and stretchers (bricks laid along the length of the wall). Such designs strengthen an ordinary two- course-thick garden wall, since the headers tie the front and back courses of brick together, performing part of the function of joint reinforcement.
Most traditional brick patterns are developed either from English bond, in which courses of headers and stretchers alternate, or from Flemish bond, which has alternating headers and stretchers in each course. Variations of these two bonds will pro duce an enormous range of ornamental patterns, which can be heightened by using bricks of contrasting colors.
A large brickyard will stock from 20 to 30 different colors of brick, but for a simple design like those shown, you need only two colors of standard-faced building bricks, one for a background and the other for the pattern. Buy all the bricks at once: colors vary from lot to lot, and you may not be able to match bricks later.
To determine how many bricks you need in each color, diagram the pattern on graph paper. Make each course one square high; let two horizontal squares represent a header and four squares a stretcher. Diagram enough complete courses (usually two or three) to show the bond pattern, count the number of odd-colored bricks in these courses and multiply the figure by the number of pat tern repeats you will need for the entire wall. Double the number of odd-colored stretchers if you want the pattern to show on both sides of a wall two courses thick; add the odd-colored headers and subtract the total from the number of bricks needed for the whole wall. Buy 5 per cent extra bricks in both colors to allow for breakage.
When you design a wall with one of the pattern units shown in the center and right rows, you must design it from the center to make the pattern sym metrical, though you will actually build the wall from its ends. On graph paper, draw an outline of a full section of the wall. Make the wall an odd number of courses high—the course that serves as a horizontal axis for the design must have an even number of courses above and below it. Find the squares that represent the center brick of the section. Fill in the pattern unit over this center brick, then fill in the rest of the section. You can now tell how many pattern units or parts of units will fit into the section and the wall, and how to begin laying the bricks.
The diagram will also show that to make a design with Flemish bond or English bond, alternate courses must begin and end with either a quarter brick, called a queen closer (bottom right), or a three-quarter brick, called a king closer . The odd sizes can be made by setting bricks more or less than half way into a pilaster or by cutting bricks, If you cut queen closers, locate them near—but not at—the end of a course. To save time, cut all the closers before you start laying bricks.
Reinforcing stacked blocks. Walls of stacked bond
need both horizontal and vertical reinforcement. The pilasters bracing
the wall below are cross pairs of double-corner blocks knitted to the rest
of the wall with continuous stretches of joint reinforcement laid after
every second course. No. 4 steel rods run up through the cores of the blocks
of each pilaster and at 4-ft. intervals between pilasters. The cores with
the rods are filled with concrete.
Basic ornamental bonds. In English bond (top), header and stretcher courses alternate; in Flemish bond (above), each course consists of alternating header and stretcher bricks. Quarter or three-quarter bricks (closers) are used at or near the ends of courses to align the headers and stretchers in every other course. FLEMISH BOND; QUEEN and FLEMISH COURSE

Open and Shut Designs with Blocks
Decorative walls from blocks. Ordinary stretcher blocks in stacked bond (top, left) make a surprisingly good-looking wall; the cap course is of flat, coreless block. A basket-weave pattern (top, right) is made from units of four stretchers and a half block. More half blocks laid on their sides (above, left) can be arranged in a wide variety of patterns to form openings for light and air. Ornamental 12” screen blocks (above, right) require half-high blocks (4 by 8 by 16”) for pilasters so that horizontal reinforcement can be laid atop each course. The pilasters are capped and

Fancy Tricks with Colored Bricks
English and Flemish variations. Bricks in contrasting colors, and courses in which brick over laps are offset, give the two ornamental bonds a different look. In English cross bond (top), a variation of English bond, the stretcher bricks “cross,” or “break joint” —that is, they overlap one another by a half brick in succeeding courses. Color emphasizes the pattern: stretcher courses are alternately of a single color and two contrasting colors. In Flemish spiral bond (center), a pattern of diagonal bands is created by the placement of dark crossed headers. Garden-wall bond consists of Flemish courses in which every fourth brick is a header.
Making a pattern unit. More complex designs are based on pattern units called eyes. The fundamental eye (top) consists of a single stretcher with headers centered above and below it. Larger eyes are formed by extending the unit by the width of one header in each course, adding headers at the top and bottom and centering the whole on the middle, or axis, course (center). You can expand the primary unit in this way until it assumes a clear diamond shape (above).
Combining pattern units. Large wall designs consist of a number of pattern units defined by colored bricks and arranged to cover the wall symmetrically, In one widely used design (top), the eyes butt one another, forming horizontal bands, and the bands are emphasized by a course of solid-color stretchers between the rows of eyes. Colored borders can make a simple pattern unit into a more complex design: in the example above, each unit is bordered by dark headers.
- - -
A Thin, Yet Sinuously Solid Wall
To the sharp, inquiring eye of Thomas Jefferson, the graceful serpentine walls he viewed on a tour of famous English gardens in the late 1780s were both al luring and ingenious. Jefferson was attracted to the obvious beauty of the walls—called “crinkle-crankle” in Eng land—but also to their subtle economy. Unlike traditional masonry walls, the serpentine design needed no buttressing pilasters and no double layer of bricks, deriving its strength from its built-in curves.
Jefferson saw the serpentine wall as a delightful addition to his plan to blend Old World forms into the grounds of the University of Virginia, and to create a neoclassical “ Academical Village” embowered by gardens. In England, he wrote, plants thrived at the bases of serpentine walls, because the walls’ curves focused the sun’s warmth. Their rippling shadows pleased the eye of the late-afternoon stroller.
To Jefferson’s pragmatic mind—he kept track of the budget for the construction of the university, and paid special attention to the price of brick, which he found to be “exorbitant”—the economy of serpentine walls was as important as their aesthetic value. He calculated that although a serpentine wall was longer than a straight one spanning the same distance, it required only about two thirds the number of bricks.
The serpentine design is as useful and economical now as it was in the 18th Century. It consists of a series of identical curves in a wavelike pattern. The trick now as then is to make the height of the wall consistent with the degree of curvature. As the British masons whose work Jefferson admired had discovered, the higher the wall, the more it had to undulate to maintain itself. A low wall could be built in a series of shallow curves; for a higher wall, the curves had to be tighter and to extend farther out from the wall’s center line.
Modern masons have reduced these considerations to two handy rules of thumb: the radius of the curves should be less than twice the proposed height of the wall, and the total width of the wall should be more than half the wall’s proposed height.
Thus, a serpentine wall with a height of 4 ft. above ground level would have to be built in curves that had a radius of 8 ft. or less and a total width of at least 2 ft. In some parts of the country where high winds prevail, local building codes might require that the wall be built with even tighter curves.
Turning a corner is a fairly simple matter; as the bricklayer arrives at the corner, he merely continues the curve on which he is working until the corner is turned, then continues his pattern in the new direction.
Ironically, Jefferson’s own serpentine walls did not stand. In the 1800s, university administrators complained that the walls were in constant need of repair, and by the turn of the century hardly any were still standing. In 1949 the Gar den Club of Virginia undertook the re construction of the walls. Following the old ground plans, landscape architects working on the project located some of the original foundations, and were able to rebuild all the serpentine walls exactly where Jefferson had planned them.
Try as they might, though, the architects were unable to explain why the original walls had fallen down. They conjectured that the bricklayers had not mixed enough crushed oyster shells—a source of lime—into the mortar.

Grace in masonry. An 1887 drawing depicts an alley
on the University of Virginia campus leading to a colonnade and bordered
by two of Jefferson’s winding walls. An inset shows Jefferson’s plan for
a series of gardens surrounded by serpentine walls.
- - -
Putting In Metal Fences
Ornamental “iron” fences—which today are steel or aluminum—are among the strongest and most durable of open fences. They also tend to be among the most costly. New ones are generally custom-made at small ironworks, though less expensive prefabricated panels of aluminum or steel bars are available from some retail fence dealers in a limited range of sizes and styles. It is also possible to construct a low metal fence from prefabricated railing panels widely avail able at building-supply stores, but such a fence may not be much cheaper than one designed for the purpose.
Old metal fences may be the most desirable. They are made of virtually indestructible wrought iron in elaborate Victorian designs hard to duplicate today, but they are generally very expensive, and it may be hard to find one in decent condition that suits your property.
Installing a new metal fence yourself will save 20 to 30 per cent of the cost of one professionally installed—and if you order in winter, the slow season for iron works, you may get a lower price. To order a custom-built fence, first consult with the ironworks and draw up a de tailed profile of the fence and the terrain it's to cover. Precise measurements are essential: once the panels are assembled and welded, there is little room for adjustment. The profile should show the exact contour of the land and the key dimensions of the fence. If the ground is uneven, decide at this stage whether to level it or to have the fence follow the contours, either in steps or by sloping the stringers.
Have the ironworks coat the fence with red oxide or zinc-chromate primer before delivery. Before you put it up, give it two coats of oil-based exterior paint.
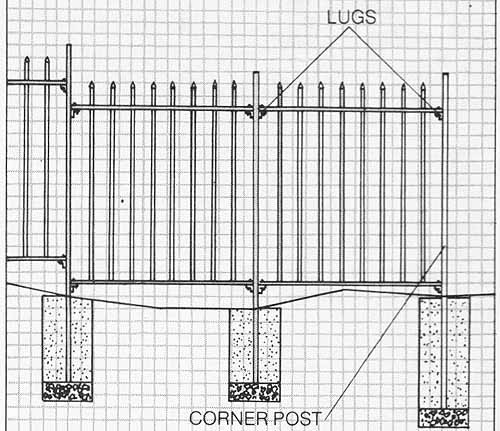
Making the profile. Run a level string along the line of the fence. Measure the height of the string at the locations of the posts and of significant dips and rises in the ground. Record the profile of the terrain on graph paper and draw in the posts and panels to scale.
Note on the profile the height and length of panels and gates, the spacing and dimensions of the pickets and stringers, the thickness and total height of the posts (as much as one third must go belowground in concrete), the location of the lugs for bolting the panels to the posts, the locations of hinges and latches, and any additional ornamentation. For a stepped or sloped fence, note the size of the stringer drop or the angle of the stringer slope.
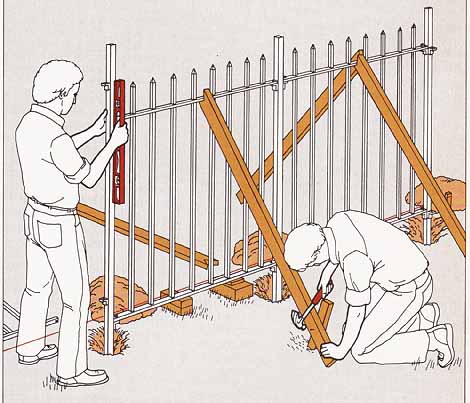
Setting the posts and panels. Because of the precise tolerances of metal fences, posts are put up together with panels and the assembled units are plumbed and braced in position in the postholes. When the fence is delivered, dig postholes and put several inches of coarse gravel in each hole. Run a low string precisely along the line of the fence. Starting at an end, corner or gate, bolt posts to both sides of a panel and mark the posts with chalk to show how much should be set above grade.
Place both posts, with the panel in place between them, in their holes just inside the string, supporting the panel with blocks under the bottom stringer. Adjust the gravel in the holes until it supports the posts at the correct height and the panel is level or properly sloped. Plumb each post and brace the panel from both sides with notched 2-by-4s nailed to stakes.
Bolt a third post to the next panel and attach the free end to the braced panel. Level, plumb and brace as before, repeating the procedure until all the fence is up and secure. At gates, set and brace a gatepost and panel on one side of a gate opening, then mount the gate to locate the other gatepost and panel. Before filling the holes with concrete, check once more to see that all posts are plumb and aligned.