Although they are higher and heavier, most privacy fences are built much
like the picket fences shown above. Common lumber nailed to simple post-and-stringer
frames will produce a variety of attractive fences; prefabricated panels—in
styles ranging from patterned plywood to latticework—can be nailed directly
to posts or framed inside posts and stringers.
Some fences, however, require more sophisticated carpentry. A tall louvered fence, for example, is heavier and more prone to warp than some of the simpler designs and should be made with sturdier joints. To build the louvered fence, you will need a router to cut grooves in the posts and the stringers. The key to using the router safely and effectively is a solidly made jig to guide the bit. Always clamp or nail the jig to whatever you are cutting and make sure the lumber is steady. Wear goggles and keep the router at chest height or below. To make the high cuts in the posts, stand on a stepladder steadied by a helper.
Five Screens for Your Yard
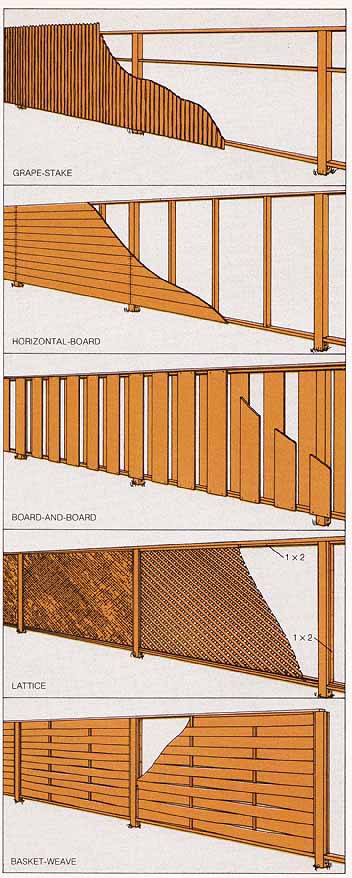
High fences on basic frames. All of the fences at right are supported on frames of 4-by-4 posts and 2-by-4 stringers. The posts are 6 to 8 ft. high, set 6 to 8 ft. apart. The simplest privacy fence is made of vertical boards or tall narrow slats, like redwood grape stakes, nailed directly to the top and bottom stringers (and to a middle stringer if the fence is taller than 6 ft.). Almost as simple is a fence of horizontal boards face-nailed to the posts and to 2-by-4 studs that are toenailed to the top and bottom stringers 24 to 36” apart. The same frame work will also support solid plywood panels.
A board-and-board fence admits breezes and looks good from either side. Vertical boards are nailed to both sides of the frame, separated by less than their own widths. The boards on one side are positioned opposite the spaces on the other. Ready-made panels in elaborate styles like latticework are mounted against 1-by-2s nailed in advance to the posts and stringers. Instructions for building a latticework panel are elsewhere on this site. Ready-made panels or precut boards and vertically grooved posts are available for basket-weave fences.
A Special Frame for Louvers
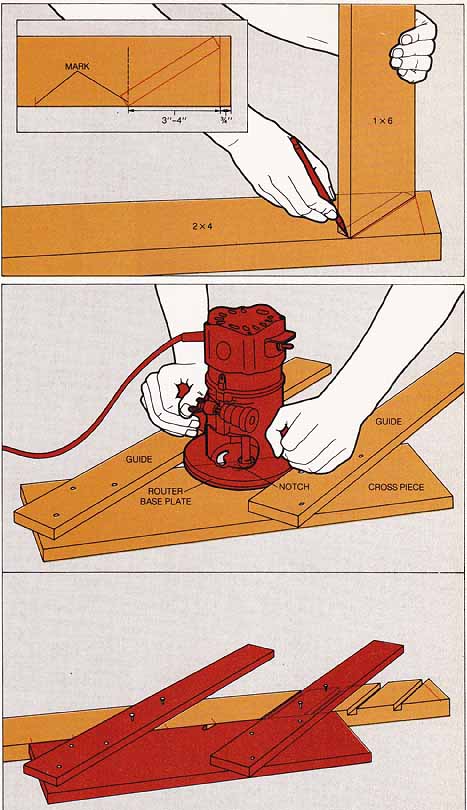
1. Marking a stringer. Cut two 2-by-4s 1½” longer than the distance between two posts. Draw perpendicular lines across both 2-by-4s, 3/4” in from each end. Stand a scrap 1-by-6 diagonally across one 2-by-4 at the angle you have chosen for the louvers so that one corner touches the pencil line; trace around the 1-by-6. Determine the louver spacing that will produce a good overlap (usually 3 to 4”) and mark the intervals on one edge of the 2-by-4, starting from the initial pencil line.
2. Cutting grooves with a router and jig. To make a jig, use a T bevel to transfer the angle traced on the 2-by-4 stringer to a piece of scrap lumber about 2 ft. long. Place two short boards on the marked scrap board at this angle, parallel to each other and separated by the diameter of the router base plate; screw them in place. Fit the router with a straight 3 jointing bit, set it to cut a groove ½” deep, and cut a 1-inch notch in the crosspiece of the jig by running the router between the two guide boards. Clamp the marked 2-by-4 stringer to a bench and tack the jig to it, aligning the notch in the jig with one of the marks on the stringer. Move the router steadily across the 2-by-4; repeat at each mark.
Use the grooved stringer as a template to mark the positions of louvers on the second 2-by-4, and cut grooves in it. Partially assemble the louver panel by slipping two or three 1-by-6 boards into position in the grooves at each end of the stringers and two in the middle; secure them in place by nailing through the stringers.
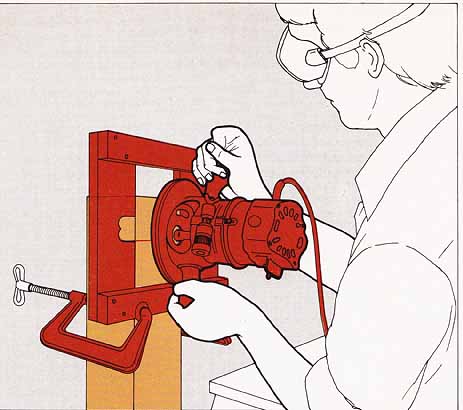
3. Cutting dados in the posts. Much as you cut grooves in the stringers, you will use a jig and router to dado the posts. First mark the positions for the lower edges of the top and bottom stringers on each pair of posts. A water level will ensure that the marks are perfectly level. Construct a two-guide jig similar to the one in Step 2 but with two crosspieces. Attach the guides at right angles to the crosspieces and ¾” farther apart than the diameter of the router base plate. With the same router bit used in Step 2 reset to cut 3/4” deep, cut a notch in one of the crosspieces by running t router along one guide and then back along the other.
At each mark on the posts, clamp the jig to the post, aligning the notch with the mark. Move the router across the post, running it along the lower guide until it hits the notch, then back along the upper guide to make a 1½-inch dado.
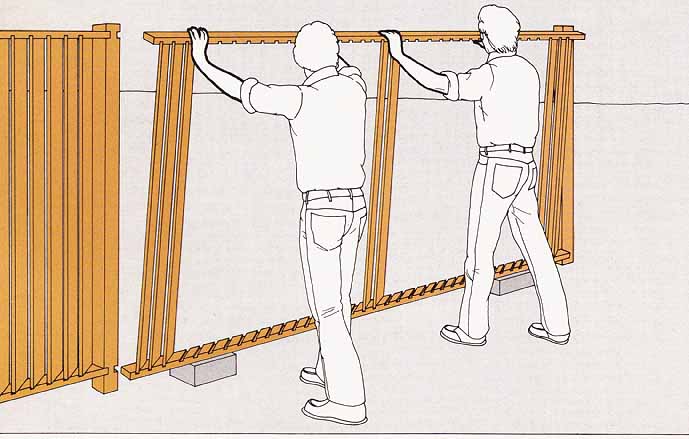
4. Assembling the fence. Supporting the bottom stringer on blocks, lift the partially assembled louvered panel upright between me posts, slip the stringers into the dados and toenail them to the posts. Slip the remaining louvers into their grooves, securing them with nails at the top and exterior-grade carpenter’s glue at the bottom.
Adapting to Uneven Ground
Building a fence that successfully follows your property’s contours often depends on choosing the right style of fence for your land and modifying the design as necessary. A post-and-rail or post-and- board fence conforms to any terrain and is best for sharply sloping or rolling ground; a fence with vertical members face-nailed to a post-and-board frame follows the ground almost as well.
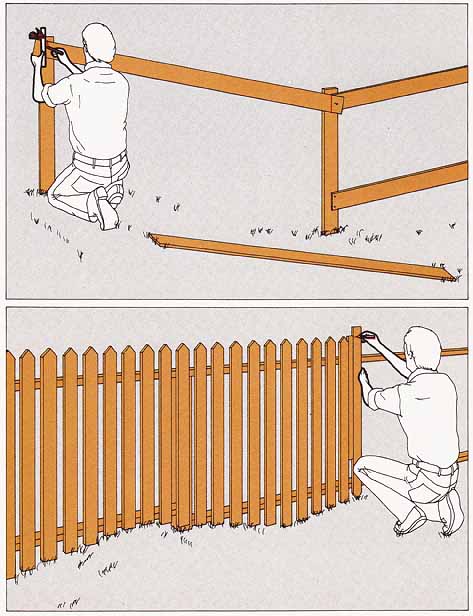
On rough but relatively level ground, a fence with vertical pickets or slats can smooth out small dips and rises; its bottom follows the earth’s contours while the top remains level. If you plan to build such a fence, buy enough pickets of extra length to fill in the low spots.
Rectangular-paneled fences are not suited to extremely rough or rolling ground, but they adapt well to steady slopes if built in steps. Uniform stepping requires a few calculations, but once the posts are in position, attaching stringers and siding is straightforward.
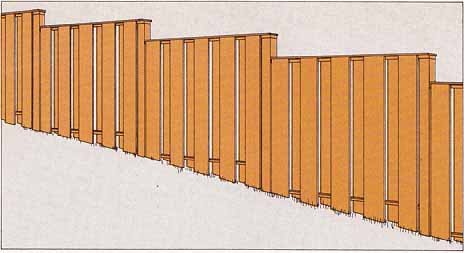
Going up and down hills. Set posts on each rise and in each depression and space the remaining posts between them. For a post- and -board fence like the one at left, hold or tack the boards in position against the posts and use a level to make vertical marks on the boards at the post centers wherever two boards meet. Trim the boards at the marked angles. If you attach slats or pickets to the stringers, use a spacer (Step 2) to align them evenly at a uniform distance above the top stringer and use a level to plumb them.
Leveling bumps and dips. To line up pickets on uneven ground, hold each one upside down against the stringers with its shaped top just off the ground. Mark its bottom end even with the top of the spacer you are using to align all the pickets, and trim at the mark.

Stepping down a slope. Run a string from ground level at the top of the slope to a tall stake at the bottom and level it with a line or a water level. The height of the string on the tall stake is the vertical drop of the hill. For a long or very steep hilt, carry out the procedure by installments and total the measurements.
By the method using a string and plumb bob (described earlier), drive stakes to mark post locations. Divide the number of fence sections into the total vertical drop to calculate the stringer drop from one section to the next. Set the top end post to the intended fence height, the rest of the posts to the fence height plus the stringer drop. Starting from the bottom of the hill, attach a top stringer to each post, level it and attach it to the adjacent taller post. Then finish the fence as you would a level one.
- - -
A familiar maxim of colonial America cautioned farmers to build their fences “horse-high, bull-proof and pig-tight.” Most new settlers had few tools and little time for careful carpentry to meet the requirements of this rustic building code; instead, they combined ingenuity with an abundance of materials—most notably in zigzag rail fences like the one in the 1858 print at right.
These early fences were by-products of clearing the land. The settlers heaped into rude barriers the rocks and trees they hauled out of their fields. Their continent’s seemingly inexhaustible virgin forests afforded more fencing material than any of them would ever need, and pioneer farmers used it freely.
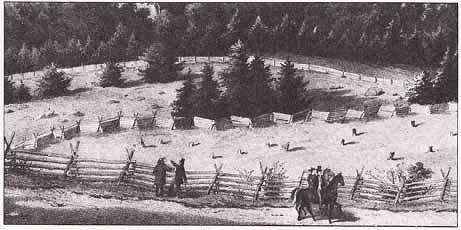
The Virginia rail, or worm, fence was among the sturdiest and most extravagant of these simple enclosures. It was made of 11- to 12-ft. logs stacked one on top of another in a zigzag pattern with their ends interwoven like the fingers of clasped hands. A typical example might stand 10 rails high, angled back and forth across a bed 5 or 6 ft. wide and braced where the rails inter locked by pairs of leaning posts crossed over the tops of the rails. The zigzag, or “worm,” of the fence gave it stability against “any wind that will not prostrate crops and fruit trees,” according to a 19th Century fencing manual. Its top course of rails was the heaviest, to weigh down the rest; slimmer logs in the bottom courses minimized the gaps. A tall zigzag fence might use nearly 8,000 logs in a mile, and even a modest four- to six-rail fence consumed 20 acres of trees to enclose a 200 acre farm. In lumber-poor Europe, where hedges and ditches separated fields, the American “mania for enclosure” seemed wasteful and bellicose. “The stripping of forests to build fortifications around personal property,” editorialized a London news paper in 1780, “is a perfect example of the way those people in the New World live and think.”
Americans could shrug off European criticism, but soon they could not ignore the increasing scarcity of land and lumber in their bountiful New World. In settled areas, the prodigality of the zigzag fence gave way to the more economical post-and-rail, set directly on the property line. Still, the amount of lumber used in farm fences was staggering. By the end of the 19th Century, wooden fences were often worth more than the land they en closed. An 1883 Iowa state agricultural report estimated that the United States’ six million miles of wooden fences were worth two billion dollars—more than the national debt at the time.
Small wonder that when a cheap, convenient, durable substitute—barbed wire—became available, it began immediately to replace wood in farm fences. By the mid-1880s, a quarter of a million miles of barbed wire were being strung each year around American fields. Today, few farmers can afford to fence their acres with wood, and in most areas the last reminders of what was once characteristic of America’s frontier agriculture are the post-and-rail fences decorating suburban lawns.
