There are many reasons for fences, and there is a fence for almost every purpose. A tall fence can appropriately surround a swimming pool, an outdoor room, a sun-bathing pocket or an entire yard. Short labyrinthine baffles can block the outside view of a bedroom window or a glass-walled bathroom, or the view through a fence entryway. You can achieve either total privacy with a brick, board or panel fence, or partial privacy with a louvered, grape-stake, picket or board-on-board fence. In addition to providing privacy, fences can enclose areas, fend off the elements, embellish your house and land, or perform all these functions at once. Used as a boundary, a fence says, with emphasis that depends on height and construction, “Don’t cross.” In a friendly, good-fences-make-good-neighbors way, such a barrier can keep out animals, cyclists and short-cutters, and prevent trespasses that could cause friction between neighbors.
Because property-line fences involve other people, they are subject to zoning or building-code regulations that vary from community to community. Codes may establish height, or the fence’s setback from a street to ensure visibility for drivers. In many places a fence built by one neighbor on a property line automatically becomes the joint property of both neighbors. And if you incorrectly locate a fence beyond your property, the mistake is costly to remedy.
Boundary-marking contributes to privacy, but fences also influence the environment—even the climate—around your house. A fence can temper the wind—though, paradoxically, a solid fence makes a poor windbreak; the flow of air over the top creates a tumbling eddy that pulls the wind back to the ground. An open picket, slat, louvered or lattice fence, however, will generally slow the wind and reduce its chilling effect. In some cases, open fences can be angled to funnel summer breezes, increasing their velocity so that the funnel area seems cooler than the rest of the yard. Solid fences that reach the ground dam the flow of frost—a peril to tender plants upstream of the dam but a boon to those below.
To enhance your property’s appearance, choose a fence style that avoids either an exact match with the house (a clapboard fence for a clapboard house) or a head-on clash. Consider matching an element of a house (brick pilasters and an iron fence for a classical brick house) or creating a deliberate but tasteful contrast (a grape-stake fence for a colonial house). A plain fence can set off plantings; a handsome fence that hides a garbage can or a compost heap does double duty. Many fences look better from one side than from the other; usually you will want to show the world the more attractive side. Your neighbor will thank you, thus demonstrating once again the accuracy of the old saying about good fences.
A fence-building aid. A picket board held base side up makes a simple but ingenious spacer to position a picket for nailing to the upper sup port of a fence panel. Painting the pickets before they are attached simplifies finishing work. Scratches and hammer marks made during construction can be easily touched up after the fence has been completed.
Setting Fence Posts Straight and Secure
The key to a good-looking, long-lasting fence is a series of sturdy fence posts, securely anchored and properly aligned and spaced. The posts are the working members of a fence, bearing and bracing the gates and railings. But the posts are also an important element in the design of a fence, creating evenly spaced visual breaks in long runs of railings or panels.
Generally, the function and size of the fence determines the characteristics of its posts. Heavy fences and any fence more than 4 ft. high should be supported by posts no smaller than 4-by-4-inch lumber. Low picket fences can be anchored with 2-by-4 intermediate, or line, posts but even on a lightweight fence the end, corner and gateposts should be at least 4-by-4s. Use pressure-treated lumber, impregnated with wood preservative under pressure so that the entire post is resistant to rot and fungus. Pressure-treated posts last up to 20 years, while untreated posts may have to be replaced after five.
The depth of the posthole and what filling to use within it are the next considerations. As a general rule, one third of the post should be belowground; a 6- ft. fence, for example, requires 9-ft. posts sunk 3 ft. into the earth. In relatively stable soil, tamped earth or gravel will hold the post securely. Concrete makes a more secure setting and is advisable in loose or sandy soils. The gateposts and the end and corner posts, which are subjected to greater stress, should be set in concrete wherever possible; if you prefer not to go to the trouble and expense of using concrete, use longer lengths of lumber for these key posts and sink them deeper into the ground.
Though concrete settings provide the most solid base, they are subject to frost damage in colder climates. As freezing water expands under and around the set ting, a phenomenon known as frost heaving tends to force the post up out of the ground. If the frost depth in your area is quite shallow, you can set the concrete below the frost line, but it's generally impractical to sink posts deeper than 3 to 3.5ft. To minimize frost heaving in shallower postholes, widen the hole at the base into a bell shape so that the surrounding earth holds the concrete in place. If wet posts in your locality some times freeze and expand, and crack concrete footings, drive wood shims - between the post and the concrete while the concrete is still wet. Then remove the shims and fill the gaps with roofing cement after the concrete has set.
The exposed end grain at each end of the post requires additional protection.
To prevent the bottom from resting in ground water, shovel several” of gravel into each hole to act as a drain. To help protect the top from rain, cut the post at a 30° to 45° angle, or cover it with a metal post cap, available at hardware stores to fit standard post sizes.
Post spacings are determined by the standardized widths of fence sections and railings; and if you build your own fence, it's simpler to use standard lumber sizes to reduce cutting and fitting on the job. In general, posts should not be spaced more than 8 ft. apart; at this spacing, a standard 16-ft. length of lumber spans three posts. After measuring the length of the fence and allowing for gates, you may find that you must use tighter spacing and shorter lengths of lumber to avoid ending a fence with a noticeably narrow section.
Measuring and marking post locations is relatively simple on flat ground; on sloping or uneven ground the type of fence determines the measuring method. For fences that slope, measurements should be made along the surface. For fences of panels with level tops, measure spacings along a level line above the ground. On hillsides, the panels are often stepped down in level sections, with posts evenly spaced along a level line.
Where to Place Postholes
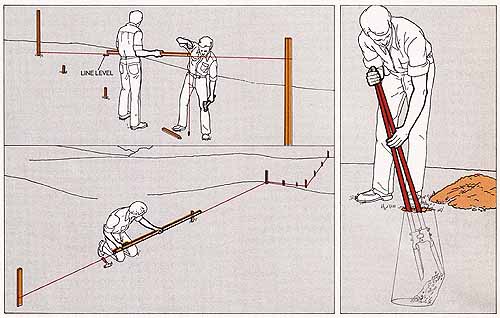
Locating posts on flat ground. Drive stakes at the locations
of the end posts, stretch a string between the stakes, just high enough
to clear the ground, and measure the length of the string to determine
the standard lengths of lumber or fencing that will make up the fence with
a mini mum of cutting. Make a gauge pole—a piece of straight 1-by-2 lumber
cut to the length of the fence sections and marked off in 1-ft. increments—and
set it repeatedly on the ground against the string to set the locations
of the intermediate posts. Use the markings on the pole to adjust locations
for gateposts and to avoid ending the fence with a very short section.
Staking posts on uneven ground. For a fence with rigid rectangular panels, or one with a level top, such as a picket fence, stretch a line between two end stakes, level it with a line level and , working with a helper if necessary, measure along it with a gauge pole. Drop a plumb bob from the line to pinpoint each post location on the ground (below, top) and drive marker stakes at all the post locations. For a fence such as a post-and-rail (), with a top that follows the natural contours of the ground, drive stakes at the fence ends and at each high and low point in between. Join all the stakes with string and use a gauge pole to space the remaining posts evenly between the post locations already marked.
To run a straight line of string over hills or in areas with heavy undergrowth or other obstructions, use sighting techniques.
Using a posthole digger. After removing the marker stake, use a manual posthole digger or hand auger to dig a posthole. For a post set in concrete, make the hole at least three times the post width and angle the digger to widen the bottom. For posts set in tamped earth, dig a hole that's twice the post width. Make the hole about 6” deeper than the depth of the post belowground. Fill the bottom with 4 to 6” of gravel, topped with a flat rock.
A Timesaving Tool for Digging Holes
A gasoline-powered auger, available from tool-rental shops, saves both time and effort, especially if you are setting 10 or more fence posts, unless you are working in very rocky soil.
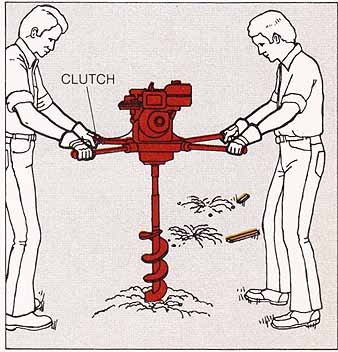
Power augers weigh between 35 and 40 pounds and come with a removable spiral-shaped boring bit that can excavate holes up to 4 ft. deep. Some kick out of the hole when it hits a rock or other obstruction.
To use a power auger, mark the depth of the posthole on the bit with tape and set it over the marked position. Turn on the motor, adjust the speed with the models can be operated by one person, but the two-man auger at right is safer to use, because the bit is braced by handles on two sides and is less likely to handle-mounted clutch and exert an even downward pressure from both sides. After digging a few inches, slowly raise the bit to clear the dirt from the hole. If you hit a rock, stop the motor and use a digging bar or pick and shovel to pry it loose.
Getting Your Posts in Line
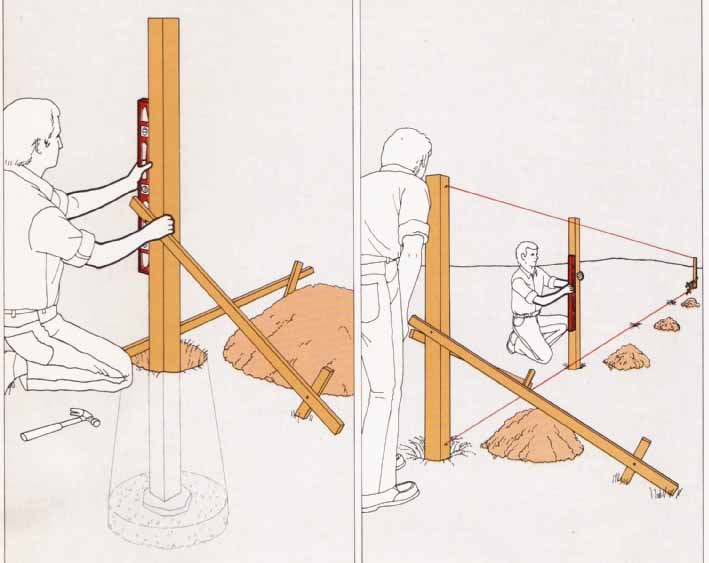
Bracing an end post plumb. Drive two stakes on adjacent sides of the posthole and fasten a 1-by-2-inch bracing board to each stake with a single nail. Set an end post in the hole, centered over the flat stone at the bottom, and use a carpenter’s level to plumb a side of the post adjacent to a bracing board. When that side is plumb, nail the upper end of the bracing board to the post. Then plumb the side adjacent to the other board and nail that board to the post. Brace the other end post in the same way.
Aligning intermediate posts. Stretch two strings between the sides of the end posts, one near the top and the other close to ground level. While a helper aligns one side of an intermediate post with the two strings and plumbs an adjacent side with a level, sight along the top string to check both the post height and the alignment. To make minor adjustments in height, add or remove gravel; to alter alignment, move the rock on which the post is centered.
If the posts are anchored in tamped earth, fill the holes with soil or gravel and tamp as you set each post; if you are setting the posts in concrete, brace all the posts as shown until the concrete has hardened.
Two Ways to a Secure Support
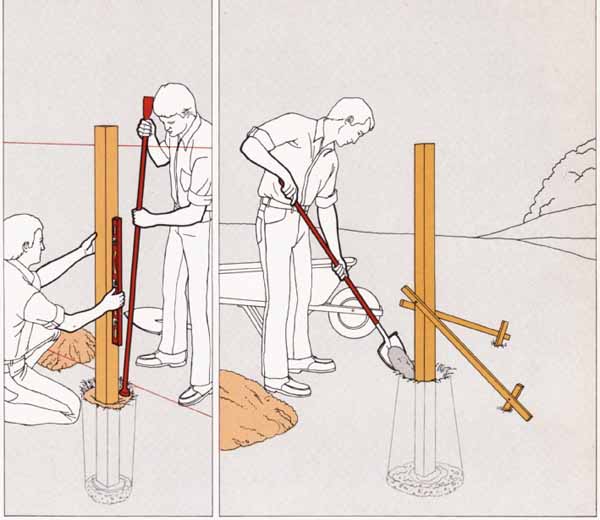
In tamped earth. While a helper holds the posts plumb, fill
the hole with earth, in 3-to 4-inch layers; as each layer is put in, tamp
the soil with the flat end of a digging bar or a 2-by-4. Overfill the hole and shape a cone of earth around the post to channel away runoff.
In concrete. Check the braced post for alignment and plumb, then fill the hole with a thin concrete mix—one part cement, three parts sand and five parts gravel. Overfill the hole slightly and use a trowel to bevel the concrete down from the post for runoff. Within 20 minutes, recheck the post for plumb and make small adjustments, adding additional concrete as necessary. Allow the concrete to set for at least 24 hours before removing the braces or attaching fencing. If the concrete leaves a slight gap around the posts as it dries, caulk the space or fill it with roofing cement.
To save both concrete and the effort of mixing it, some professionals simply empty half a bag of dry premixed concrete into the hole on top of the gravel and fill the rest of the hole with earth. Though this is not as strong as a full concrete setting, natural seepage of ground water will eventually solidify the concrete base while the tamped earth holds the post up.
Repairing and Replacing Posts
The best-anchored posts will eventually succumb to frost, rot, wind or general wear and tear. To repair the damage, you must either realign a sound post or re place—wholly or in part—any post that's split or rotted.
Posts forced slightly out of alignment by wind or frost can often be pushed back into position and secured by re tamping the earth around them or by driving wood shims between a post and its concrete base. A steeply leaning post may need to be braced by a length of steel pipe or reinforcing rod.
Damage to the upper half of a post can be repaired with a new section spliced to the base . If the base is unsound, replace the entire post. Some times the location of a post can be moved a ft. or two without extensive cutting of fence rails or panels; in this situation, simply set a new post in the new location and saw off the old one flush with the ground. Otherwise, you must drill and chisel out the rotted stump or, if necessary, uncover the entire set ting, then break up the concrete into manageable chunks with a crowbar or digging bar and pour a new setting.
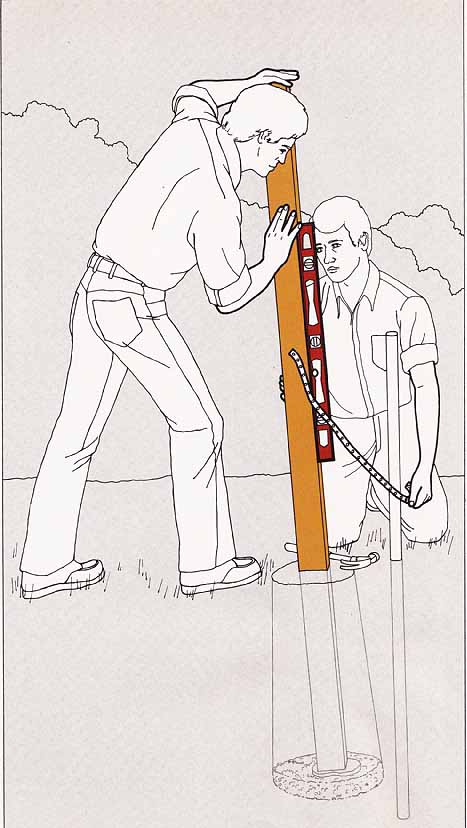
Fixing a sagging post. If wood wedges around the base do not hold a post vertical, use steel pipe and a heavy-gauge perforated metal strap to pull the post into alignment. On the side away from the sag, drive a 5- to 6-ft. length of 1½-inch pipe hallway into the ground just clear of the concrete footing. Nail one end of the strap to one side of the post, loop the strap around the top of the pipe and , while a helper pushes the post back to plumb, nail the other end of the strap to the opposite side of the post.
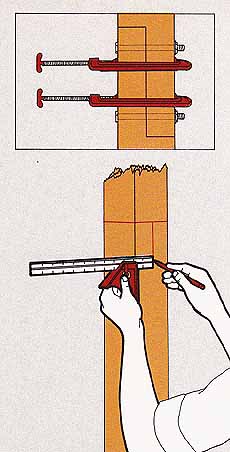
Replacing the top of a post. Use a combination square to mark a cutting line around the post below the damaged part and to draw an 8-inch vertical mark down the center of one side of the post; from the bottom of the vertical mark, ex tend a horizontal mark to the post edge. Duplicate the marks on the opposite side of the post, cut off the damaged section and saw out the wood in side the marks for a lap joint. Cut a matching joint on the new post section and glue and clamp the joint. When the glue has set but before you remove the clamps, drill two bolt holes through the lapped sections and secure the joint with 4-inch galvanized bolts.
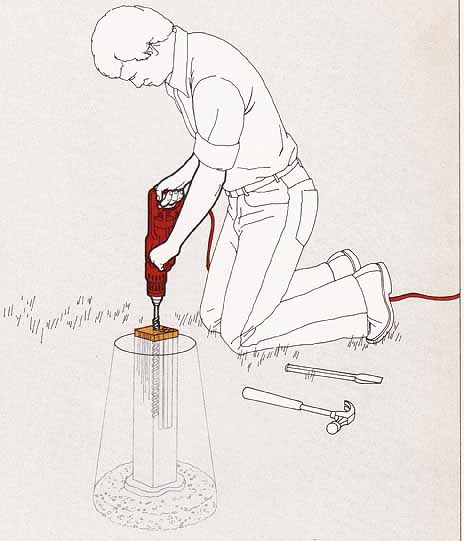
Replacing a post. Saw the post off a few” above its concrete setting and drill a number of holes down into the center of the stump using an electrician’s bit 18” long in a heavy-duty, ½-inch drill. Keep the drill bit clear of the concrete. Use a cold chisel or pry bar to split and loosen the stump, and when all the wood is out, set the new post in the hole. If the post is too small, drive shims around the base while a helper plumbs the post; if it's too wide, taper the end with a hammer and chisel.